It has taken me months and months, but finally, it’s finished!
It’s absolutely beautiful. Spectacular even. I really struggled to capture the beauty in photographs, to be honest.

I used the joining method that Marianne from MaRRose-CCC came up with, which is essentially genius. The blanket just grew beautifully and the joins are virtually invisible which I just love. Especially as I hate joining motifs.
Once the blanket was done I had to come up with an border. I searched the internet high and low for inspiration, but to be honest, there aren’t a lot of examples out there. Cornel Strydom used a simple scalloped edging, which I loved, but wasn’t quite right for me.
In the end I went digging through my crochet stitch bibles, and found an edging that I liked, but wasn’t quite right either, so I decided to modify it slightly.
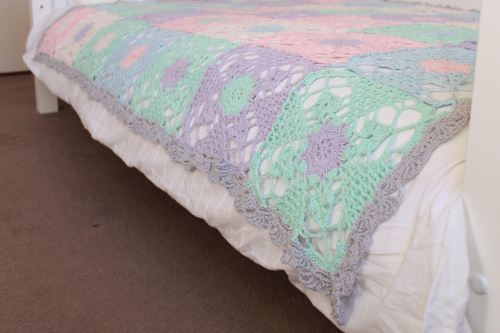
Here’s a close-up:
So how did I do it? It’s really very simple.
The pattern works on a 10 stitch repeat, so first of all, what you need to do is do a lap around the blanket in single crochet stitches, to get the edging into multiples of 10. Each finished square has loose loops at the corners, I joined those with one SC around both loops. I had to fudge it a little bit, because the squares themselves don’t have quite the right stitch count. I crocheted into each stitch, and in the chain sections I crocheted one stitch less than the chain. So when the last round of the square has a chain 3, I single crocheted 2 stitches into that space. Make sense? Otherwise the edging will become too ruffly.
On the second round, start at a corner, skip the next 4 stitches, Treble Crochet into the fifth. Chain 1, and TC, Ch1, 4 more times. Skip 4 stitches, SC into the next, skip 4 stitches, TC, CH1 5 times into the next. Repeat that fan pattern all the way around. there should be a SC at each corner, so there is a fan on each side of the corner.
The third and final round, start at a corner and Double Treble, CH2 8 times into the SC in the corner of the previous round. SC into the middle TC from the previous round, CH2, DTC (Double Treble Crochet), CH2 4 times into the SC stitch between fans from the previous round. SC into the middle TC from the previous round. Repeat this all the way round, making sure that you have the 8 DTC stitches in each corner. If you take a look at the pic above, you’ll see what I mean.
I cobbled together a chart. It’s not fabulous because I’m still getting my head around the Stitchworks software, but it will help you get the idea.

I’m so happy with the results, I just love the blanket. I just want to wrap myself in it, with a cup of tea and enjoy the sunshine. You know what? I’m going to do just that. #enjoyeverymoment
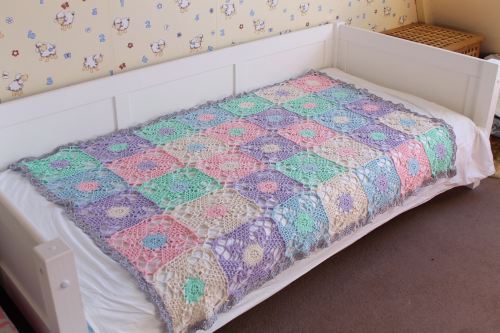
For this project I used Scheepjes Linen Soft. I used almost 5 balls of each colour, and just over two for the border. I have enough yarn leftover to make at least one matching cushion, when I get the chance.
ETA: If you haven’t seen or made the square for yourself already, here’s the chart:
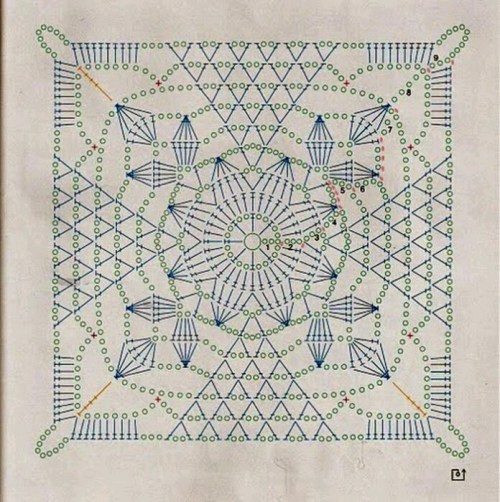
If you don’t read charts, I’ve found a written description by Crochet Tea Party on Ravelry.
You can pick up the yarn at Scheepjes retailers all over the Benelux, or internationally from Wool Warehouse.








Pingback: Rustic Lace Square Crochet Blanket
Pingback: The Rustic Lace Square Projects, Graph, and Patterns - Crocheters Anonymous©
Pingback: Sidetracked -Yarn, The After Party | MissNeriss
Thank you for the lovely border idea!
Pingback: Follow-up Friday – The “Rustic Lace Square”-blanket | maRRose CCC
It is ab-so-lu-te-ly gorgeous!!! You’ve done an amazing job, really! And I love-love-love too what you’ve done re the border: fab design!! Love, Marianne xx
PS: thanks so much for your very, very sweet compliments&link ….
Reblogged this on adornosmalulu.
It’s beautiful! Thanks for sharing the diagram. I can’t wait to try this one.
Wonderfull!!! I love it😍
What a beautiful blanket. Really really cool.
Have a nice Wednesday.
Sweet greetings,
Emily
(casacreaemilia.blogspot.nl)
That is lovely!
That is lovely. Beautiful colours and I love the border on it 🙂
Thanks so much Carole, I’m really very happy with how the border worked out.
Neris, it’s beautiful!! And a wonderful border 🙂 Well done! Hope I’ll see it in the flesh soon 🙂
Blogger Day!
Your blanket and border looks beautiful!!!!
Thanks so much, and thank you for the inspiration! XX
Love it, well done!
Thanks!
Just Beautiful, love all the pastel colours. Excellent Nerissa x
Thanks mum! X