Tag Archives: Christmas

Crochet Christmas Gnome

Love Knitting Love Crochet Big November Sale, up to 70% off

Welcome to the pattern page for my Scandinavian Christmas gnomes!

I’ve made a few changes to this post, updating the pattern to make it more user friendly.  I’ve also updated the Ravelry listing, adding UK and US crochet terms so you can choose the version that suits you best if you prefer a printer friendly version for a small fee. Here in this post you’ll find the UK version

I hope you like it!

Get the Yarn

Scheepjes has a complete list of stockists here
Wool Warehouse* ships to the UK and globally
Caro’s Atelier* ships to the Netherlands and Europe
Knotty House* ships to USA and Canada

crochet amigurumi Scandinavian Christmas gnomes, free tutorial on missneriss.com

I absolutely loved making these little guys.  I made a regular gnome, a slightly taller one, and even a lady gnome!

crochet amigurumi Scandinavian Christmas gnomes, free tutorial on missneriss.comcrochet amigurumi Scandinavian Christmas gnomes, free tutorial on missneriss.com

The pattern is really very simple, and it’s definitely possible to whip out one or two of these in an evening.  They make great ornaments, or you could even attach a loop to the top of the hat and hang it in your tree.

So, what will you need?  A couple of shades of red, a grey, a brown, white and off-white mini Catona skeins, and rice!  We’re going fill the bodies with rice, so a little tip: if you crochet loosely, consider using a stocking as a lining, or size your hook down.  The pattern uses a 3mm hook, but you might consider a 2.5mm.


IMG_0115

Ready to get started?

What You’ll Need

Four mini skeins of Catona
Colour 1: grey (242)
Colour 2, red (115)
Colour 3 off white (130)
Colour 4 white (106)
3mm crochet hook
Rice Scissors
Stitch marker
Tapestry needle

Abbreviations

(UK terms)
MR magic ring
Ch chain
Sts stitches
dc double crochet
inc two double crochet sts in one st increased
dc2tog 2 double crochet stitches decreasing into one stitch
Ss slip stitch
Rep repeat

Instructions

Body

Colour 1
Round 1. 6dc into a MR [6sts]
Round 2. INC in each stitch around [12 sts]
Round 3. (INC, 1dc) 6 times [18 sts]
Round4. (INC, 2dc) 6 times [24 sts]
Round 5. (INC, 3dc) 6 times [30 sts]
Round 6. (INC, 4dc) 6 times [36 sts]
Round 7. 36dc [36 sts]
Rounds 8-18. Rep round 7 11 times [36 sts]
Round 19. (dc2tog, 4dc) 6 times [30 sts]
Round 20. 30dc [30 sts]
Round 21. (dc2tog, 3dc) 6 times [24 sts]
Round 22. (dc2tog, 2dc) 6 times [18 sts]
Round 23. (dc2tog, 1dc) 6 times [12 sts]
Fill with the rice; use a funnel if you need to. I made one with paper and it worked perfectly.
Round 24. dc2tog 6 times [6 sts]
Sew close, tie off and hide the tail in the body.

Hat

Colour 2
Round 1. 6 dc into a MR [6]
Rounds 2-5. 6dc [6]
Round 6. (INC, 2dc) 2 times [8]
Round 7. 8dc [8]
Round 8. 8dc [8]
Round 9. (INC, 3dc) 2 times [10]
Round 10. 10dc [10]
Round 11. 10dc [10]
Round 12. (INC, 4dc) 2 times [12]
Round 13. 12dc [12]
Round 14. 12dc [12]
Round 15. (INC, 3dc) 3 times [15]
Round 16. 15dc [15]
Round 17. 15dc [15]
Round 18. (INC, 4dc) 3 times [18]
Round 19. 18dc [18]
Round 20. 18dc [18]
Round 21. (INC, 5dc) 3 times [21]
Round 22. 21dc [21]
Round 23. 21dc [21]
Round 24. (INC, 6dc) 3 times [24]
Round 25. 24dc [24]
Round 26. 24dc [24]
Round 27. (INC, 7dc) 3 times [27]
Round 28. 27dc [27]
Round 29. 27dc [27]
Round 30. (INC, 8dc) 3 times [30]
Round 31. 30dc [30]
Round 32. 30dc [30]
Round 33. (INC, 9dc) 3 times [33]
Round 34. 33dc [33]
Round 35. 33dc [33]
Round 36. (INC, 10dc) 3 times [36]
Round 37. 36dc [36]
Round 38. 36dc [36] Tie off; leave a long tail to sew the hat onto the body .

Nose

Colour 3
Round 1. 6 dc into a MR (6)
Round 2. INC in each stitch around [12]
Round 3. dc2tog 6 times [6] Tie off; leave a tail to attach the nose to the body.

Assembly

With colour 4, cut about 40 8cm lengths, fold in half, loop through the stitches in rows 19 and 20 of the body for 14 stitches on row 19 and 12 on row 20 (1 extra at each end on row 19). With your tapestry needle split the yarn so it looks more like a beard.

Attach the nose so that it over laps the beard on row 18/19 in the middle of the beard. Try to have some of the beard sewn underneath the nose.

Take the hat and sew it onto the body, pulling it firmly down over the knots you’ve made with the beard, and so that it moulds around the nose. Tie off and hide all tails in the body.

crochet amigurumi Scandinavian Christmas gnomes, free tutorial on missneriss.com

I hope you love making this project as much as I’ve loved designing it.  Please don’t forget to share your creations on social media, and tag me on Facebook, Instagram and Ravelry!  And use hashtag #ScheepjesChristmasBlogHop so we can all find and like your pictures.

And most importantly, don’t forget to visit Tammy at Canadutch tomorrow to find out what the next project is.  Trust me, if you knit, you’ll love it! There are also a bunch of other amazing projects coming your way in the next week, so don’t miss a thing on the Scheepjes Facebook page.

Scheepjes Blog Hop

2014 was Amazing, 2015 will be Better!

I’ve had one of the best years of my life in 2014.  My daughter well and truly left baby-hood behind and seems to be bypassing being a toddler and diving straight into threenager territory.  My husband just keeps getting more handsome as he gets older (poor thing’s quite a bit younger than me), my mortgage paying job is going from strength to strength with the most growth this year than in the last five combined, and crochet has just been an absolute joy.

Because I’ve had such a great time this year, I want to reflect on some of the most fun I’ve had, and my favourite projects.  Let’s get to it, shall we?

No.5 Rhinka the Rhino

Rhinka the Rhino, faux-taxidermy amigurumi pattern by Pepika. Spotted by @missnerissI had such a blast making this faux-taxidermy rhino.  Every time I look at this photo I have a little chuckle.  The ridiculousness of a crochet animal head hanging off my wall is only equalled by the ridiculousness of hanging an actual stuffed animal head off the wall!

No.4 The Bucketful of Sunshine Hat

Bucketful of Sunshine hat on missneriss.com, made with Scheepjeswol Cotton 8. #scheepjeswol #cotton8 #scheepjesThis was one of my first original designs.  Well, as original as a crochet hat can be, anyway!  I made it as a sun hat for my daughter, who wore it all summer long.  It was also the start of my ombre obsession.

No.3 My Christmas Wreath

Christmas Wreath for the Scheepjes Christmas Blog Hop - see all ten amazing designs and their free patterns, including how to make this wreath for yourself!I love this so much that I’m not going to take it down!  I love that it can be Christmassy, yet can be everyday welcome at the same time.  I think I’ll hang it above my desk, actually.

No.2 The Spring Shawl

Spring Shawl made with Malabrigo Silky Merino on missneriss.com #crochet #yarnI’ve made about half a dozen of these now, but this one remains my favourite.  I filled it with all the love I have and sent it to my dearest friend whom I haven’t had much contact with lately thanks to life getting in the way.  I hope that when she wears it she feels all the love that it contains.

No.1 The Jasper V

This was a seriously steep learning curve for me!  It was my first time making a complete garment, and even more ambitiously, I designed it myself!  I wear it all the time, and always receive comments about it.  It’s just a great top.  I’m supposed to be making one for my aunt, and as I’m going to see her in a few weeks I’d better get cracking!

And as for 2015, I know it’s going to be even better.  This coming year is the Year of the Sheep (or Ram, or Goat) and I’m a sheep myself, so it’s going to be an even luckier year for me.  And then on top of that, the new Chinese Year begins on my birthday (feb 19), so I’m going to be the luckiest sheep in town. Baa!

Happy New Year!  Enjoy the fireworks, wherever you are, and don’t forget to pop the Champagne.  I will be!

Christmas Bunting

Today is the very last day of the Scheepjeswol Christmas Blog Hop and I’m so sad that it’s over, yet very happy to be able to send it off, hopefully in style!

A fabulous Christmas-themed blog hop hosted by @Scheepjeswol. Check out all ten fantastic creations, all with free patterns!

How incredibly beautiful is Heike from Made with Loops bag?  Fair Isle, I promise you, will be absolutely THE biggest yarn trend of 2015, so get onto it!

Here’s today’s project from me, some lovely and very simple Christmas Bunting.

Christmas Bunting, part of the Scheepjes Christmas Blog Hop, see and make all ten of the beautiful Christmas projects!I had some left over yarn once I had finished my Christmas Wreath and I wanted to use it up for something fun to decorate the house with this Christmas, and I just love bunting, so bunting it was!

I came up with a very simple half double crochet pattern that works up in a jiffy.  Each flag can be made in under ten minutes!  It’s a great scrap project too, so you don’t have to worry too much about how much yarn you have lying around.

What you’ll need:

Scheepjeswol Stone Washed in five colours.  I used the same as in my wreath: 801, 807, 815, 813 and 814.
4mm hook
Scissors
Tapestry needle
Measuring tape

IMG_2229

How To:

Choose one of your colours, then start with a slip stitch, and chain 2.  Half double crochet into the second chain from the hook and there you will have the foundation of the triangle to start building your bunting.
From here on, you will need to increase at the end of each row with 2 half double crochets into the last stitch.
Row 2: Chain 2, 2 HDC (half double crochet) into the next stitch (3 stitches in total), turn.
Row 3: Chain 2, HDC into the next stitch, 2 HDC into the last stitch (4 stitches), turn.
Row 4: Chain 2, HDC into the next 2 stitches, 2 HDC into the last stitch (5 stitches), turn.
Continue this pattern until you have a stitch count of 17 (16 rows in total), then tie off and weave in the ends, making sure you keep the nice point at the bottom of the triangle.

Make 3 of each colour (or more if you’d like to make it longer)

Here’s a chart to help make it a bit easier:

Use this chart to create a Half Double Crochet Bunting triangle for your Christmas Bunting

To join the bunting, take your lightest colour (801) and start chaining, working the end in as you go.  Chain for 60cm to create a long enough tie, then attach to the first bunting triangle by single crocheting into the first and then all 17 stitches along.  Continue to chain, leaving about 8cm in between triangles.  Repeat this pattern until you have attached all your triangles to the chain, then to finish off, chain a further 60cm before cutting the yarn and weaving in the end.  The finished bunting will measure about 4m in length.

And you’re all done!  Now all that’s left to do is find the perfect spot to hang it!

Christmas Bunting, part of the Scheepjes Christmas Blog Hop, see and make all ten of the beautiful Christmas projects!On a wall…

Christmas Bunting, part of the Scheepjes Christmas Blog Hop, see and make all ten of the beautiful Christmas projects!Or in a window…?

And that’s it.  The Christmas Blog Hop is over for this year *sob*.  I hope you found some wonderful inspiration – I certainly did.  But before I go, here’s a recap of what we’ve seen in the last ten days:

 The beautiful Knitted Star motif from Crafts from theCwtch

 The seriously cute Reindeer Mug Cozy (including fluffy butt – haha!) by Haak Maar Raak

 Jellina-Creation’s lovely Christmas Tree Garland

Atty’s cool Bauble Coasters

Christmas Wreath for the Scheepjes Christmas Blog Hop - see all ten amazing designs and their free patterns, including how to make this wreath for yourself!My Christmas Wreath

 The most beautiful Christmas Baubles you’ve ever seen, by 50 Shades of 4 Ply

 The deliciously warm Fair Isle mittens by Canadutch

Vicarnos adorable little snowman

and finally,

This spectacular Fair Isle Christmas gift bag from Made with Loops.

What a collection of designs, I’m so happy to have been involved – surrounded by such talent!

Merry Christmas.

A Christmas Wreath

If you follow me on Facebook at all (you should, btw), you would have seen me posting about the Scheepjes Christmas Blog Hop all week, and today it’s my turn!

A fabulous Christmas-themed blog hop hosted by @Scheepjeswol.  Check out all ten fantastic creations, all with free patterns!

Thanks so much to Atty’s for yesterday’s post, wasn’t it just fabulous?  I’m definitely going to make some of those coasters, but I don’t know if I’ll actually use them as coasters, or get some Christmas washi tape and decorate my walls!

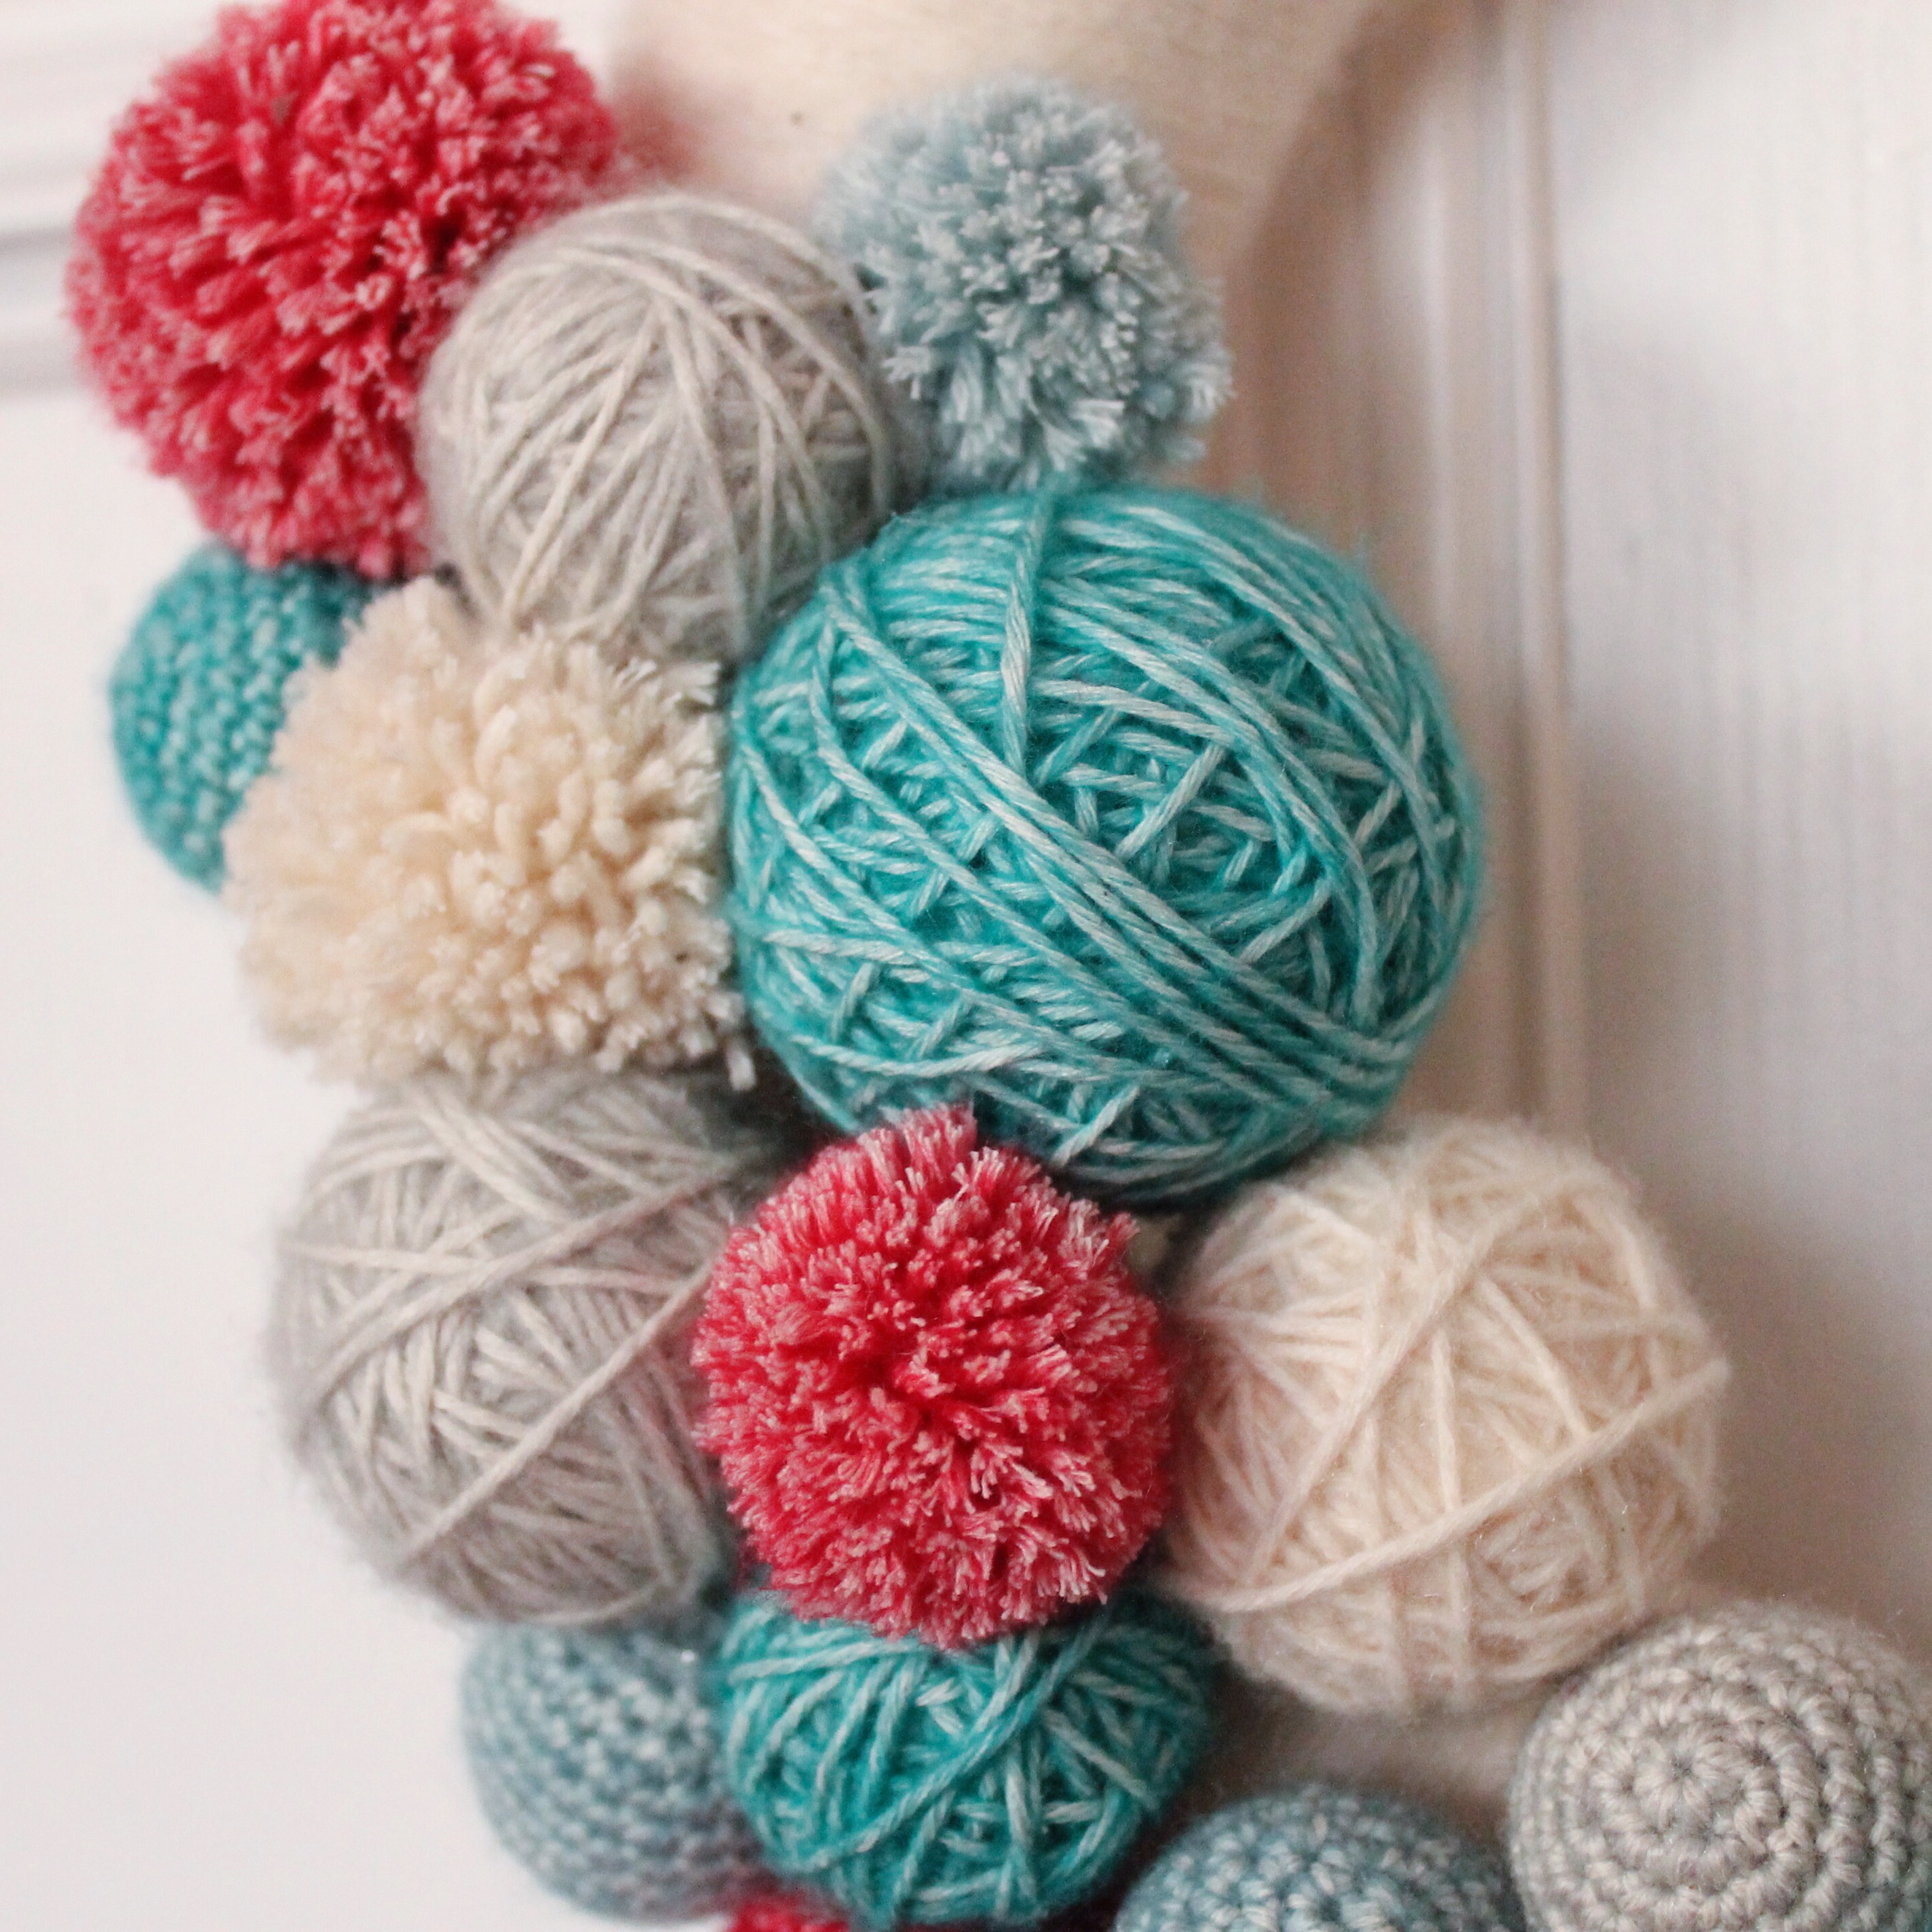
So let’s get to my contribution for this fabulous event, a yarn wreath.

Christmas Wreath for the Scheepjes Christmas Blog Hop - see all ten amazing designs and their free patterns, including how to make this wreath for yourself!

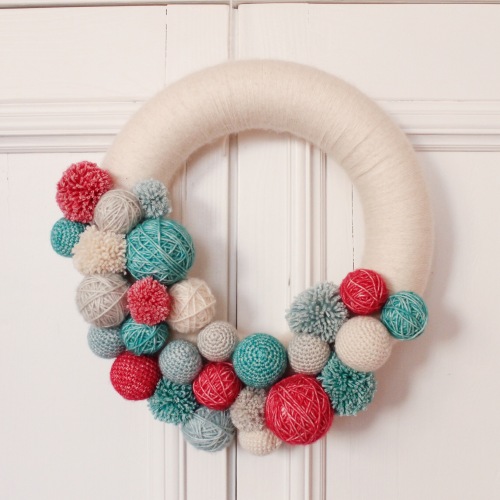
For this I used a couple of different techniques instead of just crochet.  I made pom poms in varying sizes, and also made yarn-wrapped balls to decorate this gorgeous wreath.

Christmas Wreath for the Scheepjes Christmas Blog Hop - see all ten amazing designs and their free patterns, including how to make this wreath for yourself!

What do you think of my palette?  I wanted something different, yet a little bit Christmas-sy and so I took Kirsten’s advice and spent countless hours (days?) trawling through Design Seeds for just the right colours and I thought that this one was just perfect.

Christmas Palette, design seeds

So let’s get to the instructions, shall we?

What you’ll need:

3 mm crochet hook
Scheepjeswol Stone Washed yarn in five shades (801, 807, 815, 813, 814)
A 25cm Styrofoam ring that has a flat side
About 20 Styrofoam balls in three sizes (4, 5 and 6 cm)
Fabric glue
Cardboard to make pom poms (or a pom pom maker if you prefer)
Scissors

How to:

First start working on the ring.  Using the glue, fasten the end of the lightest shade of yarn (801) to the Styrofoam ring.  Once it’s a little dry, start working the yarn around and around, adding dobs of glue as you go to ensure it all stays in place.  Once you come back to the beginning, snip the yarn, and fasten it all in place.  Set aside to dry thoroughly.

To make the Yarn Wrapped balls, take the colour of choice (make multiple in each size and colour), fasten the end of the yarn to the ball with the glue and start winding the yarn around the ball, like you’re just winding any old ball of wool.  Make sure that you add dobs of glue every now and then to keep the yarn in place.  Once it’s completely covered, snip the yarn and glue the end in place.

Christmas Wreath for the Scheepjes Christmas Blog Hop - see all ten amazing designs and their free patterns, including how to make this wreath for yourself!

To make the pom poms, first cut two pieces of cardboard into corresponding sizes to your balls and make them into doughnuts.  I like to cut an opening to help wind the yarn around, but you should use your favourite pom pom method.  Using the various colours, wind the yarn around the cardboard until it’s very full, then cut and fasten it all together, trimming it to be a nice, round ball.

Christmas Wreath for the Scheepjes Christmas Blog Hop - see all ten amazing designs and their free patterns, including how to make this wreath for yourself!

To make the crochet balls, you’ll need the different size styrofoam balls and a matching stitch count.

4cm ball:
Start with a magic ring, and stitch 6 single crochets (UK double crochet) into the ring, tightening it once you’re done.
For the second round, increase into each stitch around with single crochet so that you have 12 stitches around.
Round 3: Increase, then single crochet into the next stitch, repeating around until you have 18 stitches.
Round 4: Increase, then single crochet into the next 2 stitches, repeating around until you have 24 stitches.
For the next 5 rounds, single crochet around, before beginning your decrease at round 10. Insert the ball here too.
Round 10: Decrease (2 single crochet together), then single crochet into the next 2 stitches, repeating around until you have 18 stitches.
Round 11: Decrease, then single crochet into the next stitch, repeating around until you have 12 stitches.
Round 12: Decrease around until you have 6 stitches, cut the yarn, tie off and using a tapestry needle close up the ball.

Christmas Wreath for the Scheepjes Christmas Blog Hop - see all ten amazing designs and their free patterns, including how to make this wreath for yourself!

5 cm ball:
Follow the above instructions until you’ve completed round 4.
Round 5: Increase, single crochet into the next 3 stitches, repeating around until you have 30 stitches.
Round 6-13: Single crochet around and after round 13 insert the ball.
Round 14: Decrease, single crochet into the next 3 stitches, repeating around until you have 24 stitches.
Continue with the instructions from round 10 of the 4 cm ball.

6 cm ball:
Follow the instructions for the 5 cm ball until you’ve completed round 5.
Round 6: Increase, single crochet into the next 4 stitches, repeating around until you have 36 stitches.
Round 7-19: single crochet around, and after round 19 insert the ball
Round 20: Decrease, single crochet into the next 4 stitches, repeating around until you have 30 stitches.
Complete the ball as per the instructions from round 14 of the 5 cm ball.

Assembly

Now is the time to put it all together.  I like to vary the colours, sizes and textures, trying to make sure that no two balls of the same size and texture are next to one another.  Start building your wreath using the fabric glue to attach each ball to the wreath and its neighbour.  This will take some time as the glue needs to dry a little before you can proceed.  Make sure you hold the wreath up to see how it’s coming together often so you can get a feel for the result.

Once you’re happy, leave it to dry properly over night, and then you’re ready to hang it!

Christmas Wreath for the Scheepjes Christmas Blog Hop - see all ten amazing designs and their free patterns, including how to make this wreath for yourself!

What do you think? Will you try to make one?  I’ve really enjoyed the process and I absolutely love the result.  I’ve started buying all my Christmas decorations in matching colours and if you check back here in a few days, you’ll see that I have something to go with this that I think you’ll love.  I’m also using the leftover balls as baubles for the tree – fun!

In the mean time, be sure to visit 50 Shades of 4ply tomorrow for the next installment of the Scheepjes Christmas Blog Hop!

Love,
Nerissa

Merry Mini Christmas

Happy December!  You know what that means right?  You’ll be bombarded with all things Christmas for the next 25 days until you just can’t possibly wait another minute to rip open all your presents on Christmas morning and will be devastated to have to put all your beautifully crafted decorations away in the new year.  I know I will be anyway!

So, to get us started, I’ve updated a pattern that I created last year, and am re-releasing it for the Christmas season.  I give you the new and improved Merry Mini Christmas hat!

Merry Mini Christmas - Mini Santa Hat pattern from @missnerissThe pattern has been updated and a few corrections made, and is ready to go for you to download and create the cutest little Santa Hat.  It’s just the best Christmas accessory, everyone comments and they’re just so much fun when you see them bobbing through the busy Christmas Market crowds.  I guarantee that you’ll be stopped multiple times to be asked where you found your hat, and you’ll have so much satisfaction from being able to say, “I made it myself!”

Grab it on Ravelry right now right her:  

Or on Etsy if you prefer shopping there instead!

Enjoy!

Merry Mini Christmas - Mini Santa Hat pattern from @missneriss Merry Mini Christmas - Mini Santa Hat pattern from @missneriss

How beautiful are all the Christmas ideas on Esty?  A couple of days ago I finished making the amigurumi elf by Buttonbeautiful and I went back to her shop to browse more patterns (they’re THAT good).  While I was there, I thought that I should make a Christmas Treasury to showcase other amigurumi patterns.  I was reading maRRose regular Treasury Tuesday post the other day where she shared her own Christmas inspiration and something sort of clicked in my head – I should share my treasury on the blog for all of you who don’t necessarily spend as much time on Etsy as you should!

So, here it is, what do you think?  I’m not sure I could pick a favourite if I have to be honest.  Maybe the Christmas Deer Doll, or the slightly wonky Christmas Tree?  I do know that I seem to have a thing for Reindeer though!


Amigurumi Crochet PDF Patter…

$3.8

Rudy The Reindeer Amigurumi …

$4.5

Rudolph reindeer plush – cro…

$24

Amigurumi Pattern – Frosty t…

$5

Christmas lights amigurumi /…

$15.95

Knit your own amigurumi Chri…

$4

Amigurumi Crochet PDF Patter…

$4.5

Christmas Deer Doll. – pdf …

$5

Crochet Pattern – Christmas …

$3.99

Christmas Friends Pattern

$8

Pattern, Christmas tree, Cro…

$3.5

3 Gnomes – pdf knitting patt…

$6

Waldorf Christmas Babies – p…

$4

Santa’s Reindeer Crochet…

$5

PDF Tree Pattern, Ornament P…

$3.9

If you want to, you can import your own Etsy treasury to your blog too.  This little piece of magig is powered by Handmadeology and took about 20 seconds to make, including the copying and pasting here.  It’s so simple, I’m going to make the treasury sharing a regular thing!

Sinterklaas Crochet Cake Pops

This time last year my friend Anel asked me to make some Christmas themed cake pops for her display at the Amsterdam Small Business Network Pop-Up, and when she asked me again this year I jumped at the chance.  Although, instead of Christmas, this year she was going to make Sinterklaas themed cake pops, and could I make something in that vein for her.

But of course!  Cake pops are about the most fun way to eat cake ever, and I just love making the crochet version.

Here’s what I came up with, what do you think?

I especially love the little horse Amerigo, and how cool is it that the crochet cake pops look so much like the real deal?  Not sure I’d like to mix them up the dark if I was sneaking downstairs in the middle of the night for a sneaky cake pop though…

Anel and Little Cakes will be at the ASBN Pop-Up again this weekend, with a sack full of delicious Sinterklaas and Christmas cake pops.  If you’re in Amsterdam, you absolutely must stop by and grab one.  And do your Christmas shopping while you’re there – you’ll have loads of fabulous local business showcasing their wares!

What do you think of last year’s offering?

Should I write patterns for the pops?  Some of them could also double as Christmas tree ornaments, couldn’t they.

Love the photos?  You should follow Anel on Instagram for more cake poppy goodness.  And while you’re at it, follow me too.

http://instagram.com/miss__neriss

Ravelry Giveaway, just in time for Christmas!

I’m giving away 20 copies of my Merry Mini Christmas hat for free on Ravelry to help everyone get into the Christmas spirit! Just enter MERRYMINIXMAS when checking out!

Free pattern with coupon code MERRYMINIXMAS for the first 20 customers!http://www.ravelry.com/patterns/library/mini-santa-christmas-hat

Image

Instagram Action

I love taking photos, but my time is so limited that I never seem to get round to taking fabulously constructed shots with great lighting. Coupled with a daughter who will not sit still to take a sharp shot and a husband I never see during daylight hours, my model opportunities are often limited to desperate selfies! Honestly, most photos are taken on my couch at 11pm with my iPad before items get wrapped and shipped. Because of that, Instagram is my absolute best friend. I can share what I like there and it’s ok that my images aren’t professionally finished. Poor lighting isn’t the end of the world. I just try not to post blurred photos…

Here’s some of my latest creations that have only really made it as far as Instagram:

The pattern for this one is coming soon!

The pattern for this one is available to buy on Craftsy and Ravelry

Meanwhile, did you know that WordPress allows you to add Instagram images to posts by merely pasting the image link into the post/page? Looks fantastic and is interactive as well! Don’t forget to follow me on Instagram, it’s where I spend most of my time.

How do you tackle the time vs lighting vs model issues?