Well isn’t it obvious? This is the neon bag literally of my dreams 😀
I love the look of a crochet cross-body bag, but wasn’t entirely sure on the colours I wanted to use, UNTIL Scheepjes launched their neon catonas. I knew instantly that it was a done deal.
GET THE YARN
Scheepjes Catona is a 100% mercerised cotton, fingering weight yarn, with balls available in 50g, 25g and teeny tiny 10g sizes.
Scheepjes has a full list of stockists on their website.
Wool Warehouse ships all over the world from the UK Caro’s Atelier is my LYS and they also ship across Europe LoveCrafts.com also stock most colours
The pattern is in progress, should be ready soon. Lots of fun parts and only a single ball of each colour. I also bought the plastic chain online, but I’ll provide alternative instructions for you so it can be 100% crochet.
Don’t you just love this curly, lacy mess on my lap?
It’s been perfect crochet weather here in the Netherlands. I look out the window and the beautiful trees on my street are all slowly turning a rich copper. I’m making the most of enjoying this time before the less-romantic phase where I spend a my days clearing leaves from my garden!
I’m really enjoying working with this Scheepjes Legacy yarn. It’s easy to crochet, my project is growing quickly and it holds up magnificently to frogging – which I do a LOT of while designing.
GET THE YARN
Scheepjes has a full list of stockists on their website, you can search for one close to you.
I’m nearly done, now I’m on the hunt for the right hoop to be able to stretch it. I think I might have found a stockist local to me which is a huge win. More on that next week!
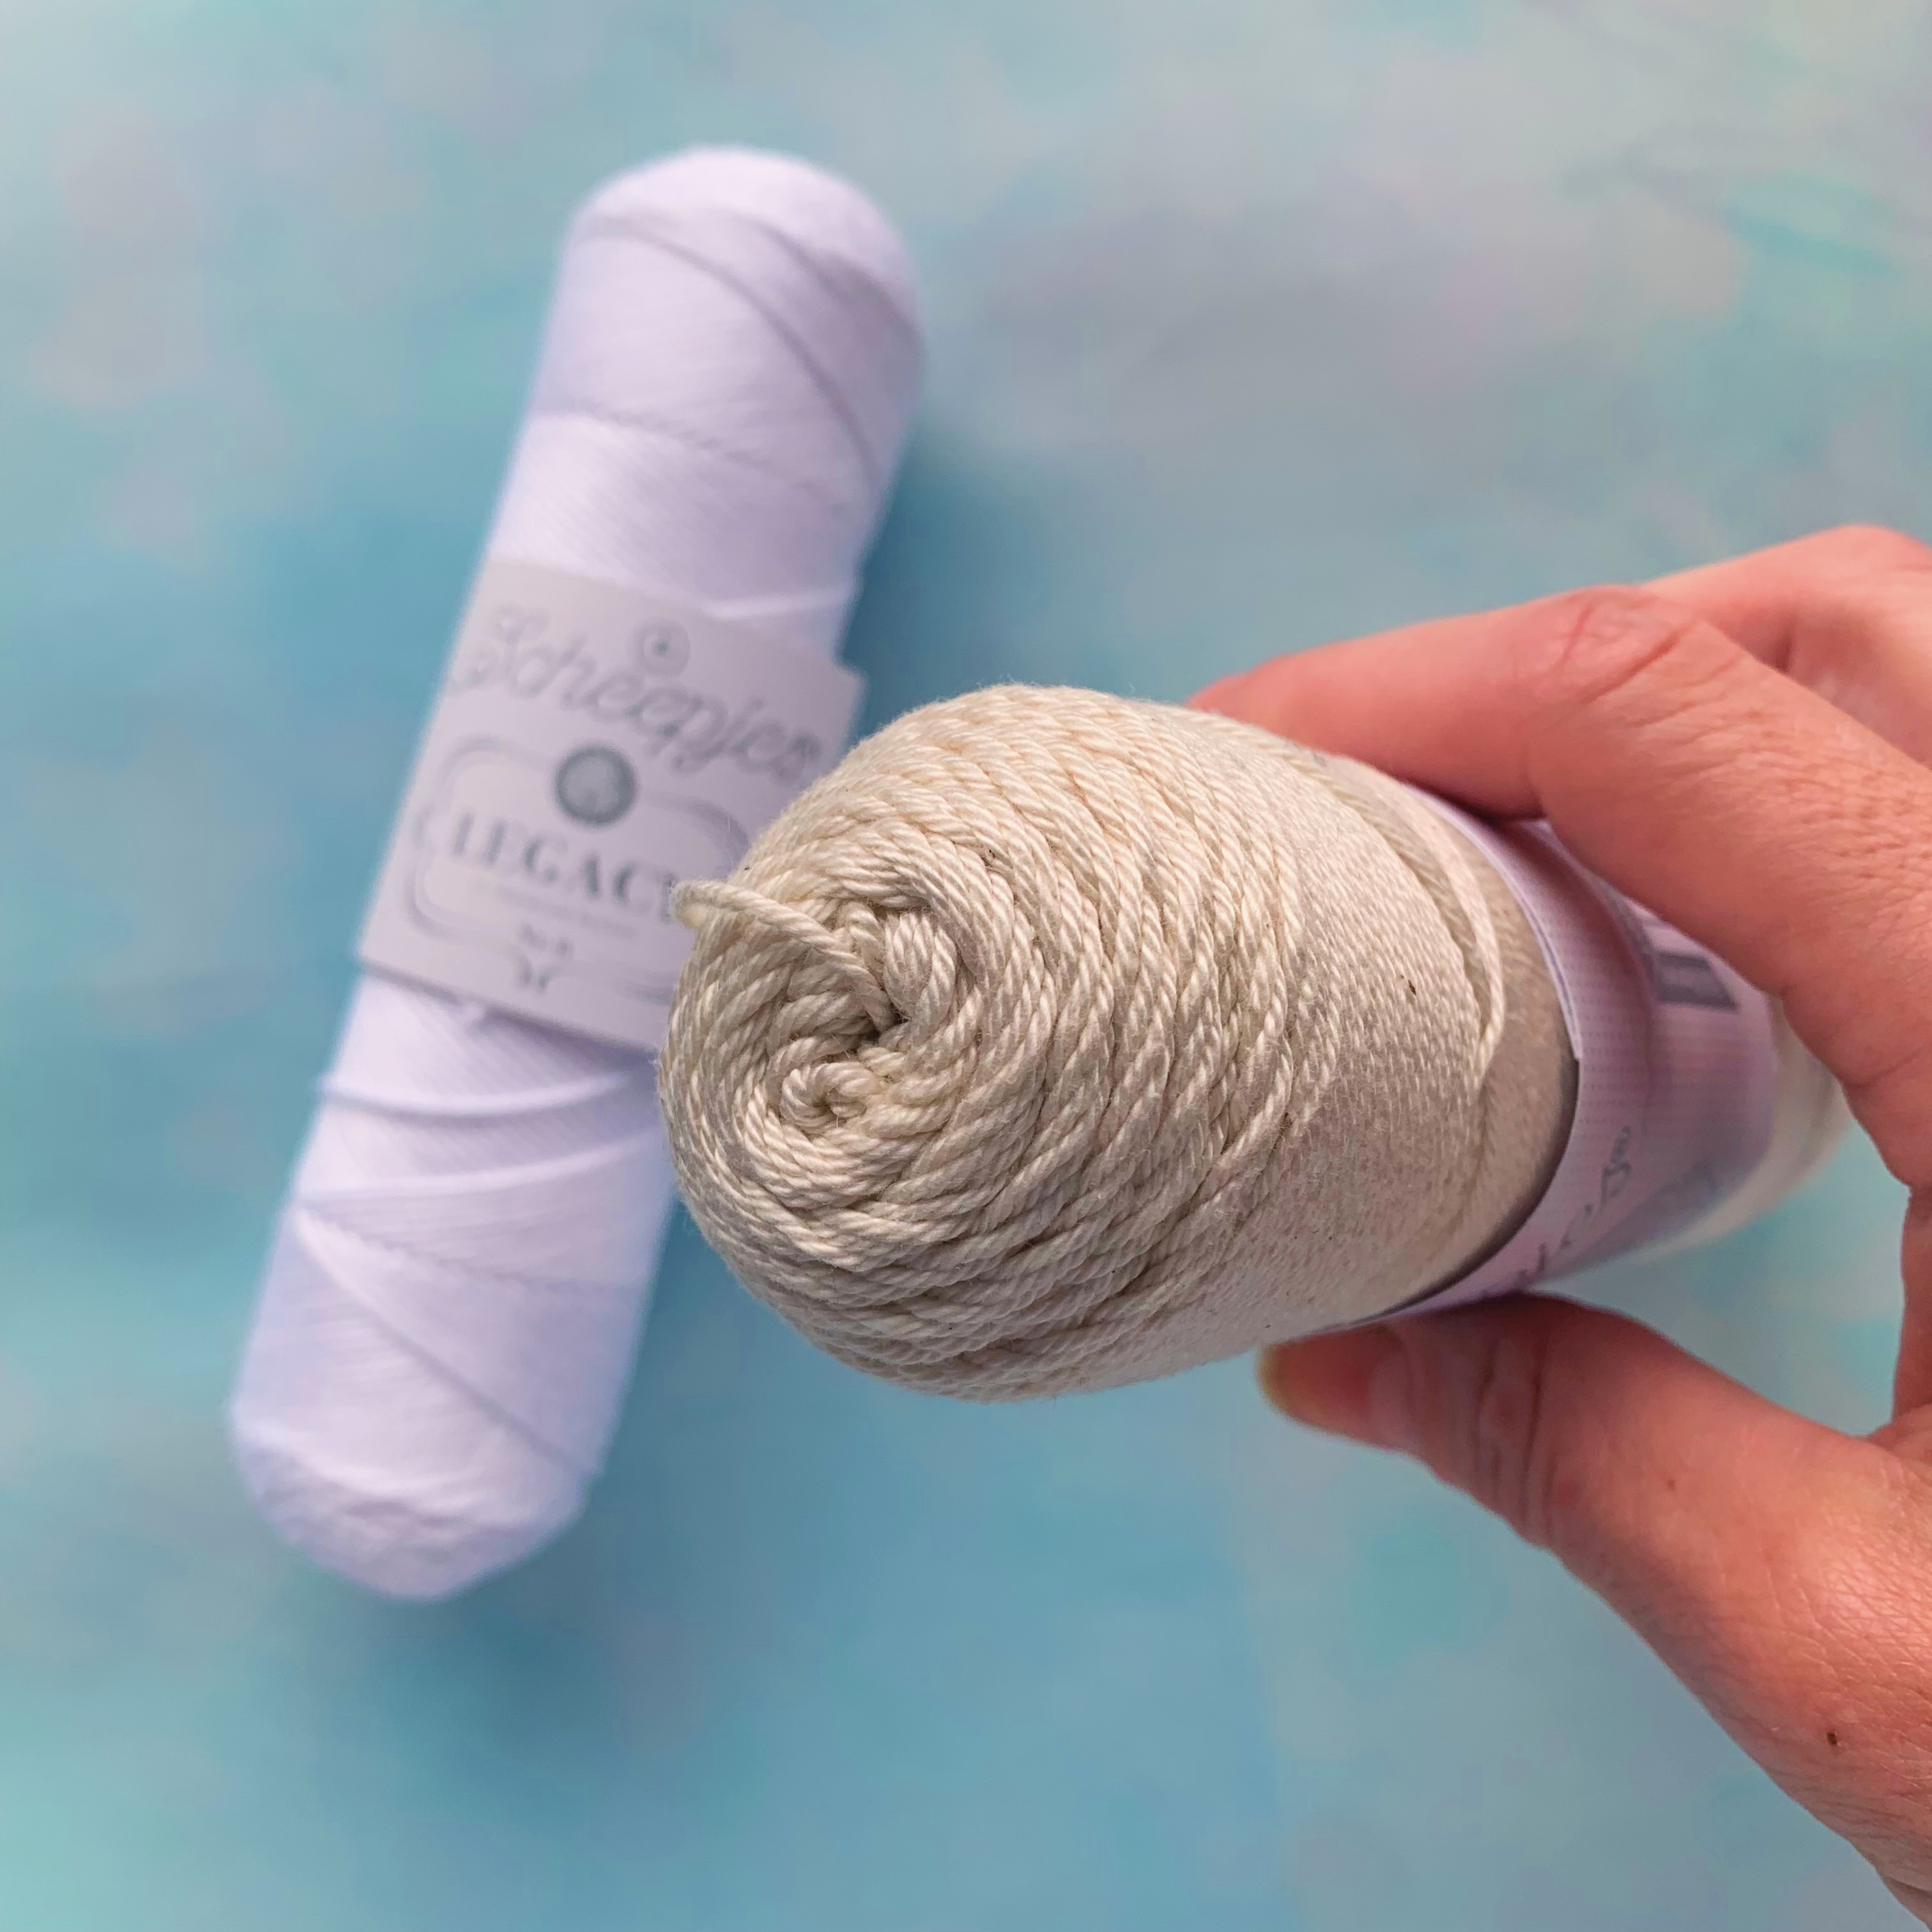
I have a brand new crochet project on the go that I can’t wait to share with you!
I’m using the lovely Legacy yarn from Scheepjes which is a nostalgic delight.
Doesn’t this yarn just trigger memories of years gone by, visiting an older relative, being fascinated by the cabinet filled with precious china and statuettes, all artfully arranged on delicate lace doilies?
Scheepjes has multiple weights of this yarn, mercerised and non-mercerised, in two colours, bright white and off white. I’m going to use the mercerised Nr. 6, with the following specs:
Hook size: 3.5mm Ball Weight: 100 grams Length: 240 metres Gauge: 23 stitches x 30 rows to 10 cm on 3.5mm hooks
Get the Yarn
Scheepjes has a full list of stockists on their website, you can search for one close to you.
I absolutely love these hanks. The way they’re wound, they way they feel in my hands, I’m transported to another time by this yarn, which I’m sure was the intention of the Scheepjes design team.
With that feeling of a by-gone era in mind, I’m going to use this yarn to make a vintage-inspired lace mandala. I’ve been busy building a chart to work from, it’s going to be quite a challenge to write it all out line by line I’m sure, so this will be a great project to brush off the chart making skills!
Keep an eye on my blog and Instagram for more photos and progress to come!
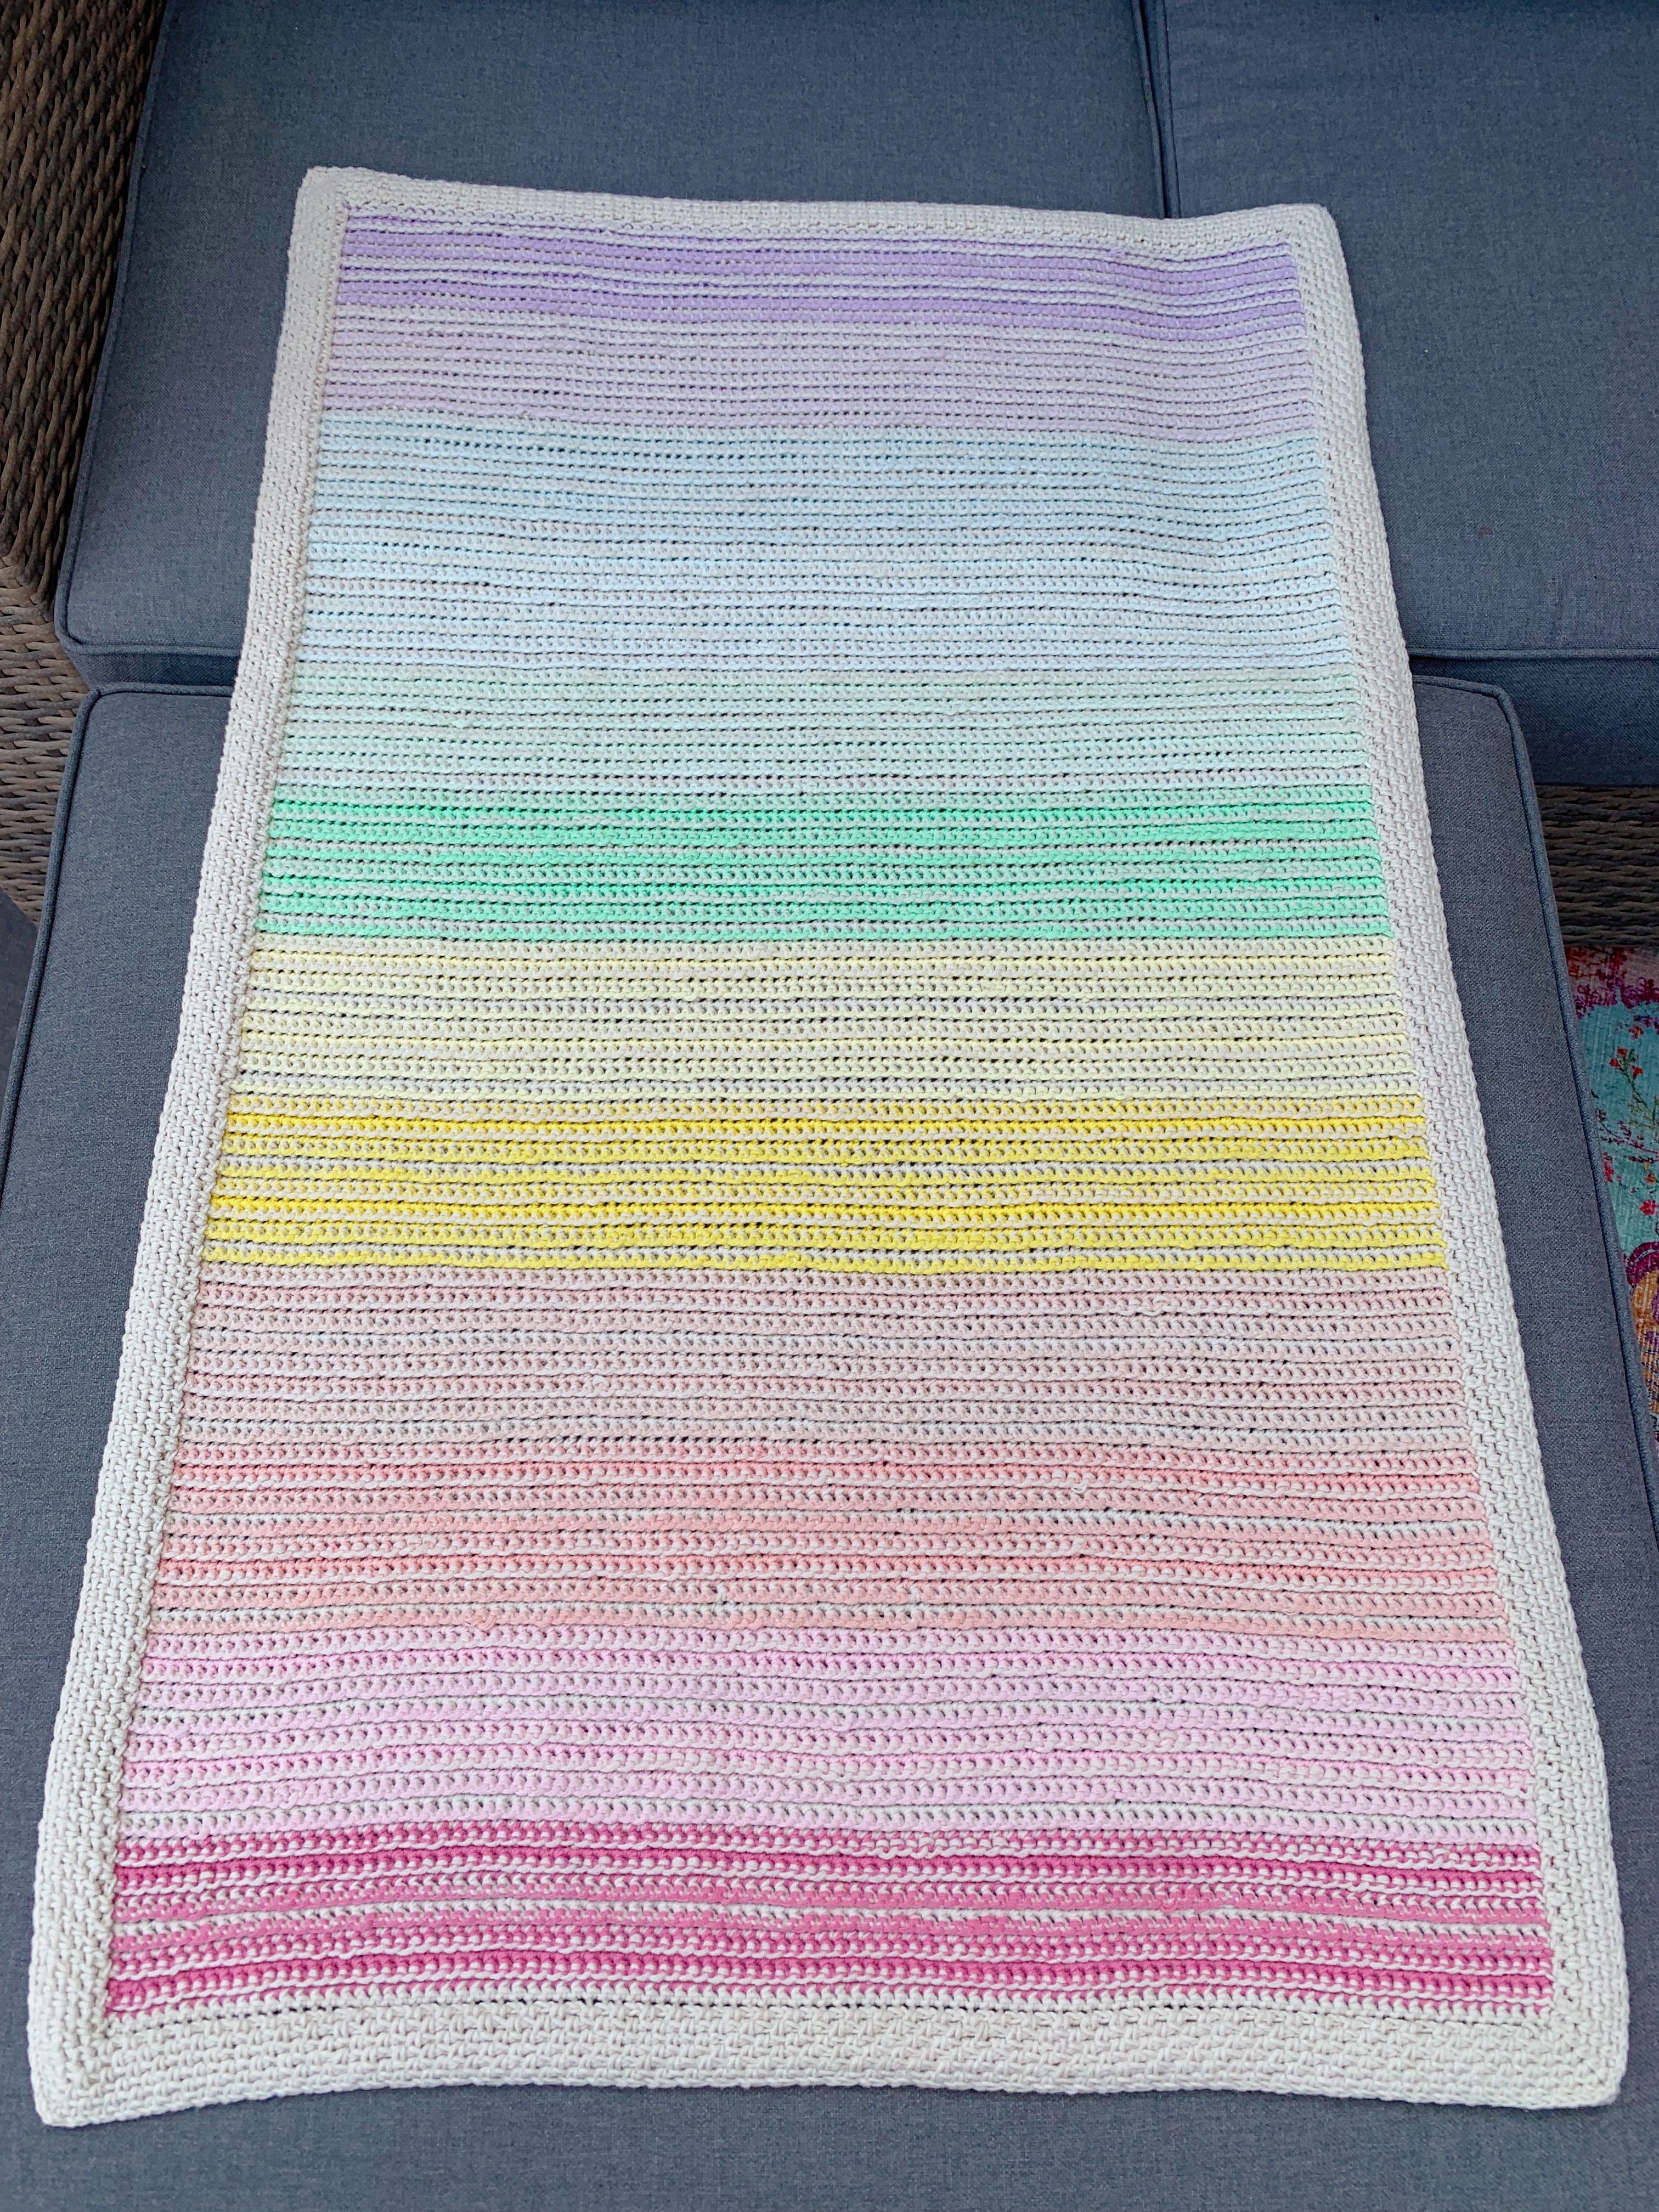
Ik heb de Nederlandstalige versie van mijn Rainbow Ridge Blanket toegevoegd! Het is hieronder, en ook op Ravelry/Lovecrafts te vinden als je liever een PDF printvriendelijke versie willen gebruiken.
100 x 70 cm na opspannen (kan iets kleiner uitvallen door spanning in het garen)
Stekenverhouding
18 stn en 19 rijen meten 10 cm in patroon. Houd de stekenverhouding goed in de gaten, want je hebt weinig speling met deze kleine bolletjes. Afkortingen
(NL termen) L losse Hv halve vaste S(tn) steek/steken l-open lossen opening St stokje(s) SOv sla-over vaste (zie speciale steken) HK hoofdkleur (2622 Latte) K(1) kleur (1) Herh herhalen VK Voorkant AK Achterkant
Notities
Je haakt het patroon in rijen heen en weer, met de SOv techniek (zie Speciale steken). Daarna haak je de dubbele rand in toeren.
Elk rij begint met een l1. Dit telt niet als een steek.
Herhalingen
[(…)] herhaal de instructies tussen haakjes het totaal aantal keer aangegeven.
Sorteer de kleuren in deze volgorde:
K1: 2514 Rose K2: 2513 Light Rose K3: 2620 Starfish K4: 2466 Peach K5: 2518 Canary K6: 2496 Banana K7: 2640 Mint K8: 2639 Green Tea K9: 2630 Arctic K10: 2646 Glacial Mist K11: 2658 Lavender K12: 2657 Orchid
Speciale steken
SOv (Sla-over vaste) is een techniek waarmee we een steek met twee draden tegelijk haken. Met de eerste kleur, steek naald in steek en sla de draad om de haaknaald. Haal de lus op. Met de tweede kleur, sla draad om van voor naar achter (houd de tweede kleur voor de eerste), met de eerste kleur, sla draad om en haal de eerste kleur door alle lussen.. Zie video instructies hier. Ook op Youtube.
Instructies
Rij 1 Met HK, 102l, 1v in derde l en alle l tot einde van rij, keer om. (100 stn) Rij 2 Met K1 als leidende kleur, samen met HK, l1, SOv in alle stn tot rij-eind, keer om. Rij 3-6 Herh Rij 2. Rij 7 Met HK als leidende kleur, herh Rij 2. Rij 8-10 Herh Rij 7. Rij 11-14 Herh Rij 2, knip draad K1 af. Rij 15 Wissel naar K2, met HK als leidende kleur, herh Rij 7. Rij 16-18 Herh Rij 7. Rij 19 Met K2 als leidende kleur, herh Rij 2. Rij 20-22 Herh Rij 2. Rij 23 Met HK als leidende kleur, herh Rij 7. Rij 24-26 Herh Rij 7. Rij 27 Met K2 als leidende kleur, herh Rij 2. Rij 28-30 Herh Rij 2, knip draad K2 af. Rij 31-46 Met K3, herh Rij 15-30. Rij 47-62 Met K4, herh Rij 15-30. Rij 63-78 Met K5, herh Rij 15-30. Rij 79-94 Met K6, herh Rij 15-30. Rij 95-111 Met K7, herh Rij 15-30. Rij 112-127 Met K8, herh Rij 15-30. Rij 128-143 Met K9, herh Rij 15-30. Rij 144-159 Met K10, herh Rij 15-30. Rij 160-175 Met K11, herh Rij 15-30. Rij 176-191 Met K12, herh Rij 15-30. Knip draad K12 af.
Rand
De rand haak je in toeren, eerst met een 6 mm en daarna een 4 mm haaknaald.
Toer 1Deze toer wordt de VK. Met HK en 6 mm haaknaald, keer om, 2l, 1hv in elke s tot einde van rij (dit is nu de hoek), 2l, roteer 90 graden, 1hv in elk rij-eind, zo dichtbij de zijkant als mogelijk, tot de volgende hoek, 1hv in de hoek, 2l, roteer 90 graden, 1hv in elke l tot de volgende hoek, roteer 90 graden, 1hv in elk rij-eind tot de laatste hoek, sluit met een hv in eerste s.
Toer 2 Met 4 mm haaknaald, 1l, 1v in de hoek-open [(1l, sla 1 s over, 1v in l-open) tot hoek-open, 2l, 1v in l-open], herh tot einde van toer, sluit toer niet in laatste l-open, maar haak hv in v.
Toer 3 1hv in elke s tot hoek-open, 1l, [(1l in l-open, 1l) tot hoek-open, (1v, 2l, 1v) in hoek-open], herh tot einde van toer, 1l, sluit af met hv in v.
Toer 4 Herh Toer 3, maar voeg 1 extra herh van (1l, v, 1l) toe voordat je de toer sluit met een hv.
Toer 5 Herh Toer 4, hecht af.
Omdraaien naar AK Hecht aan in in AK van dezelfde hoek als Toer 1 van de rand, en haak Toer 1 opnieuw, maar nu in de AK van de hv van Toer 1 (VK). Herh daarna Toer 2-5 (deze bevinden zich dus aan AK).
Omdraaien naar VK We sluiten nu de dubbele rand en verbergen alle draadjes daarin als volgt: 1l, 1v in l-open van zowel laatste AK als laatste VK toer, [(1l, 1v in l-open van beide toeren) tot de hoek-open, (1v, 1l, 1v in beide toeren) in hoek l-open], herh tot einde van toer, sluit af met een hv.
I LOVED making this blanket SO much! I mean, you know how few blankets I make, right? I simply struggle with making something so huge, it takes me months! This one however, is perfect for my instant gratification heart. I could smash it out relatively quickly as it’s sized for a baby, and the rhythm of the stitches means you just want to keep doing “one more row.”
The Scheepjes Softfun is a wonderful blanket yarn. It has loads of stretch to make it squishy and a bit of weight to add warmth, plus enough cotton to make sure you can still use it all summer long.
No baby? No problem! It also makes a great lap blanket 😉
There will be US terms available on Ravelry and Lovecrafts, and this free version below uses UK terminology.
There are five different Softfun colour packs to choose from including Pastel (which I have), Jewel, Rich, Rainbow and Cloud. There are a full list of stockists on the Scheepjes website, but you can also find the packs at your favourite LYS or online retailer including: Wool Warehouse* (global) Caro’s Atelier* (NL and Europe) Love Crafts* (US) Dot’s Yarn Den (US) Belle Mae Yarns (AU)
You’ll need one colour pack in the colours you like best, plus 6 balls of Softfun in a complementary colourway. I chose 2622 Latte.
18sts and 19 rows over 10 cm in pattern. Stick as close to the tension as possible as the mini balls are limited and you may run out if your tension is looser than indicated.
Measurements
100 x 70cm blocked (will contract a little due to the stretch in the yarn)
Abbreviations
(UK terms)
Ch chain Ss slip stitch St(s) stitch(es) Ch chain Ch(2)-sp chain (2) space Dc double crochet YUdc yarn under double crochet MC main colour (2622 Latte) CC(1) contrast colour. Number denotes which colour to be used Rep repeat RS right side WS Wrong side
Pattern Notes
This pattern is worked back and forth in rows using the yarn under colourwork technique to make the blanket. The double border is worked in rounds.
Each row begins with a ch1, this does not count as a stitch.
Work instructions inside brackets and parentheses [(…)] the indicated number of times.
Sort the colours into the following order:
CC1: 2514 Rose CC2: 2513 Light Rose CC3: 2620 Starfish CC4: 2466 Peach CC5: 2518 Canary CC6: 2496 Banana CC7: 2640 Mint CC8: 2639 Green Tea CC9: 2630 Arctic CC10: 2646 Glacial Mist CC11: 2658 Lavendar CC12: 2657 Orchid
Special Abbreviation
YUdc (yarn under double crochet) is a colourwork technique using two strands of working yarn. To work the stitch insert hook with mc, yoh, pull up a loop, with cc yoh from front to back (keeping cc in front of mc), with mc yoh, pull through 3 loops. See video instructions here on Instagram, or here for Youtube.
Row 1 With MC, ch102, dc in the third ch and in all ch sts to end (100sts), turn Row 2 With CC1 as the lead, carrying MC, ch1, YUDC in all sts to end, turn Row 3-6 Rep row 2 Row 7 With MC as the lead and rep row 2 Row 8-10 Rep row 7 Row 11-14 Rep row 2, cut CC1 Row 15 Switch to CC2, with MC as the lead, rep row 7 Row 16-18 Rep row 7 Row 19 With CC2 as the lead, rep row 2 Row 20-22 Rep row 2 Row 23 With MC as the lead, rep row 7 Row 24-26 Rep row 7 Row 27 With CC2 as the lead, rep row 2 Row 28-30 Rep row 2, cut CC2 Row 31-46 With CC3 rep rows 15-30 Row 47-62 With CC4 rep rows 15-30 Row 63-78 With CC5 rep rows 15-30 Row 79-94 With CC6 rep rows 15-30 Row 95-111 With CC7 rep rows 15-30 Row 112-127 With CC8 rep rows 15-30 Row 128-143 With CC9 rep rows 15-30 Row 144-159 With CC10 rep rows 15-30 Row 160-175 With CC11 rep rows 15-30 Row 176-191 With CC12 rep rows 15-30, cut yarn
Border
Working in rounds with 6 and 4mm hooks
Round 1 This now becomes the RS. With MC and a 6mm hook, turn, ch2, ss to end (now corner), ch2, rotate 90 degrees, ss in each row as close to the edge as possible to next corner, ss in corner, ch2, rotate 90 degrees, ss in each st across, ch2, rotate 90 degrees, ss in each row to next corner, ss to ch1 to join.
Round 2 With 4mm hook ch1, dc in ch-sp [(ch1, miss 1, dc in ch-sp) rep to corner ch2-sp, ch 2, dc in ch2-sp], rep on all four sides to end, don’t work last dc in final corner ch2-sp, ss to dc instead.
Round 3 Ss to ch2-sp, ch1 [(dc in ch2-sp, ch1) rep to corner, (dc, ch2, dc) in corner] rep to end, ch1, ss to dc to join.
Round 4 Rep round 3, but ad 1 (ch1, dc, ch1) at the end before ss to join.
Round 5 Rep round 4, tie off.
Flip to WS, Starting in the same corner as R1 from the RS instructions, and working in the back of the SS from round 1, rep rounds 1-5.
Flip to RS Close the double border. Ch1, dc into ch-sp of both layers, [(ch1,dc in ch-sp of both layers) to corner, (dc, ch1, dc in both layers) in corner ch2-sp], rep to end, ss to join, hiding all the ends inside the border. Cut yarn, weave in the end, block to size.
I already shared my love for the Scheepjes Softfun colour packs, and if you follow me on Instagram (please do if you don’t, I share a bit more often there), you’ll have seen my progress pics already.
There are five different Softfun colour packs to choose from including Pastel (which I have), Jewel, Rich, Rainbow and Cloud. There are a full list of stockists on the Scheepjes website, but you can also find the packs at your favourite LYS or online retailer including: Wool Warehouse* (global) Caro’s Atelier* (NL and Europe) Black Sheep Wools* (UK) Dot’s Yarn Den (US) Belle Mae Yarns (AU)
You’ll need one colour pack in the colours you like best, plus 6 balls of Softfun in a complementary colourway. I chose 2622 Latte.
I’m working the YUDC stitch that I used in my Reti Koala pattern, so these two projects together might almost be called a collection!
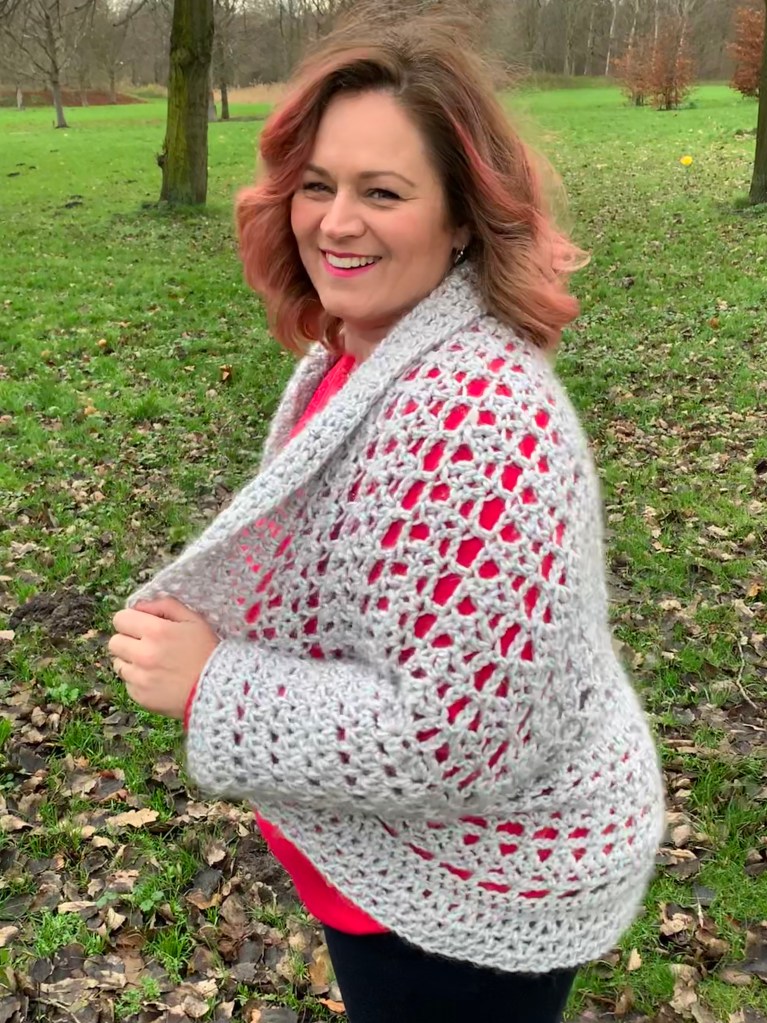
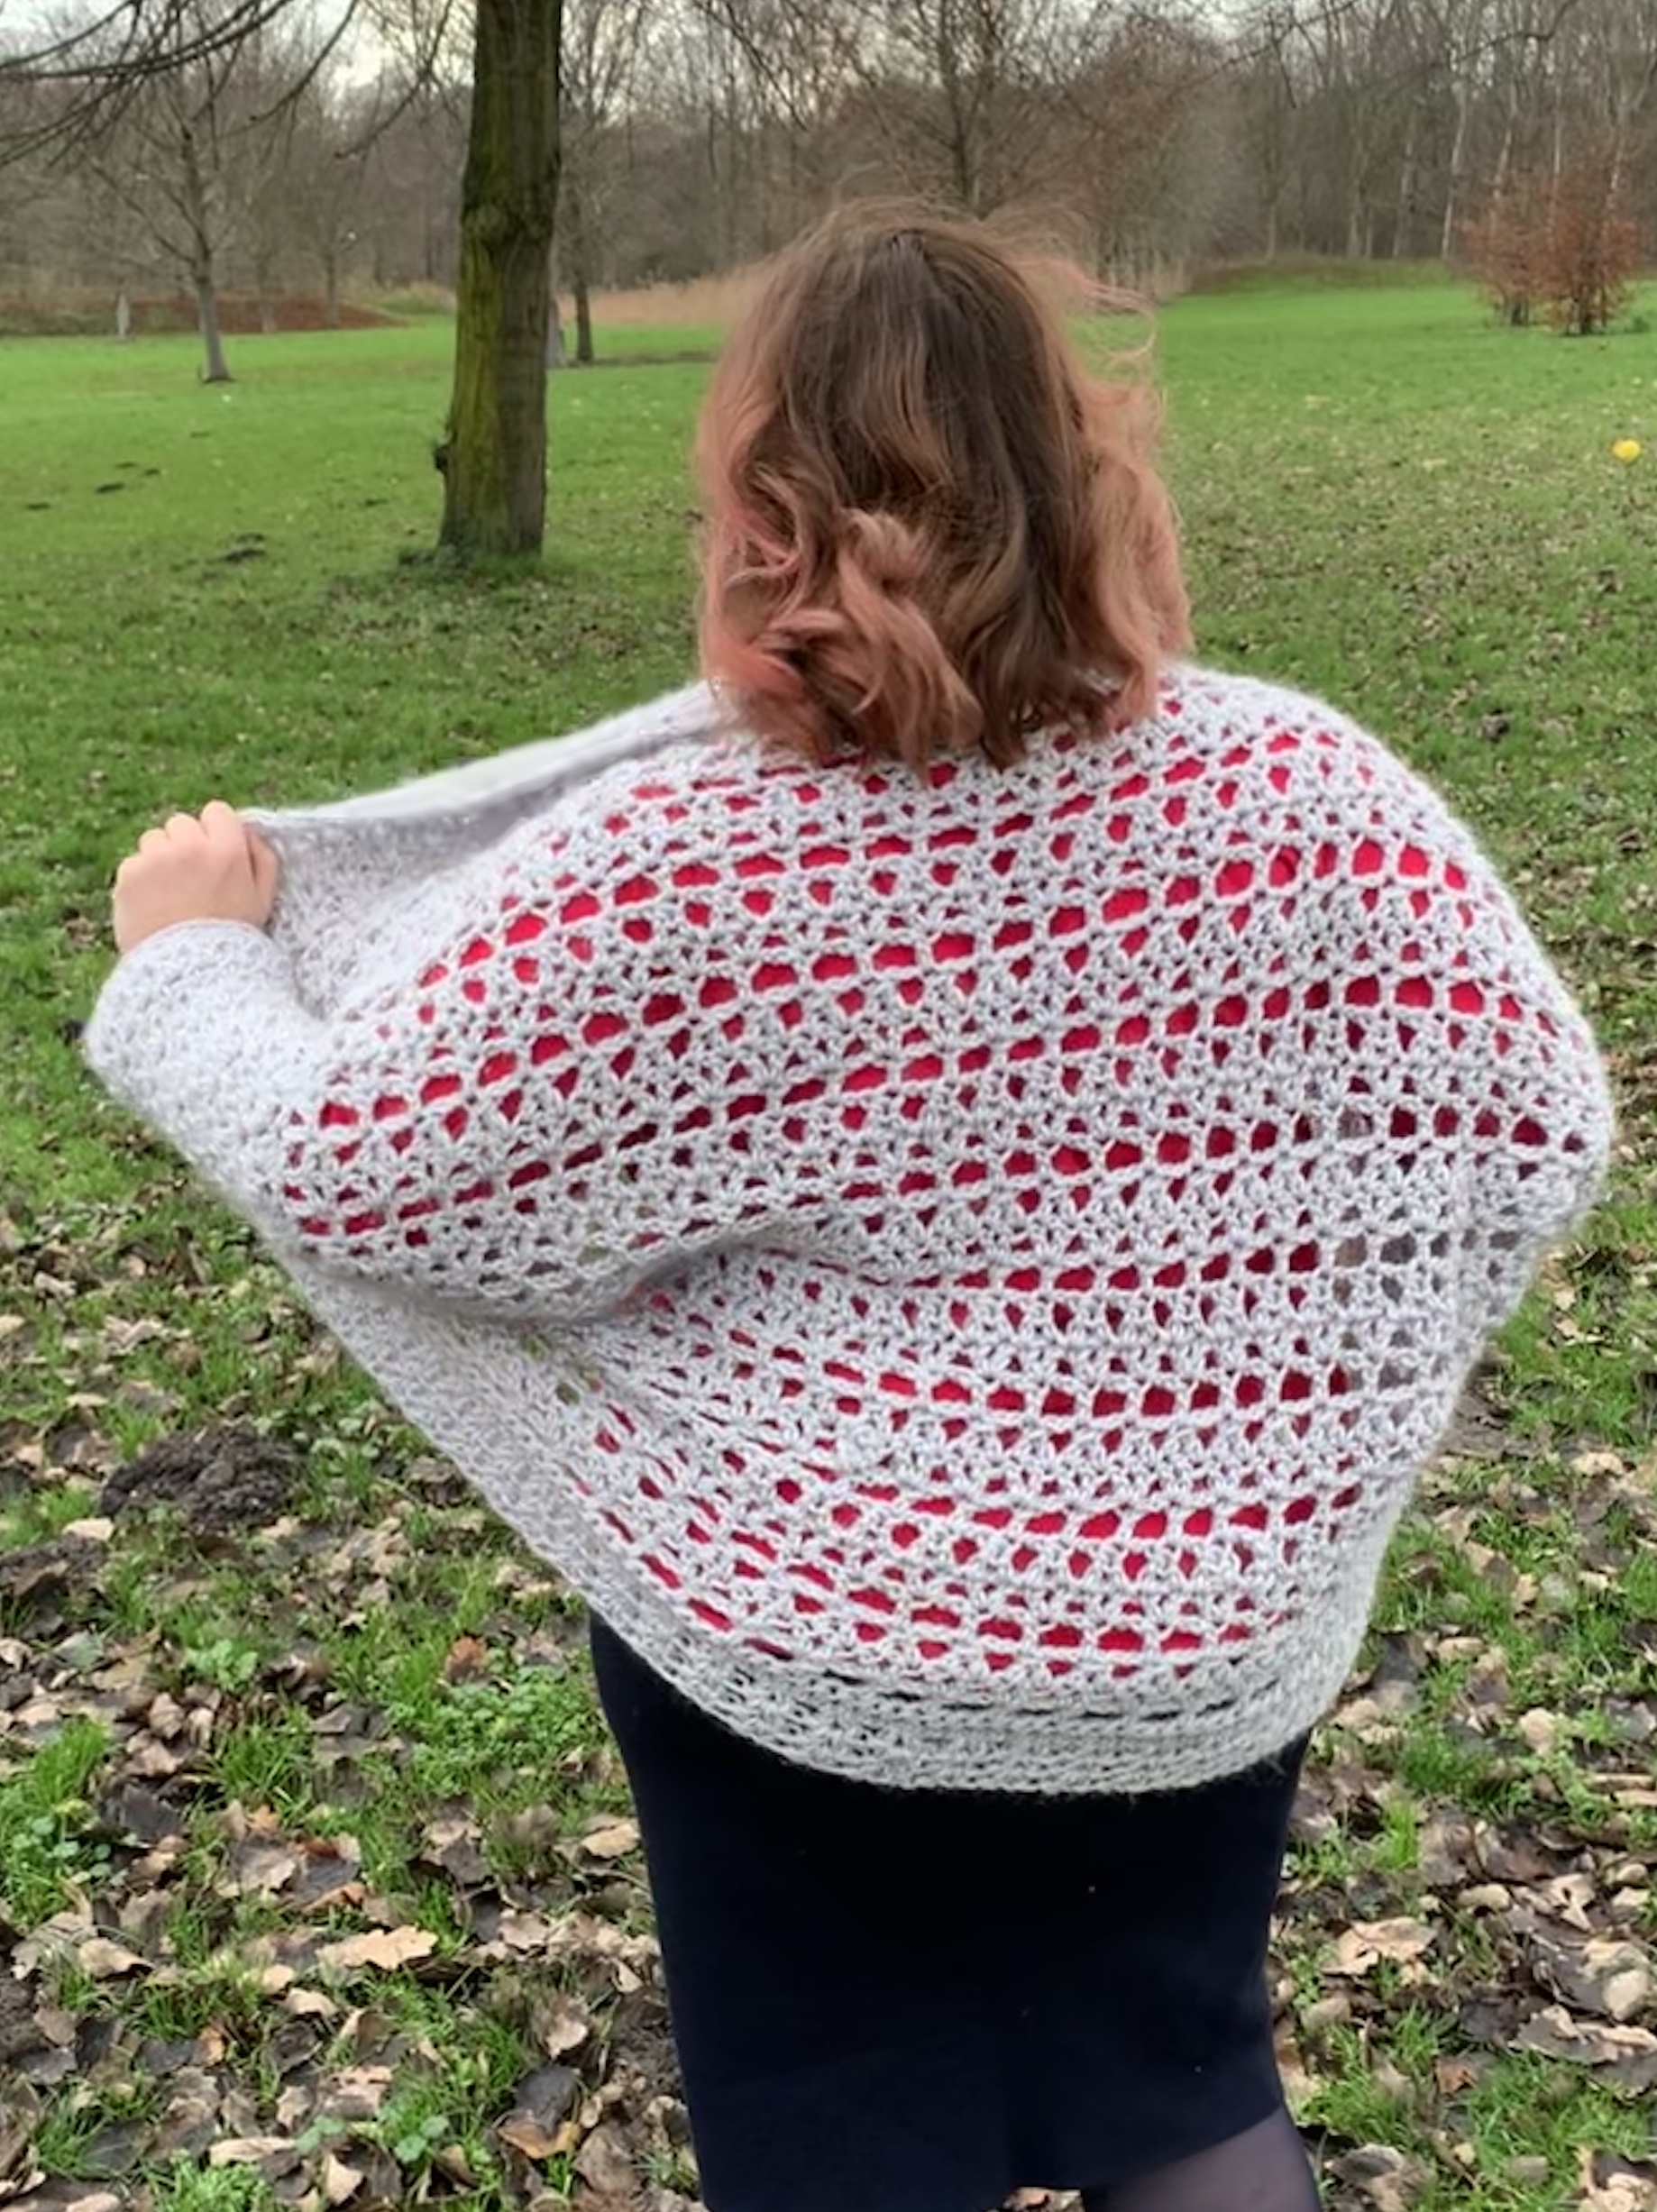
Just in time for Christmas, I’m sharing my latest free pattern with you!
While I was making this, I kept wondering what I should call it. I was hoping for a yoga related name, as I’m using Scheepjes Namaste, but as soon as I tried it on it felt like a warm hug. And then because I have a young kid, all I could hear in my head (over and over again, omg) was “I’m Olaf, and I like warm hugs,” so I couldn’t call this anything but Olaf (the warm shrug)!
What you’ll need for this pattern is 7 balls of Scheepjes Namaste in your favourite colour and a 10mm hook. I used Warrior (614). I also deliberately made this a one size fits all design and the size that fits me (XL) fits my husband and several friends I asked to try it on for me. If you’re a very small person, it may well be too large for you, but there are some tips on how to resize it if you would like to make it smaller.
The pattern below is written in UK crochet terms, but if you prefer US terms I have a separate PDF for both versions for a small fee to download from my Ravelry store. That version is print friendly, and there is also a printer/e-reader friendly version for the UK terms as well for a small fee.
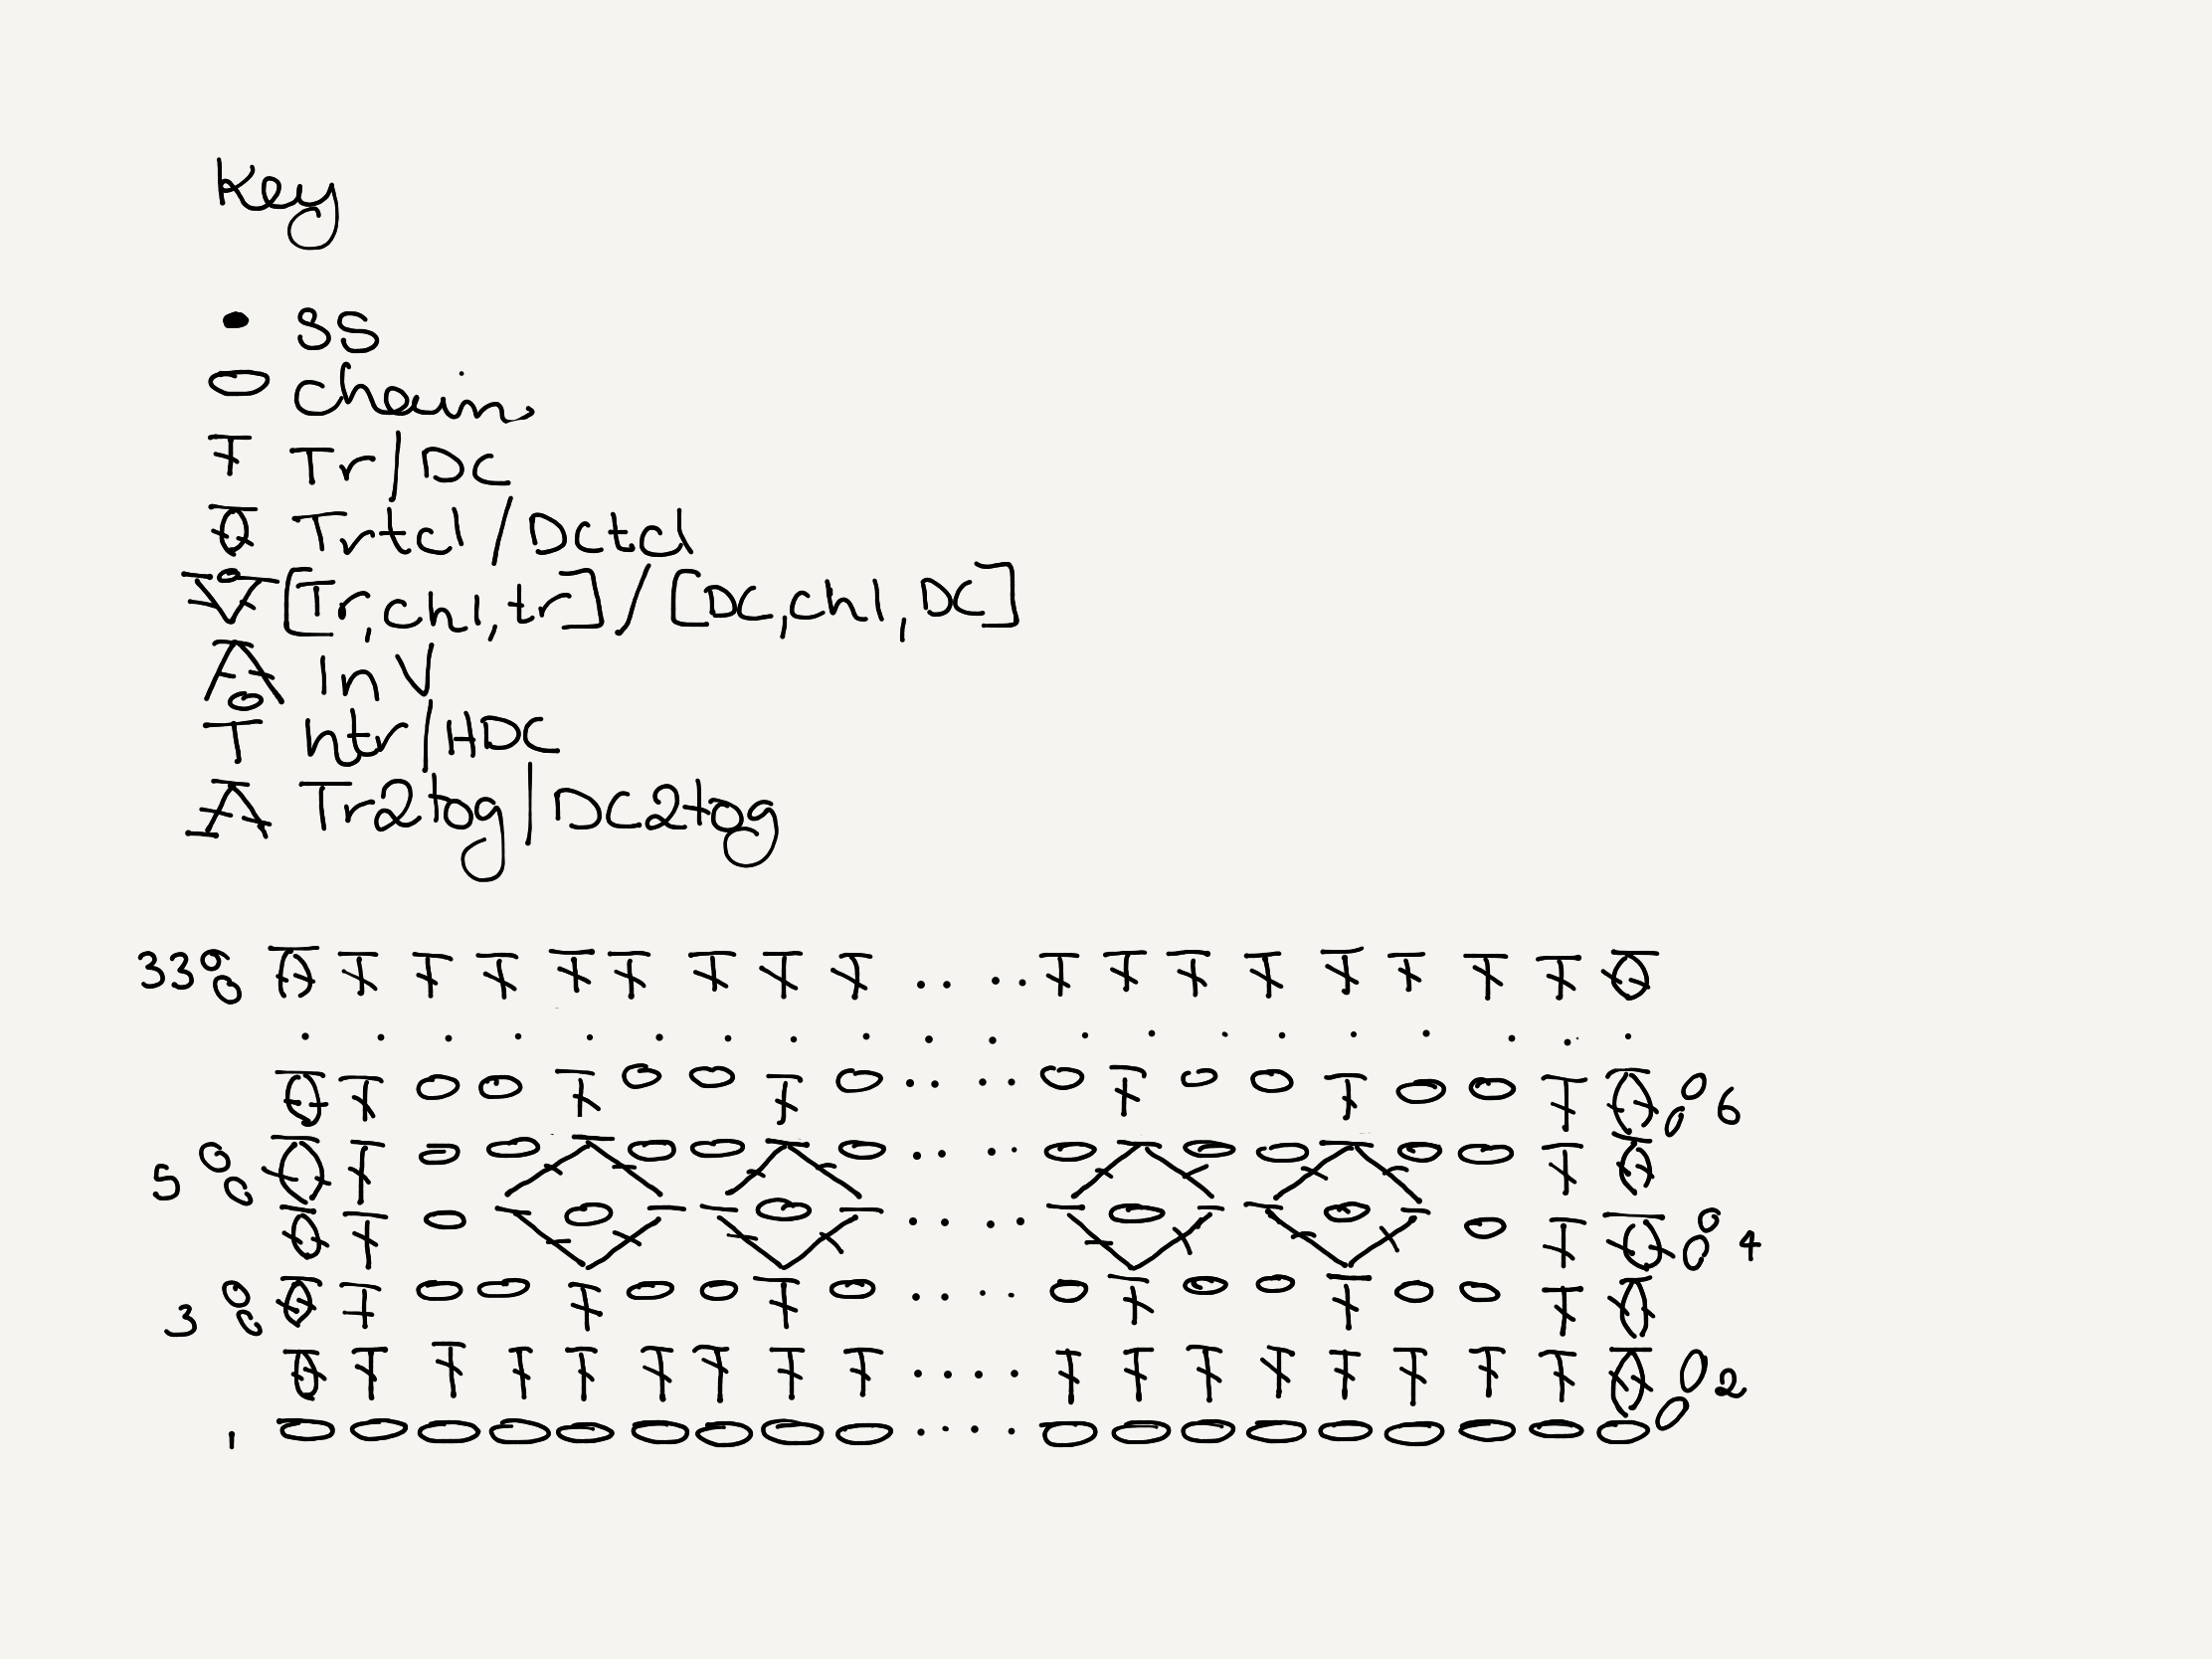
Abbreviations
(UK Terms) Ch chain stitch Htr half treble crochet Tr treble crochet Trtcl treble crochet tiny cluster Tr2tog treble crochet two together (decrease) InV inverted v-stitch (see notes) […] (…) repeat instructions between brackets the required number of times. Rep repeat SS slip stitch
Notes
Olaf (the warm shrug) is designed to be one size fits most, but by adjusting the sleeve length, you’ll be able to make it smaller, or larger. There will be information on how to do that at the end of the instructions.
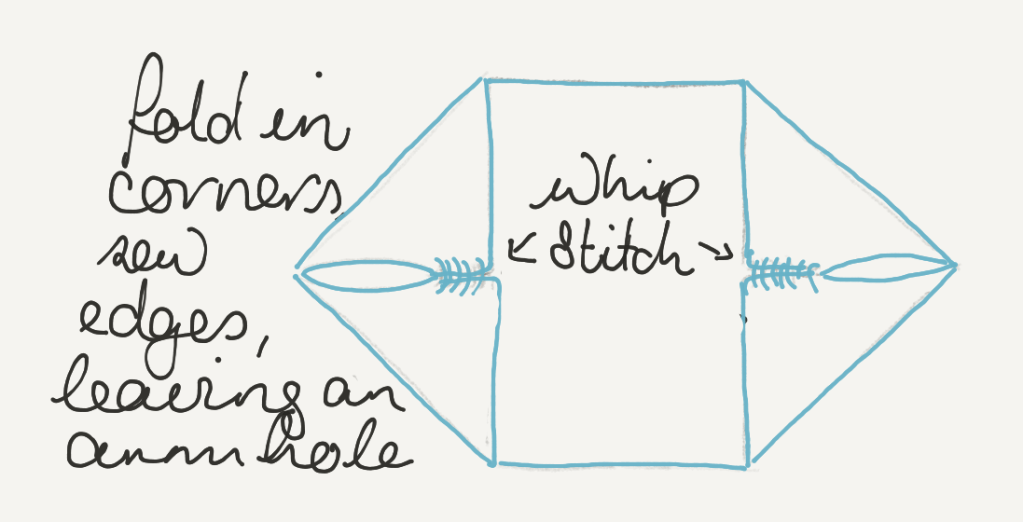
The shrug is created back and forth in rows, then the corners are folded in and stitched together to make the lapels and yoke, then we attach a collar and sleeves.
The InV stitch is an inverted V-stitch: YO, insert hook, pull up a loop, YO, pull through 2 loops, miss 1, YO, insert hook, pull up a loop, YO, pull through 2 loops, YO, pull through all loops.
Instructions
Body
Ch 89 (84 +5), mark the 43rd stitch for later, and leave a 40cm tail for sewing the sides (you can roll this up and poke it in through some stitches to hold it out of the way).
Trtcl in the 3rd ch from the hook, tr to last, trtcl. Ch 2, turn.
Trtcl, tr [ch2, miss 2, tr next] to last, trtcl. Ch 2, turn.
Trtcl, tr, ch 1 [miss 2 (tr, ch 1, tr in next tr)] to last 4, ch 1, miss 2, tr, trtcl. Ch 2, turn.
Trtcl, tr, ch 2 [InV, ch 2] to last 2, tr, trtcl last. Ch 2, turn. Repeat rows 3-5 9 times
Trtcl, tr, [2 tr in the ch sp, tr next] to last, trtcl. Tie off, leave 40cm tail.
Fold top and bottom corners into meet in the middle, and using the long tails, whip stitch the from the outside corners toward the fold for 10 cm. Repeat for the other side. Take care that you will be able to work 18 trebles into the opening (the gaps between rows) when making the sleeves.
Sleeves
Make 2
Join at the seam with a standing tr, ch1 (or ss to join and ch 4), [tr in the next space between rows, ch1] repeat around, ss to join. You should have 18 trebles. If not, adjust your stitch placement accordingly.
Ss into the ch space, ch 2, tr next ch sp, ch 1 [tr2tog in same sp and next sp, missing the treble in between, ch 1] repeat to last tr2tog in the last sp and 1st sp, ch 1, ss to join.
Ss to ch sp, ch 1, tr same sp, [ch 1, tr next sp], repeat to last, ss to join. Note, there is no ch between the last and 1st trebles, this is a decrease.
Ss to ch sp, ch 2, tr next ch sp, ch 1, [tr2tog in the same sp and next sp, missing the treble in between], repeat to last ch sp, ch 1, tr2tog in the last sp and 1st sp, skipping 2 trebles. Ch 1, ss to join.
Repeat round 3
Repeat round 4
Ss to ch sp, ch 1, tr, ch 1, [tr next ch sp, ch 1] repeat to end, ss to join.
Ss to ch sp, ch 2, tr next sp, ch 1 [tr2tog in the same and next sp, missing treble in between, ch 1], rep to last, tr2tog last sp and 1st sp, ch 1, ss to 1st tr.
Repeat round 7
Repeat round 8
Ss to sp, ch 1, 2 htr in the same sp, [2 htr in the next sp] repeat to last, ss to join.
Repeat round 11. Tie off.
Note: to make the shrug smaller, you can make the join seam longer. This will make the lapels and collar wider, and you will need to work fewer rounds on the sleeves (skip rows 9 and 10).
Your stitch count in round 1 will also be less, but the instructions for rest of the rounds will work if you have fewer trebles as well.
If you like, you can omit the sleeves altogether, and instead work rows 1, 11 and 12 to make a cuff.
Collar
Starting at the marker from the very first row, count and mark the 18th stitch in each direction. This is the bottom of the shrug. Note: Make sure you check to hold the work the right way out, so the sleeves won’t be inside out.
Join at middle marker with a standing tr (or ch 3), ch 1, tr in the same st, [miss 2, (tr, ch 1, tr same)] to marker, remove marker, [miss 1, (tr, ch 1, tr same)] to marker, remove marker, [miss 2 (tr, ch 1, tr same)] to last, ss to join.
Ss to ch sp, ch 1, [tr, ch 1, tr same] in the same space, [tr, ch 1, tr same] in the next ch space, and to the last, ss to join.
Repeat round 2, mark the join, tie off.
Count 16 V-stitches (tr, ch1, tr) and join with an ss to the next ch sp. Ch 2, [dc, ch 1, dc] next ch sp, [htr, ch 1, htr] next ch sp, [tr, ch 1, tr] next 46 spaces, [htr, ch 1, htr] next ch sp, [dc, ch 1, dc] next ch sp, ch 2, ss in the next ch sp, tie off.
Weave in ends, block gently if desired.
Feel free to add an oversized button where the sleeves are seamed if you want to close it like a jacket.
Chart
What do you think? Do you like warm hugs? I’d love you to make this, and you can purchase the yarn from a bunch of great retailers. Scheepjes lists all the shops on their website, and if you’re in the Netherlands I recommend my local yarn store, Caro’s Atelier*.
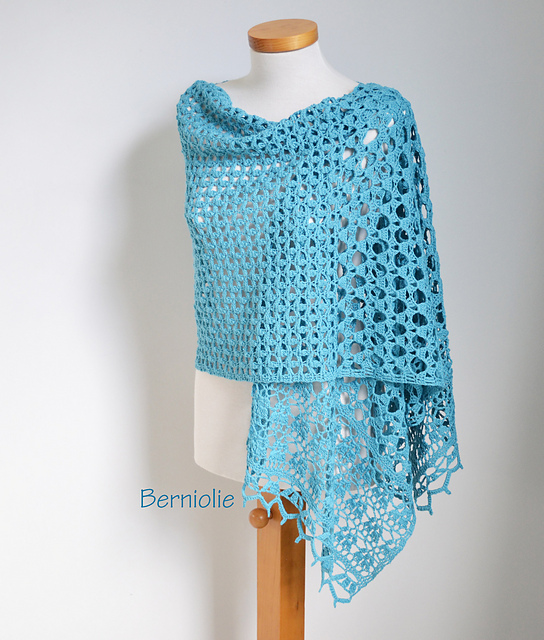
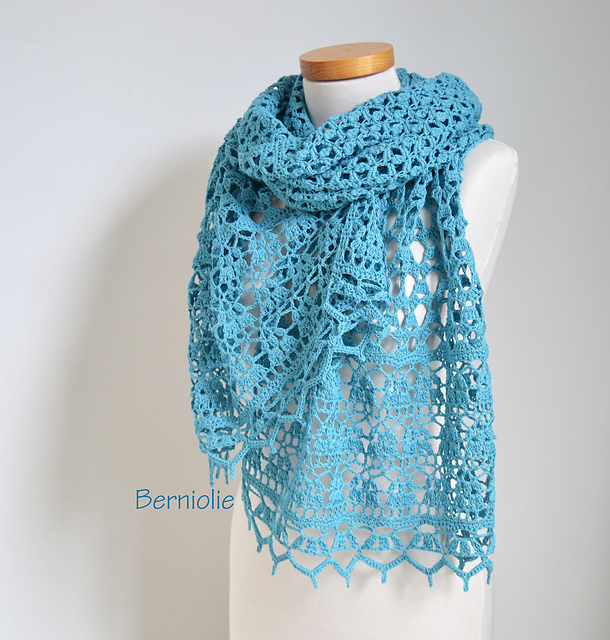
Remember the other day I told you about Berniolie and her Noor shawl? Well, look!
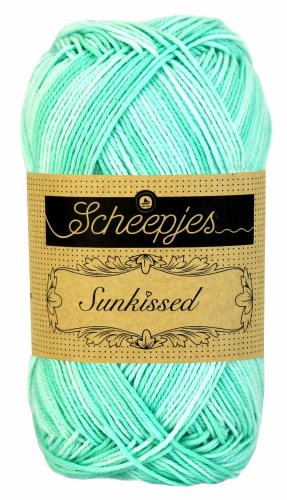
My Scheepjes Sunkissed arrived yesterday and I’m very excited to crack on! So much so that my 3500 other projects are all being shoved to the side while I work on this one!
You can get the pattern on Ravelry here, or Etsy here and you can get the gorgeous yarn from either Wool Warehouse or any Scheepjes retailer.
It’s time to go back to basics and crochet a gorgeous project that I haven’t designed myself. I’ve found myself working on a lot of secret projects that I can’t share with you and I miss that!
Bernadette Ambergen is a designer I wish I had discovered when I first started crocheting. I think if I had, it would have made me a much better crocheter faster by stretching my boundaries and improving my internal stitch library.
She’s also probably the most prolific designer I know of. My friend Tammy and I always joke that she must have an army of minions making everything for her, such is the rate of pattern releases!
I also just love how the construction of her shawls is so varied and different to any other designer out there. Not only that, it’s the mixture of both knitting and crochet in a single design that is so inspiring.
After trawling Ravelry for the perfect project I settled on Noor. It’s a design that is constructed in a way I have never tried before (from the centre outwards) and well, look for yourself. It’s beautiful.
I have a gorgeous shawl for summer in mind. I was tossing up between this and Beach Hut Orange, but in the end I thought I’d get more wear out of this one. I know I should gift it, but I can’t help it. I want it for myself!
So when the yarn arrives I’ll share some more photos, and be sure to keep up on Instagram where I’ll be sharing all the time.
You can get the Sunkissed yarn for the Noor shawl on Wool Warehouse* who ship globally, or from your favourite benelux retailer. You’ll need 7 balls for this design and it’s under 3 euros a ball, so great value!
I’d love you to join me in making this one, please let me know in the comments.
I don’t usually worry too much about Valentine’s Day. When I was younger I was chronically single (and liked it that way), and we’ve never really made a big deal about it in the 10 years we’ve been together. I mean, it’s lovely to celebrate, but it’s not important to me if it’s on the 14th of Feb or the 14th of September, if you know what I mean? My husband is a total romantic anyway, so he doesn’t need a special day to remind him.
But because I love to celebrate love, I’ve found some gorgeous Valentine’s Day inspired projects and ideas for you – focusing on spoiling yourself!
My Instagram friend Vanessa has made a series of gorgeous project bag and hand dyed yarn kits. I’m absolutely in love with this one – the hearts even look crocheted. and the yarn, wow. It’s gorgeous red with sparkle, and I love me some sparkle! Check out the full range here.
This little Bigly Migly is just the sweetest! The pattern is a free Ravelry download by Autumn Leaf, here.
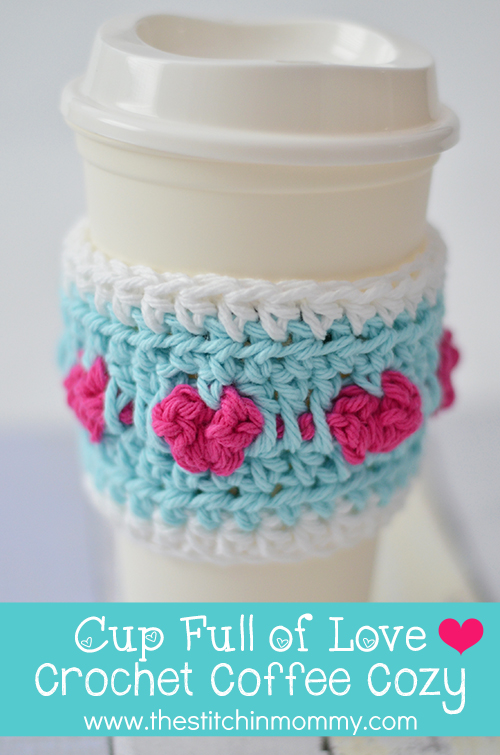
I love mug cozies. I’m not often out and about drinking coffee, but when I am, I want something this cute to stop my fingers from burning! It’s a free pattern from The Stitchin Mommy.
Aren’t these coasters cute? Tatsiana at Lillabjorn made these and they look gorgeous. They’d make a great stash-buster project, don’t you think?
While not knit or crochet, I had to include this tutorial by Tonya at A Love of Family and Home. Tonya shows us how to make those gorgeous felted roses, I think I’ll have to do it too…
Don’t these look lovely and snuggly? Susan from Felted Button has designed these and they’re on Ravelry as a free download. They’re perfect for that romantic Valentine’s Night out in this freezing weather!
Ok Aussies. I realise that it’s a massive heatwave there right now, so even though these aren’t Valentine related, they’re hot weather related! And in all honestly, when I lived in Alice Springs I had thongs (flip flops) for all occasions. These can totally be “Date Night Thongs,” right? These are my own design.
Have a great Valentine’s Day, whether you’re married, single, in love or out of it. Just use it as an excuse to eat great chocolate!