Tag Archives: gratis haakpatroon

Rainbow Ridge Deken – Nederlands Haakpatroon

Hoi hoi!

Ik heb de Nederlandstalige versie van mijn Rainbow Ridge Blanket toegevoegd! Het is hieronder, en ook op Ravelry/Lovecrafts te vinden als je liever een PDF printvriendelijke versie willen gebruiken.

styled shot of crochet blanket

Verkooppunten

Kijk op de Scheepjes website, bij je lievelings LYS of:

Caro’s Atelier*
Wool Warehouse* (buiten Europa)


Materialen

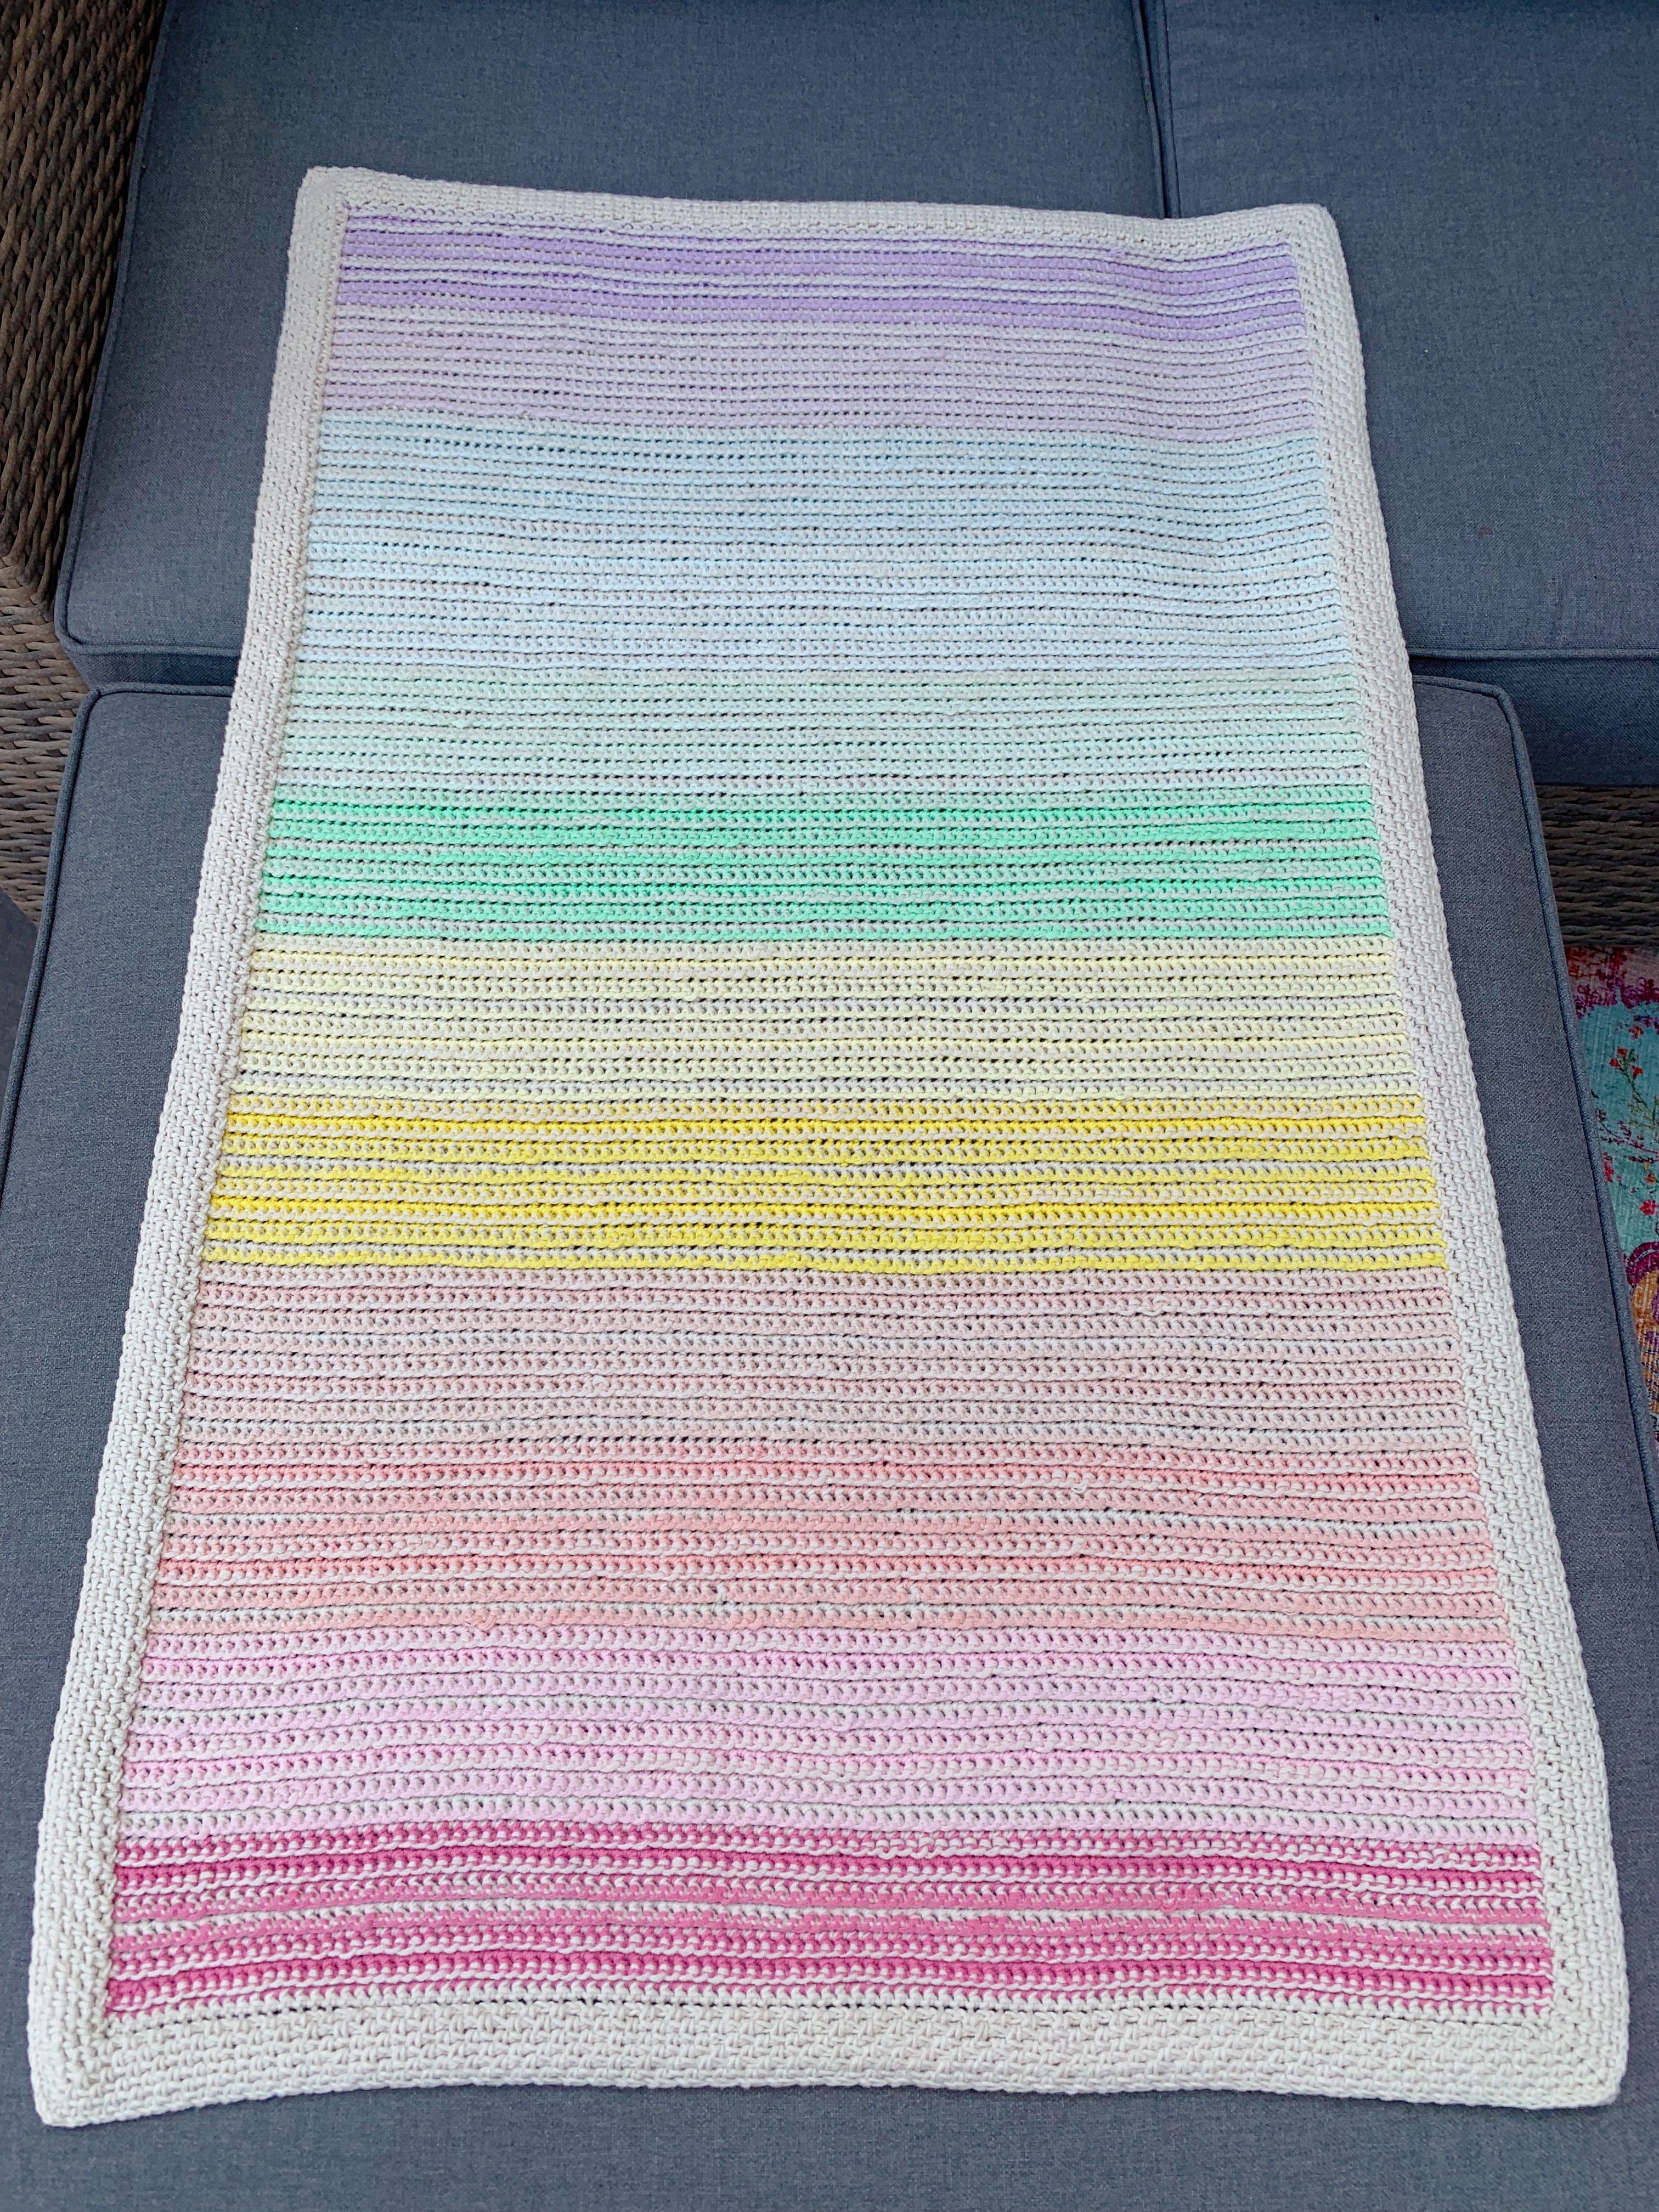
6 bollen Scheepjes Softfun in 2622 Latte
1 Scheepjes Softfun minis colour pack in pastel
5 mm haaknaald (deken)
4 mm haaknaald (rand)
6 mm haaknaald (hv toer om de rand te beginnen)

Afmetingen

100 x 70 cm na opspannen (kan iets kleiner uitvallen door spanning in het garen)

Stekenverhouding

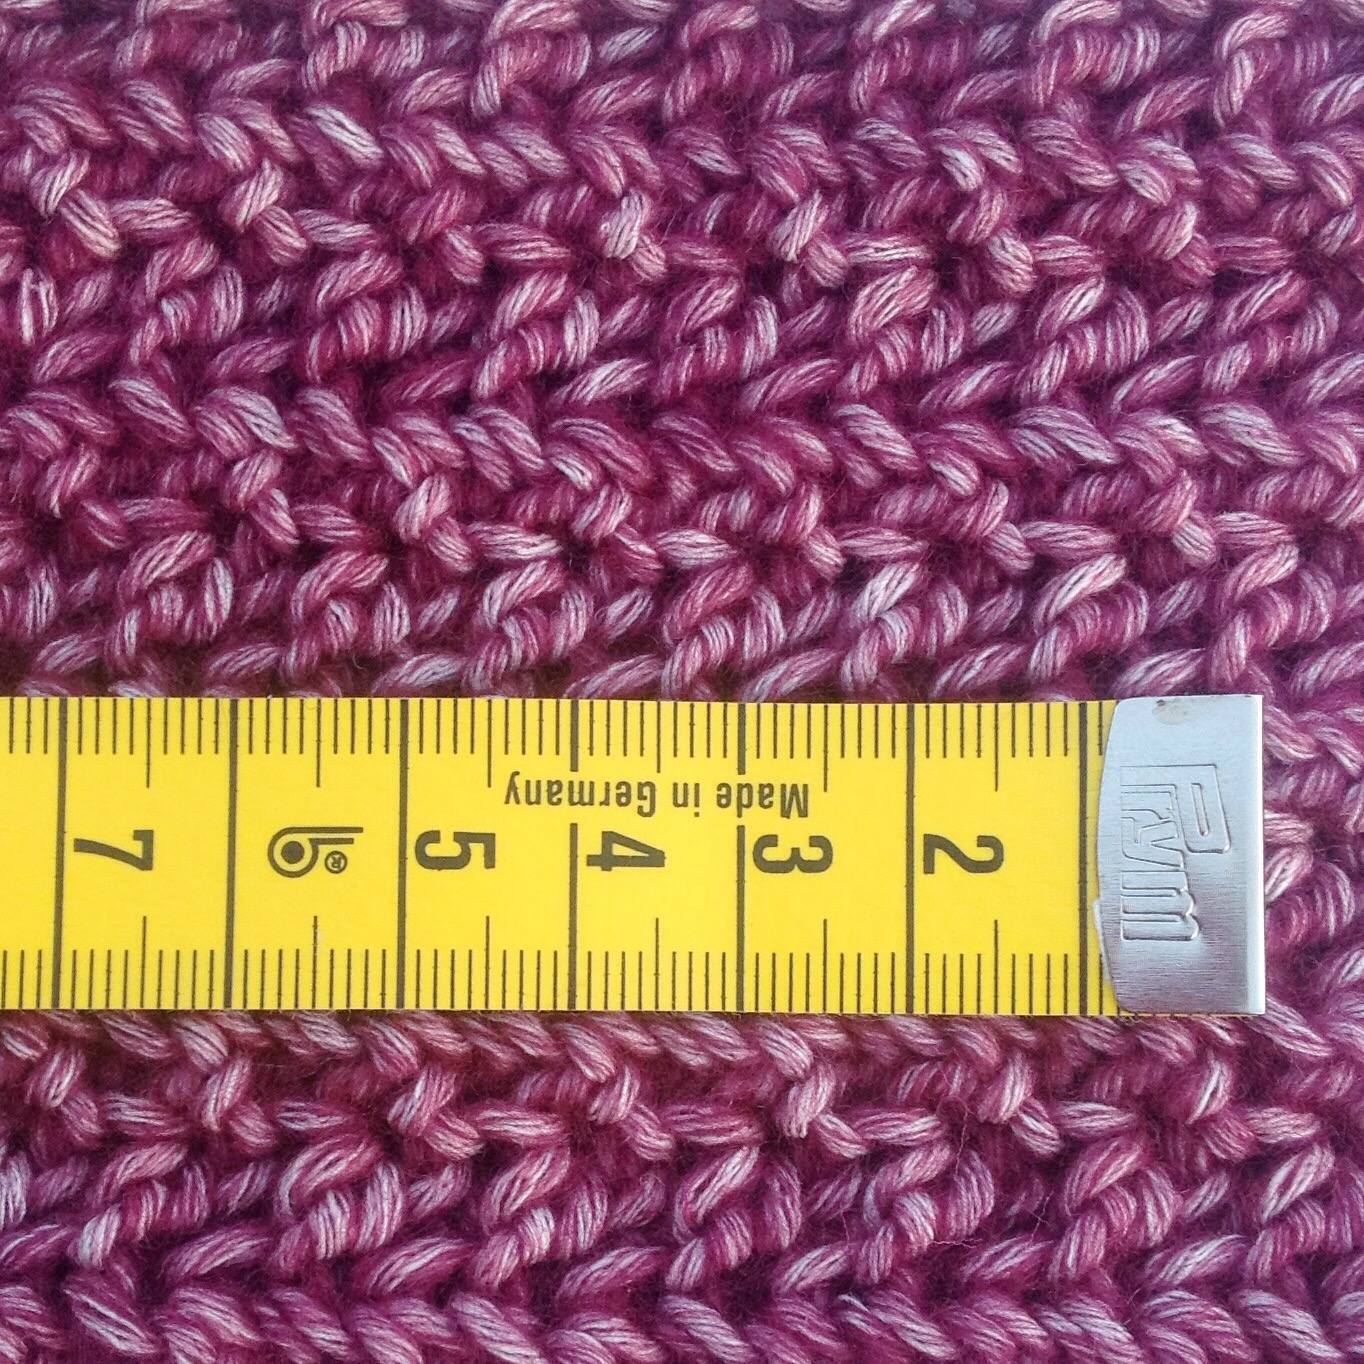
18 stn en 19 rijen meten 10 cm in patroon. Houd de stekenverhouding goed in de gaten, want je hebt weinig speling met deze kleine bolletjes.
Afkortingen

(NL termen)
L losse
Hv halve vaste
S(tn) steek/steken
l-open lossen opening
St stokje(s)
SOv sla-over vaste (zie speciale steken)
HK hoofdkleur (2622 Latte)
K(1) kleur (1)
Herh herhalen
VK Voorkant
AK Achterkant

Notities

Je haakt het patroon in rijen heen en weer, met de SOv techniek (zie Speciale steken). Daarna haak je de dubbele rand in toeren.

Elk rij begint met een l1. Dit telt niet als een steek.

Herhalingen

[(…)] herhaal de instructies tussen haakjes het totaal aantal keer aangegeven.

Sorteer de kleuren in deze volgorde:

K1: 2514 Rose
K2: 2513 Light Rose
K3: 2620 Starfish
K4: 2466 Peach
K5: 2518 Canary
K6: 2496 Banana
K7: 2640 Mint
K8: 2639 Green Tea
K9: 2630 Arctic
K10: 2646 Glacial Mist
K11: 2658 Lavender
K12: 2657 Orchid

Speciale steken

SOv (Sla-over vaste) is een techniek waarmee we een steek met twee draden tegelijk haken. Met de eerste kleur, steek naald in steek en sla de draad om de haaknaald. Haal de lus op. Met de tweede kleur, sla draad om van voor naar achter (houd de tweede kleur voor de eerste), met de eerste kleur, sla draad om en haal de eerste kleur door alle lussen.. Zie video instructies hier. Ook op Youtube.

Crochet blanket from above

Instructies

Rij 1 Met HK, 102l, 1v in derde l en alle l tot einde van rij, keer om. (100 stn)
Rij 2 Met K1 als leidende kleur, samen met HK, l1, SOv in alle stn tot rij-eind, keer om.
Rij 3-6 Herh Rij 2.
Rij 7 Met HK als leidende kleur, herh Rij 2.
Rij 8-10 Herh Rij 7.
Rij 11-14 Herh Rij 2, knip draad K1 af.
Rij 15 Wissel naar K2, met HK als leidende kleur, herh Rij 7.
Rij 16-18 Herh Rij 7.
Rij 19 Met K2 als leidende kleur, herh Rij 2.
Rij 20-22 Herh Rij 2.
Rij 23 Met HK als leidende kleur, herh Rij 7.
Rij 24-26 Herh Rij 7.
Rij 27 Met K2 als leidende kleur, herh Rij 2.
Rij 28-30 Herh Rij 2, knip draad K2 af.
Rij 31-46 Met K3, herh Rij 15-30.
Rij 47-62 Met K4, herh Rij 15-30.
Rij 63-78 Met K5, herh Rij 15-30.
Rij 79-94 Met K6, herh Rij 15-30.
Rij 95-111 Met K7, herh Rij 15-30.
Rij 112-127 Met K8, herh Rij 15-30.
Rij 128-143 Met K9, herh Rij 15-30.
Rij 144-159 Met K10, herh Rij 15-30.
Rij 160-175 Met K11, herh Rij 15-30.
Rij 176-191 Met K12, herh Rij 15-30. Knip draad K12 af.

Rand

De rand haak je in toeren, eerst met een 6 mm en daarna een 4 mm haaknaald.

Toer 1 Deze toer wordt de VK. Met HK en 6 mm haaknaald, keer om, 2l, 1hv in elke s tot einde van rij (dit is nu de hoek), 2l, roteer 90 graden, 1hv in elk rij-eind, zo dichtbij de zijkant als mogelijk, tot de volgende hoek, 1hv in de hoek, 2l, roteer 90 graden, 1hv in elke l tot de volgende hoek, roteer 90 graden, 1hv in elk rij-eind tot de laatste hoek, sluit met een hv in eerste s.

Toer 2 Met 4 mm haaknaald, 1l, 1v in de hoek-open [(1l, sla 1 s over, 1v in l-open) tot hoek-open, 2l, 1v in l-open], herh tot einde van toer, sluit toer niet in laatste l-open, maar haak hv in v.

Toer 3 1hv in elke s tot hoek-open, 1l, [(1l in l-open, 1l) tot hoek-open, (1v, 2l, 1v) in hoek-open], herh tot einde van toer, 1l, sluit af met hv in v.

Toer 4 Herh Toer 3, maar voeg 1 extra herh van (1l, v, 1l) toe voordat je de toer sluit met een hv.

Toer 5 Herh Toer 4, hecht af.

Omdraaien naar AK Hecht aan in in AK van dezelfde hoek als Toer 1 van de rand, en haak Toer 1 opnieuw, maar nu in de AK van de hv van Toer 1 (VK). Herh daarna Toer 2-5 (deze bevinden zich dus aan AK).

Omdraaien naar VK We sluiten nu de dubbele rand en verbergen alle draadjes daarin als volgt: 1l, 1v in l-open van zowel laatste AK als laatste VK toer, [(1l, 1v in l-open van beide toeren) tot de hoek-open, (1v, 1l, 1v in beide toeren) in hoek l-open], herh tot einde van toer, sluit af met een hv.

Hecht af, weef alle eindjes weg, span op maat op.

close up of crochet blanket rolled

*affiliate link

Peek-a-Boo Button Wrap Pattern Size S-XL

Here it is, what you’ve been waiting for – the pattern for the Peek-a-Boo Wrap!

Peek-a-Boo Wrap free crochet pattern size S-XL on missneriss.com #haken

I’ve made this for you in four different sizes, from Small through to XL.

Here you can find a written pattern for size Medium, and below you can find a chart which will give you the measurements and stitch counts for sizes Small, Large and XL.

For the Dutch speakers among us, I’ve also had the design translated.  You can find it here. Veel plezier!

You can pick up the yarn at Scheepjes retailers all over the Benelux including Caro’s Atelier*, or internationally from Wool Warehouse* and Deramores*.

And even better, Esther from It’s all in a Nutshell has created a video tutorial, which is enormously helpful!

Are you ready?

What You Need

Scheepjes Stone Washed XL in 850 (Garnet) – 12 balls for size M (I used 11, but get an extra to be safe)
S = 10 balls (each ball of Stone Washed XL has 75 metres)
M = 12 balls
L = 15 balls
XL = 17 balls
7cm bamboo button – you can pick these up at any good craft store, or online
Size 5mm hook (or hook to obtain gauge)
Measuring Tape
Scissors
Tapestry Needle
Eucalan wool wash

Gauge

8 stitches x 5 rows = 5cm x 5cm
gauge across gauge up

Stitches

Note: All stitches are in US terms
Chain (CH)
Half Double Crochet (HDC)
Half Double Crochet Back Loop Only (HDCBLO)
Half Double Crochet Front Loop Only (HDCFLO)

Size Medium

  1. Chain loosely 119 stitches.  If you’re a tight crocheter, consider going up a hook size to make sure that the chain isn’t too tight.
  2. HDC into the third chain from the hook, and all the way across (a total of 117 stitches across).  CH2, turn.
  3. HDCBLO in the first stitch, HDCFLO in the next.  Repeat this front and back (HDCBLO/FLO) format all the way across, CH2, turn.  Note:  It’s important to ensure that you have an odd number of stitches to make it easier to achieve the texture of the stitches.  If you finish the row in the back loop, when you start the next row, start in the front loop and vice versa.  You’ll find very quickly as you go that the look of the wrap will be different if you don’t maintain the BLO then FLO stitch pattern in alternating stitches.Stitch view vest
  4. Repeat this pattern building rows for 25cm.
  5. Now we are going to make the first sleeve.  Follow the HDCBLO/FLO pattern for 20 stitches, then CH 35, skip 35, then continue the HDCBLO/FLO pattern all the way to the end.  Make sure you double check that you stitch into the BLO or FLO correctly (if the stitch in the row below was FLO, you need to stitch into the BLO).
  6. HDCBLO/FLO to the chain from the previous row, then HDC 35 into the chain, then continue the HDCBLO/FLO to the end.  the short end becomes the collar of the wrap.
  7. Repeat step 3 for a further 37cm and then we will make the next sleeve.  Making sure you start from the top of the collar and work down (add a row if you need to), repeat steps 5 and 6.
  8. Continue building the final front panel, for 25cm, then we will make the button hole.button large
  9. Starting from the top of the collar, repeat the HDCBLO/FLO pattern for 37 stitches.  Chain 7, skip 7 stitches, then repeat the HDCBLO/FLO pattern all the way to the end.
  10. HDCBLO/FLO to the chain from the previous row, then HDC 7 into the chain, then continue the HDCBLO/FLO to the end.
  11. Build a further 7 rows, or complete your ball of yarn.  Tie off, weave in ends.
  12. Sew button on the opposite end of the garment to the button hole 9cm from the end, 25cm from the top.Peek-a-Boo Wrap free crochet pattern size S-XL on missneriss.com #haken
  13. Block, stretching a little (especially the length) and you’re done!

Peek-a-Boo Wrap free crochet pattern size S-XL on missneriss.com #hakenThe back of the body warmer

Size Chart

You can switch out the stitch counts and centimetres in the written pattern above for the numbers in the chart below, depending on your required size.

SMALL MEDIUM
CM Rows CM Rows
Length 70 Chain 117 + 2 70cm Chain 117 + 2
Back 32 32 37 37
Front (button) 20 20 25 25
Front (button hole) 27 27 32 32
CM Stitch Count CM Stitch Count
Start Sleeve 12.5 20 12.5 20
End Sleeve 20 32 22.5 35
Start Button Hole 23 37 23 37
Button Hole Size 7 7
LARGE X-LARGE
CM Rows CM Rows
Length 75cm Chain 123 + 2 75cm Chain 123 + 2
Back 42 42 47 47
Front (button) 30 30 35 35
Front (button hole) 37 37 42 42
CM Stitch Count CM Stitch Count
Start Sleeve 15 24 17.5 28
End Sleeve 25 39 27.5 43
Start Button Hole 25 40 25 40
Button Hole Size 7 7

*Affiliate Link