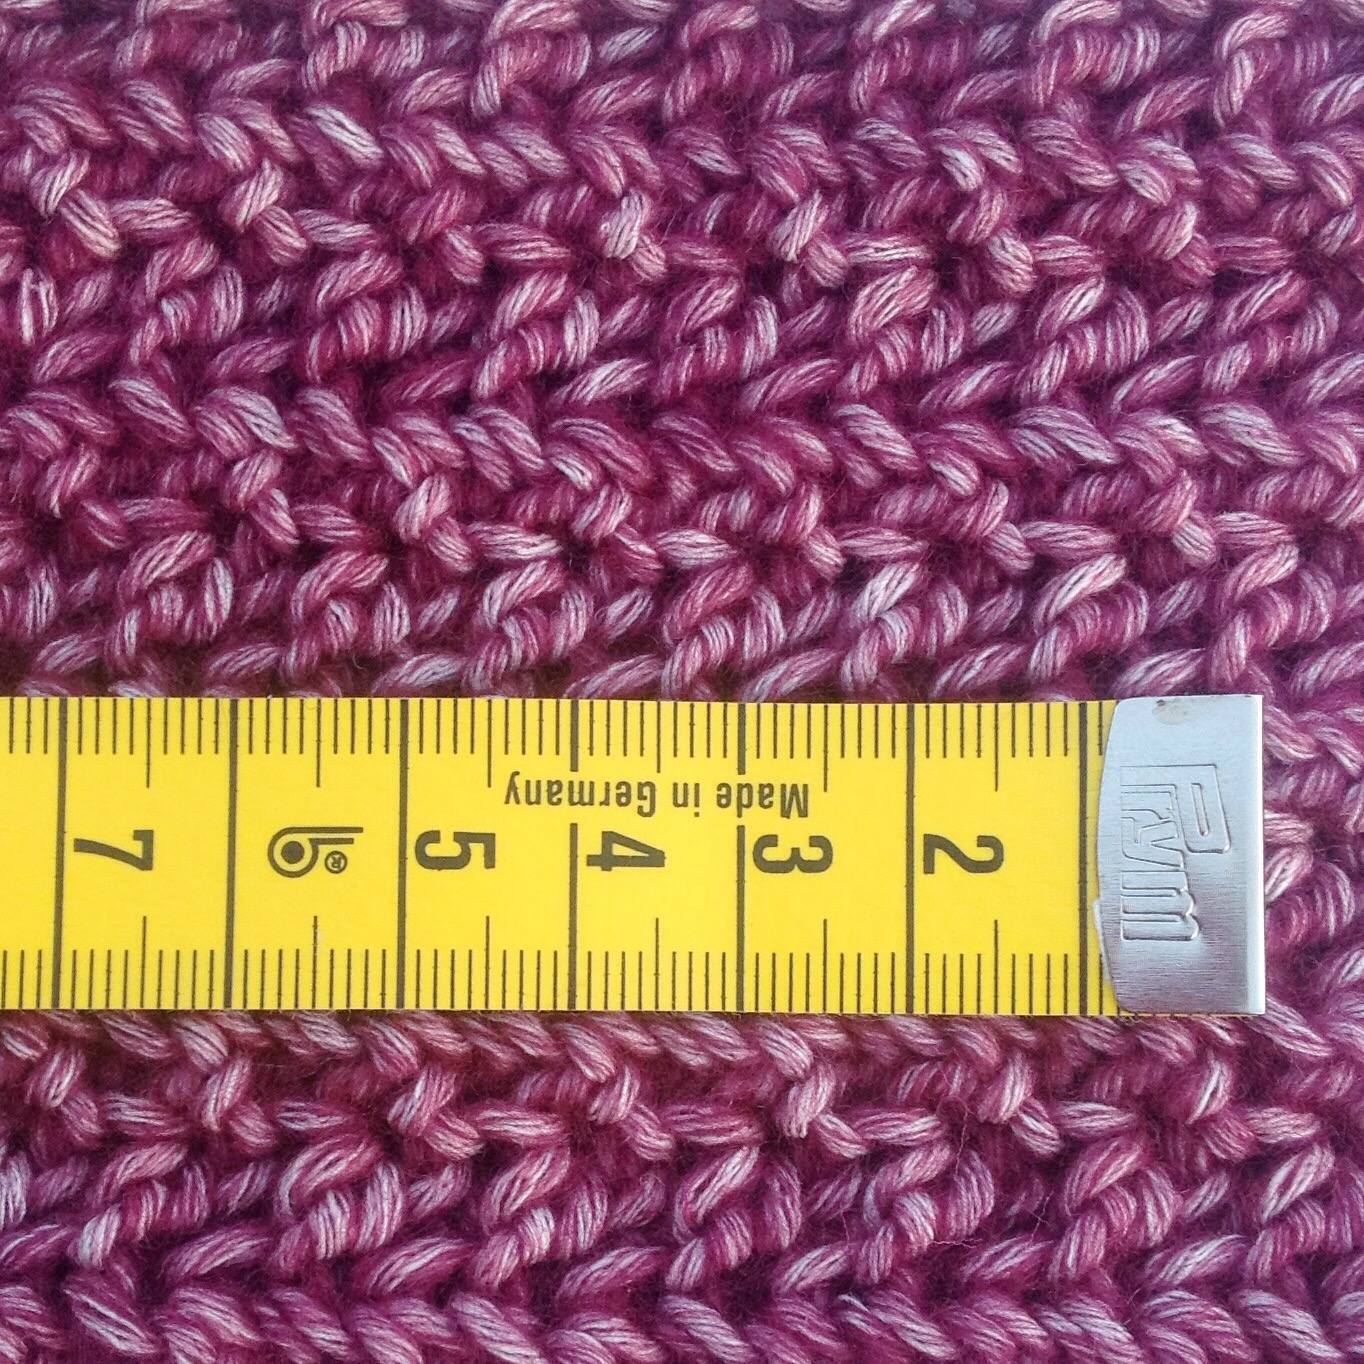
Usually I’m all about the pastels, as you know. But, in 2022 I’m obsessed with neon. I have an acid neon green floor length coat, I have the craziest neon pink sandals. So when Scheepjes launched their new neon catona colours, I knew I needed to get my hand on a few balls.
I have all four new neon colours: 601 neon yellow 602 neon green 603 neon orange 604 neon pink
And I also picked up a couple of balls of black, because the colours are all best friends.
Get the yarn
Scheepjes Catona is a 100% mercerised cotton, fingering weight yarn, with balls available in 50g, 25g and teeny tiny 10g sizes.
Scheepjes has a full list of stockists on their website.
Wool Warehouse ships all over the world from the UK Caro’s Atelier is my LYS and they also ship across Europe LoveCrafts.com also stock most colours
See what I mean about the shoes? Stay tuned to see what becomes of the yarn!
Scheepjes Cahlista is an aran weight yarn, made with 100% cotton. I’m using two balls of colour 074 Mercury, and you will also need a single ball of the complementary colour. Have a look at the Scheepjes Website for colour inspiration and stockists, there are more than 100 colours to choose from!
You can order the yarn online from my local yarn store Caro’s Atelier*.
Note: this version of the pattern uses UK terms. If you would like to access US terms or printable PDFs in both UK and US terms, you can purchase the patterns from either Ravelry or Lovecrafts.com for a small fee.
Please share your projects using #KoalaLovey in the socials and tag me everywhere!
Let’s go!
Materials
MC: Scheepjes Cahlista in 074 Mercury – 2 balls (100% cotton, aran weight, 50g, 85m) CC: Scheepjes Cahlista in your choice – 1 ball (100% cotton, aran weight, 50g, 85m) Scrap black, preferably Scheepjes Cahlista – about 2 metres I used 385 Chrystalline and 256 Cornelia Rose in my samples. 4mm hook (amigurumi parts) 6mm hook (mini-blanket) 5mm hook (border of mini-blanket) Toy filling (or you can stuff the head with scrap yarn or anything you have at home that will be a bit squishy)
Tension
Mini-blanket: 16 rows and 17sts over 10 cm in YUdc
Head: not important, but stitches should be tight, so use at least a hook size down from what the yarn recommends.
Measurements
Mini-blanket – 30 x 30cm blocked
Abbreviations
(UK terms) Ch chain MR magic ring Ss slip stitch St(s) stitch(es) Ch chain Dc double crochet DcInc double crochet increase (2 sts increased in 1 st) Dec double crochet decrease (1 st worked decreased over 2 sts) HtrInc half treble crochet increase (2 sts increased in 1 st) Tr treble crochet YUdc yarn under double crochet MC main colour CC contrast colour. Rep repeat Pm place marker Rm remove marker Flo front loop only Blo back loop only
Pattern Notes
This pattern is worked both amigurumi style in continuous rounds (with no joining) and sewn together to make the koala’s head, and also back and forth in rows using the yarn under colourwork technique to make the mini-blanket.
Work instructions inside parentheses (…) the indicated number of times.
Special Abbreviation
YUdc (yarn under double crochet) is a colourwork technique using two strands of working yarn. To work the stitch insert hook with mc, yoh, pull up a loop, with cc yoh from front to back (keeping cc in front of mc), with mc yoh, pull through 3 loops.
Round 1 6dc in MR (mark first st and move marker up each round to keep track of starting point) (6) Round 2 6dcinc (12) Round 3 (inc, dc) six times (18) Round 4 (inc, 2dc) six times (24) Round 5 (inc, 3dc) six times (30) Round 6 (inc, 4dc) six times (36) Round 7-17 36dc (36) Round 18 dec twice, pm second dec, 14dc, dec twice, pm second dec, 13dc, dec, rm. (32) Round 19 dec, pm, 12dc, dec twice, rm, pm second dec, 11dc, dec, ss. (28)
Cut yarn, leave tail long enough to sew top shut when assembling.
Ear
(make 2) Working in rounds, with MC and 4mm hook
Round 1 6dc in MR (6) Round 2 6dcinc (12) Round 3 (inc, dc) six times (18) Round 4 inc, pm in second st of inc, 8dc, inc, pm in second st of inc, 9dc (20) (starting point is moved by 1st ) Round 5 20dc Round 6 inc, pm in second st of inc, 9dc, inc, pm in second st of inc, 10dc (22) (starting point is moved by 1 st) Round 7-10 22dc. Ss (22)
Cut yarn and leave tail to sew to head when assembling.
Nose
Working in rounds, with black and 4mm hook
Round 1 6dc in MR (6) Round 2 6dcinc (12) Round 3 (3htrinc, 3dc) twice, ss to join (18)
Cut yarn, leave long tail to sew to head and make eyes.
Mini Blanket
Working back and forth in rows using both MC and CC, 6mm hook
Row 1 MC, ch42 Row 2 YUdc in third loop and each ch across to end (40) Row 3 ch1 (does not count as a st), YUDC to end (40) Row 4-42 rep row 3 (40)
Cut MC and continue working the border in CC.
Border
Working in rounds 5 and 6mm hooks
Round 1 turn, with 6mm hook, work 40ss loosely across to corner, ch1, 40ss across the rows (note, there are two more rows than border sts, so you will need to “lose” two sts). Continue around to end and ch1 and ss to 1st st of the round. Round 2 change to 5mm hook, ch2, working into the ss, [tr to corner ch (tr, ch1 tr) in flo of corner ch], rep around to end, ss to join. Cut yarn. Round 3 flip your work so the back is facing you, ss to join at a corner, ch2, tr in the back of the ss from round 1, rep round 2. Round 4 now we’ll join the two rounds. Ch1, dc in the flo of round 3 sts and the corresponding blo from round 2 sts to join the two rounds together. Rep to corner, 3dc in the corner ch, then rep all the way round to end. Ss to join, cut yarn, weave in ends and block.
Assembly
Position nose 7 rounds below opening at mid-point between markers, sew to head. Make eyes 1 st to the side of the nose, 3 sts wide and slightly angled (1 round) upwards at the outer side. Fasten the eye loop on row below to fix it in place.
Stuff the head with toy filling and sew shut. Attach ears to side of head on an angle, 3 sts in from the sides of the sewn shut head.
Sew the head to the middle of the blanket, either using the leftover yarn tails, or a new length of yarn, using round 3 of the head as your guide.
Last week I told you about the baby project that I’m working on and I’m making great progress!
My little Koala Lovey is really starting to take shape!
There are almost as many stitch markers as pieces!
Right now it’s a bit like a jigsaw puzzle, everything is there, it all just needs to find the perfect placement so it all fits together, just so.
If you don’t know what a lovey is, I think it’s a very technical term for a stuffed animal head attached to a little square of fabric that babi’s absolutely love to snuggle with and munch on. I remember how much my daughter enjoyed hers, it was adorable! I made a bunch in the past, it was like a mini production line there for a while as babies seemed to be popping out all over the place!
GET THE YARN
Scheepjes Cahlista is an aran weight yarn, made with 100% cotton. I’m using two balls of colour 074 Mercury, and you will also need a single ball of the complementary colour. Have a look at the Scheepjes Website for colour inspiration and stockists, there are more than 100 colours to choose from!
You can order the yarn online from my local yarn store Caro’s Atelier*.
I never really appreciated the colours of Autumn growing up. In Australia we have mostly evergreen trees – Eucalyptus, Acacia, Melaleuca and the like. They tend to look (and smell) beautiful all year round.
It wasn’t until I moved to the northern hemisphere that I really learned to appreciate it. Driving through the Devon lanes and wandering the old forests and moors of de Veluwe in October, or dreaming of visiting Canada in the Autumn. It’s something that the average Australian just doesn’t really get to experience at home.
The biggest joy of them all, however, are the toadstools! Nothing quite triggers the “I’m living in a fairy tale” feeling quite like finding one of these beauties while out wandering.
The glorious shades of red and orange inspired me to choose Scheepjes River Washed(XL) in the colour Avon for my autumn/winter hat pattern, which I’ll be sharing with you over the next few weeks.
Isn’t that colourway perfectly Autumn?
And when you look at the balls in the sunshine, it’s like they’re on fire, the way the forest looks when hit by the late afternoon sunshine in October. I love it.
Get the Yarn
Scheepjes has a complete list of stockists on their website. Most of their retailers stock Stone Washed and River Washed, but if not, don’t be afraid to ask them to get it in!
Here in the Netherlands, Caro’s Atelier* has River Washed and River Washed XL, plus they’re my LYS (and awesome).
In the US, Jimmy Beans stocks Stone Washed and Stone Washed XL, which you can easily substitute for River Washed.
In Australia Little Woollie also stocks Stone Washed and Stone Washed XL
For my hat project you’ll need two balls of River Washed and one ball of River Washed XL. You can easily substitute Stone Washed, as it’s essentially the same yarn with a different coloured core (white core in SW opposed to a coloured core in RW). The sizing will be for adults, but my daughter is already asking for her own, so let’s see how that goes later on!
Stay tuned for progress in the next week or so, but in the meantime I want to know your favourite Stone Washed or River Washed colourway. Who knows, I’m thinking of gifting some – ’tis the season afterall! Let me know on my Instagram.
Have you seen the latest monthly publication from Scheepjes?
It’s called Pretty Little Things, or Klein Maar Fijn in Dutch, and it’s released every month with three designs which are accessible to everyone, with a crochet, knit and sewing pattern in each one.
The Most recent is called Beach and I have a pattern to share!
My design is called Toes in the Sandals, and they’re super cute, a pair of stylish sandals that you can wear at the beach or out and about because they’re so comfy!
The sandals are made using a single ball each of Scheepjes Maxi Sweet Treat, in two (or just one if you prefer) of your favourite colours. You’ll also need a pair of foam soles, which are easy to come by, I’ll share the stockist links below.
I’ve also used a fun crochet technique which prevents the straps from stretching out, which in shoes, unlike your most comfy jeans, is not what you want, right?
There are two other designs featured in the publication, one is a knit beach cover-up (or stylish top!) called Blue Skies Top, using Cotton 8 from Pat Strong:
The third design is the lovely Below The Reef Bag from Ingrid Peters, a colourful beginner-friendly sewing project for crafters looking to create a fun bag to for all summer essentials.
It also has undersea embroidery which is so much fun to do!
To get the publication and the yarn, visit any of your favourite Scheepjes stockists, almost everyone stocks it because it’s such a fantastic yarn. I use it for embroidery as well as crochet, I love it!
Also, in NL, check out Caro’s Atelier* – my local yarn store. For the rest of the world, Wool Warehouse* is shipping everywhere again, so they can get it to you.
You can also get a digital copy of the pattern via Ravelry.
In this lovely Dutch weather, it’s the perfect time to be getting your beach on, enjoy!
It’s been a long time in the making, but here she is!
The pattern is available to download from Ravelry here. Through the end of this weekend (until the 12th of July 2020) you will receive 50% off the pattern, plus an extra surprise at checkout, so don’t wait too long!
If you have issues with Ravelry access, please reach out to me at missnerisscrochet@gmail.com and we will arrange an easy alternative for you.
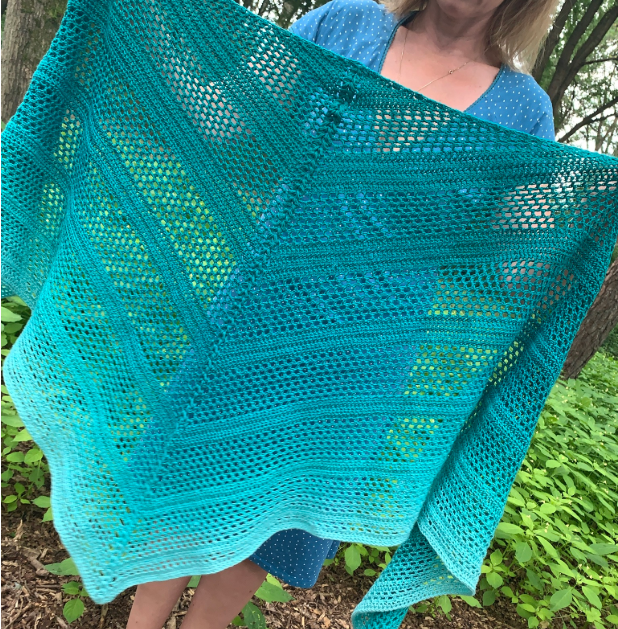
Why Shallow?
I wanted to create a shawl that had enough wingspan to wrap around my shoulders, cross over my chest and tie in a knot behind my back – Claire Fraser style, but not so big that it would be cumbersome.
So I needed to figure out construction to make a more obtuse angle, and eventually Shallow came to life, named for the more shallow depth.
What yarn do you need?
The pattern calls for either three balls of Scheepjes Metropolis (150g fingering weight yarn), or a single Scheepjes Whirl (or Woolly Whirl) cake. There are instructions included for both yarns, so you can choose your favourite.
My Whirl sample is made with shade 560 Jade Jim Jam and the Metropolis version uses 045 Perth. I think the design suits both a solid colour and the long whirl colour changes perfectly.
Get the supplies
Wool Warehouse* ships globally (although check their shipping process due to Covid-19 restrictions if ordering from outside the UK) Choose your Scheepjes Whirl here*. Choose your Scheepjes Metropolis here*.
Caro’s Atelier will also ship pretty much everywhere, and they’re my local yarn shop (and great people!) Choose your Scheepjes Whirl here*. Choose your Scheepjes Metropolis here*.
(If you own a yarn store and stock either or both of the listed yarns, please feel free to add direct links to your product page in the comments of this post.)
Tips from me
One thing you’ll see quickly is that the stitch placement is a bit tricky while you’re getting the hang of the pattern. I recommend you use stitch markers to keep track of your counts to prevent one side suddenly becoming longer than the other.
Another tip: if you match gauge, you’ll be able to follow the instructions without much issue, but if you find using Whirl that your tension is looser than mine, you can follow the Metropolis instructions instead. It will just mean fewer rows to work.
The pattern includes two charts which will help you progress, and there’s a handy puff stitch video that I’ve linked in the pattern as well.
Finally, as with all patterns, the more languages the better! If you would like to volunteer to translate this pattern into your local language, please do reach out to me via email (missnerisscrochet.com) and we can go through it together.
Enjoy, I can’t wait to see your ravelry projects and instagram posts. Use #shallowshawl so I can find it, and tag me @miss__neriss.
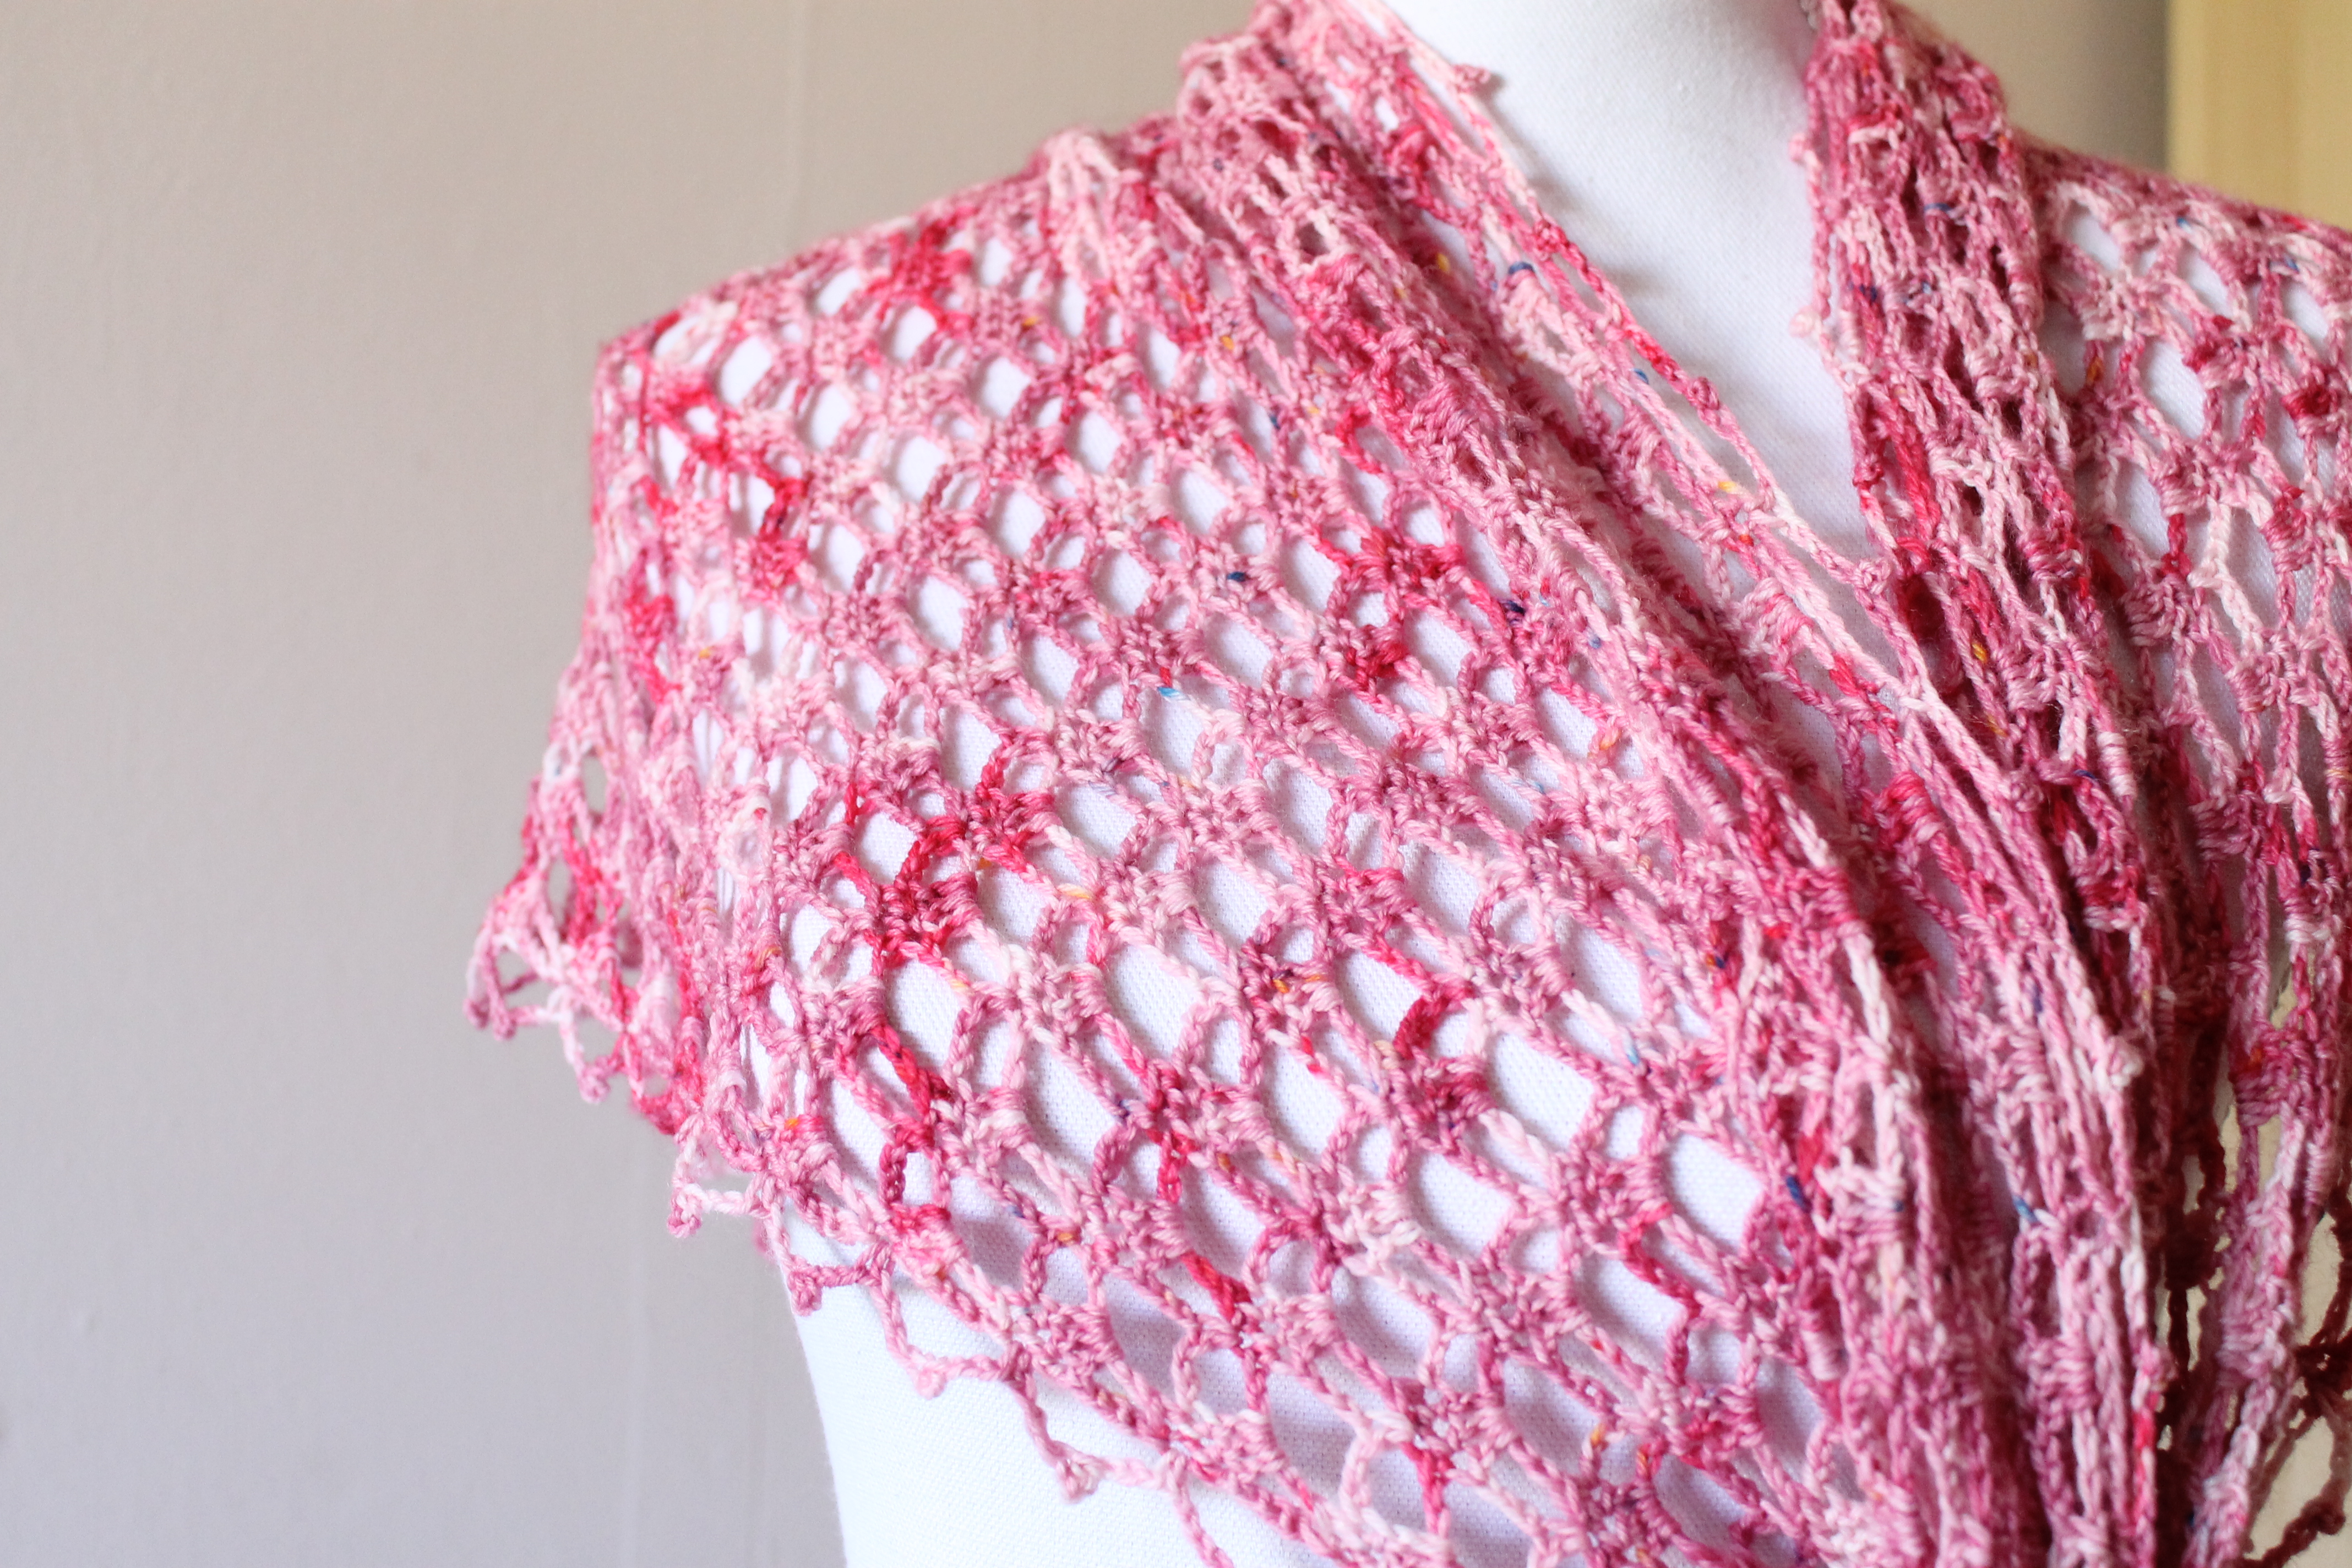
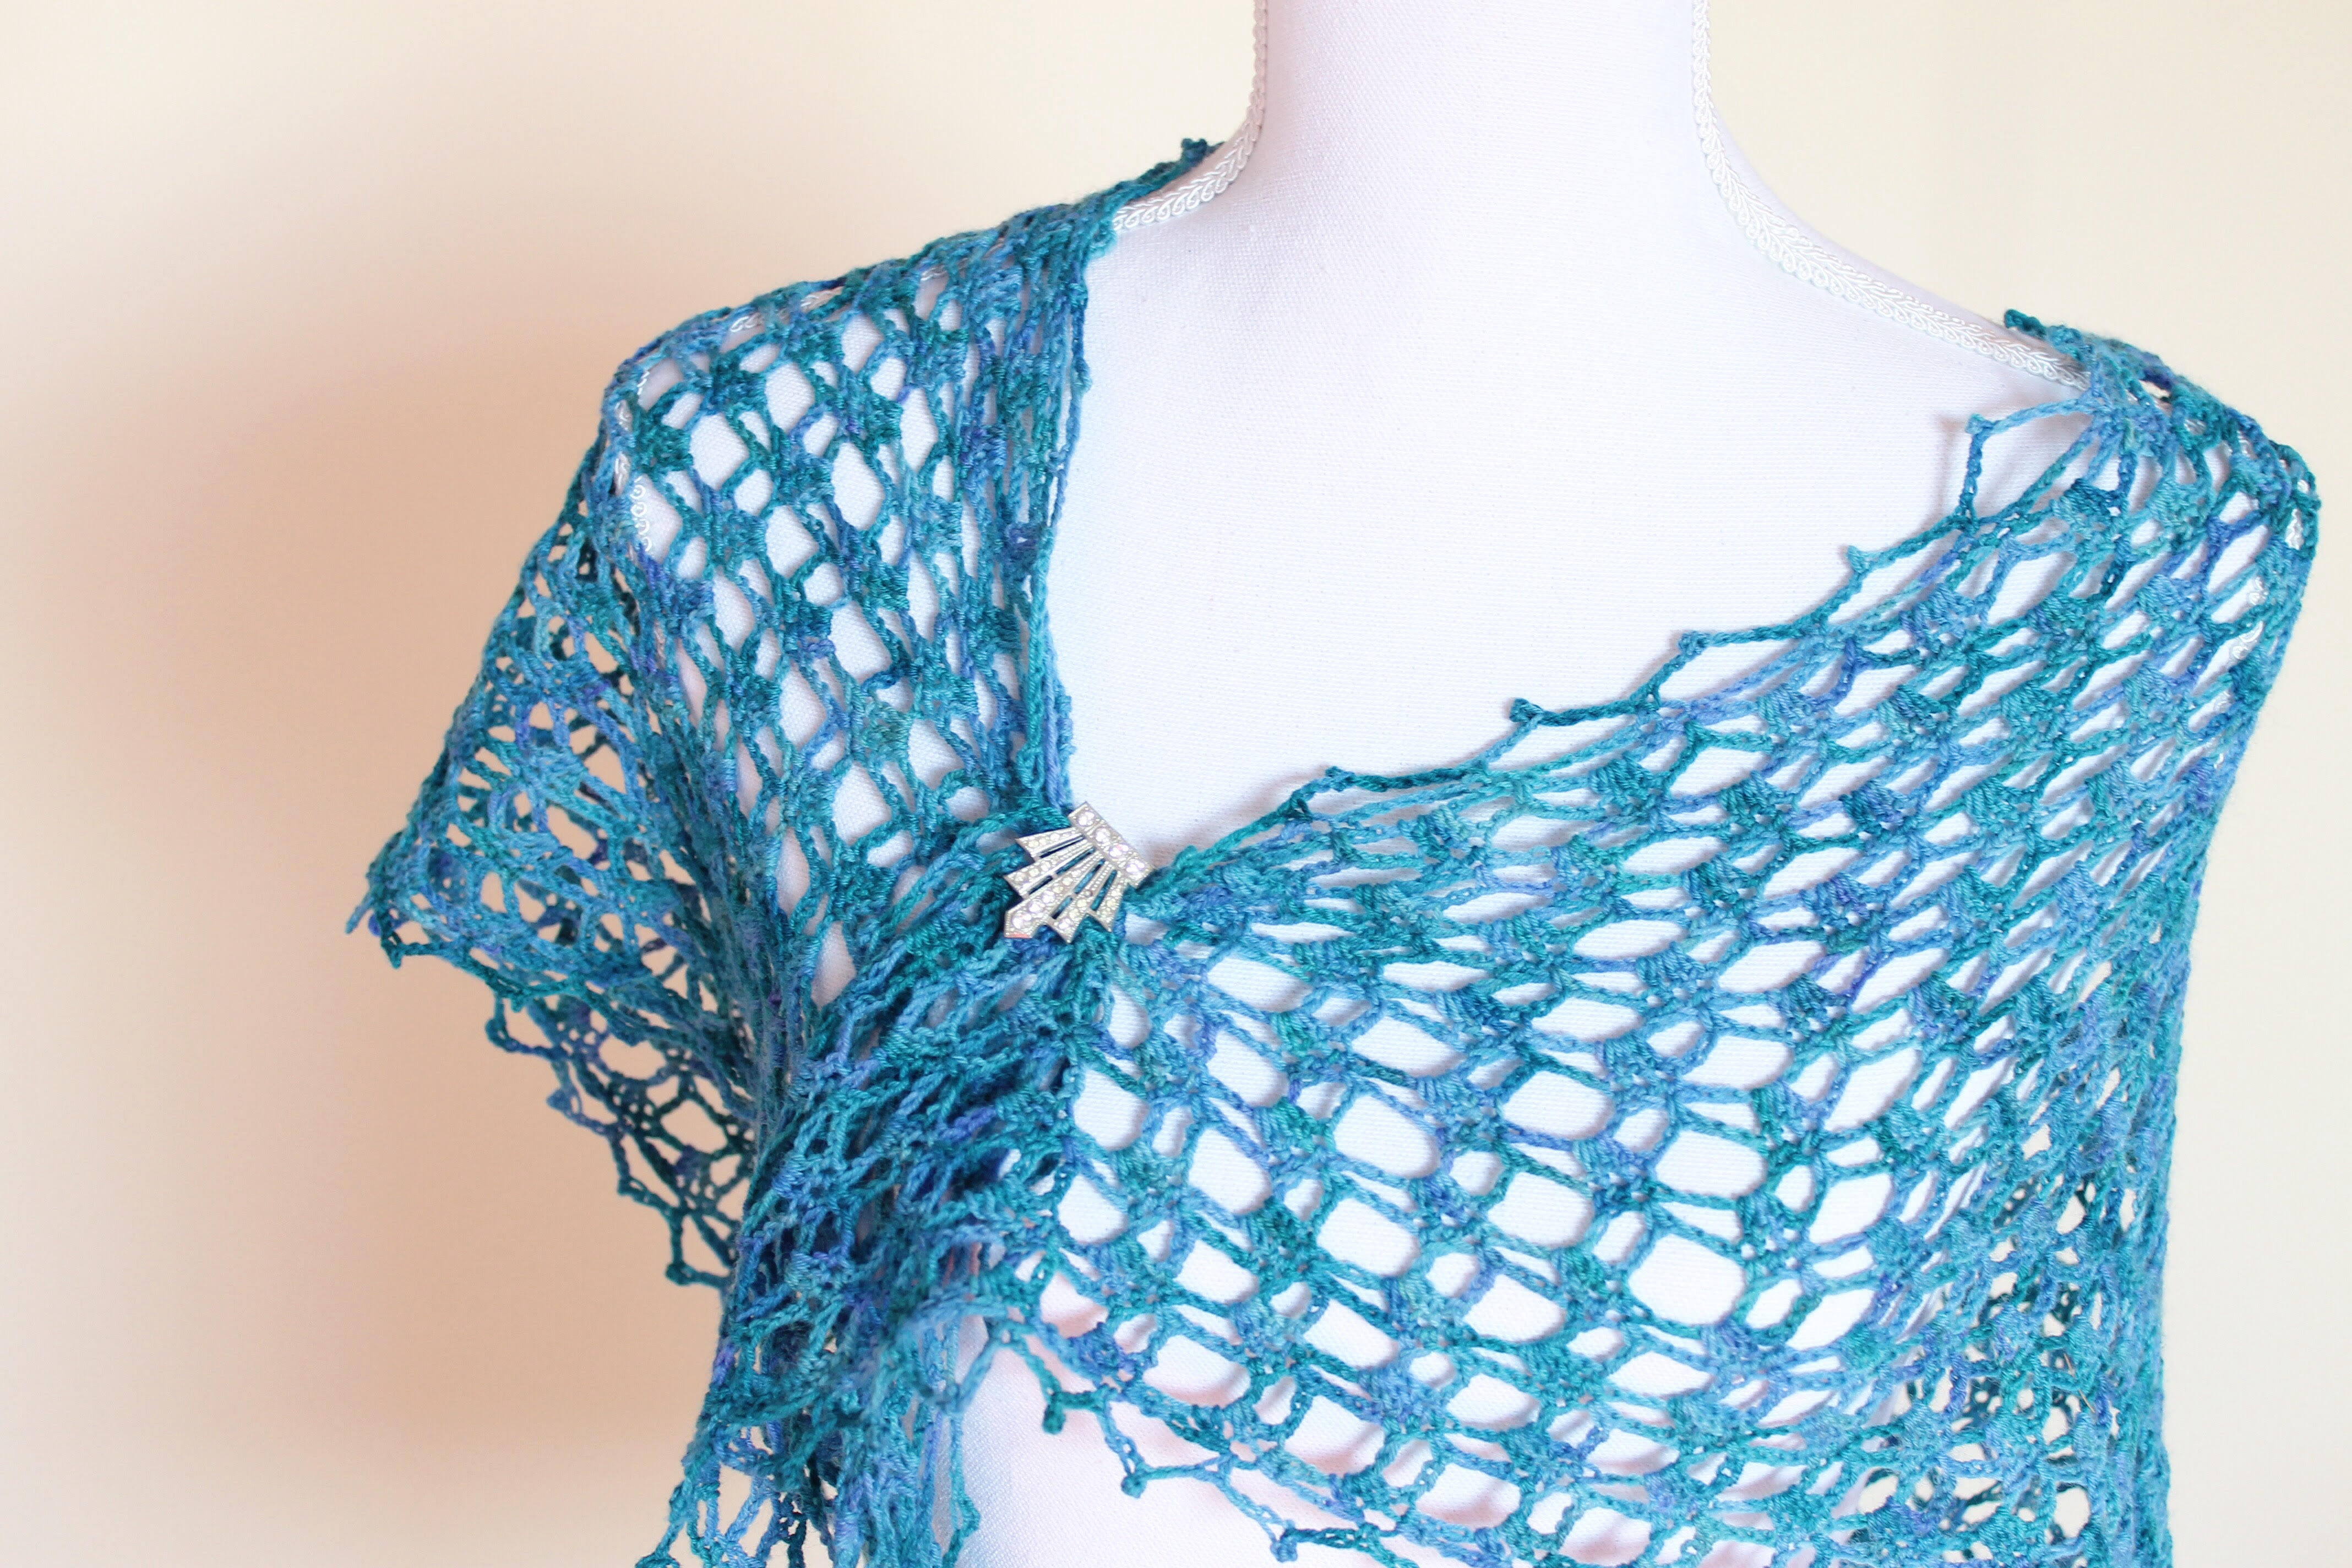
I’m so in love with this shawl. It makes me happy to wear it; the colour is gorgeous, the merino blend is soft, warm and snuggly.
It’s elegant and light, and adds a splash of glamour to my outfit. But it’s also perfect to just wrap around my neck on a chilly day when I’m cycling to the shops.
I’ve added the design to Ravelry, for sale at 5.45EUR. If you head to Instagram and follow me, you can grab yourself a 50% discount until May 1st. Just check the details in the Emma Shawl photos I post there. You can also click the Instagram links on the sidebar to the right.
For the design I used a gorgeous hand dyed fingering/4ply (sock) yarn from Craftfulness, but you can use any fingering weight yarn, as long as there is about 420 metres on the skein. I also used a hand dyed yarn I bought from Textiel Werk Wol en Zo (in Dutch, but they speak English fabulously) a long time ago.
It’s also a lovely quick design – you can easily whip it out in a couple of evenings in front of Game of Thrones. Once you get going, the design all but crochets itself.
And don’t you just love the beautiful crystal shawl clip? It’s about a hundred years old, and belonged to my Aunt Hilda. I’ve loved the clips (and matching earrings) as long as I can remember, so it makes me incredibly happy to have and be able to use them.
Enjoy, I hope you love it. I do, I’ve made lots already!
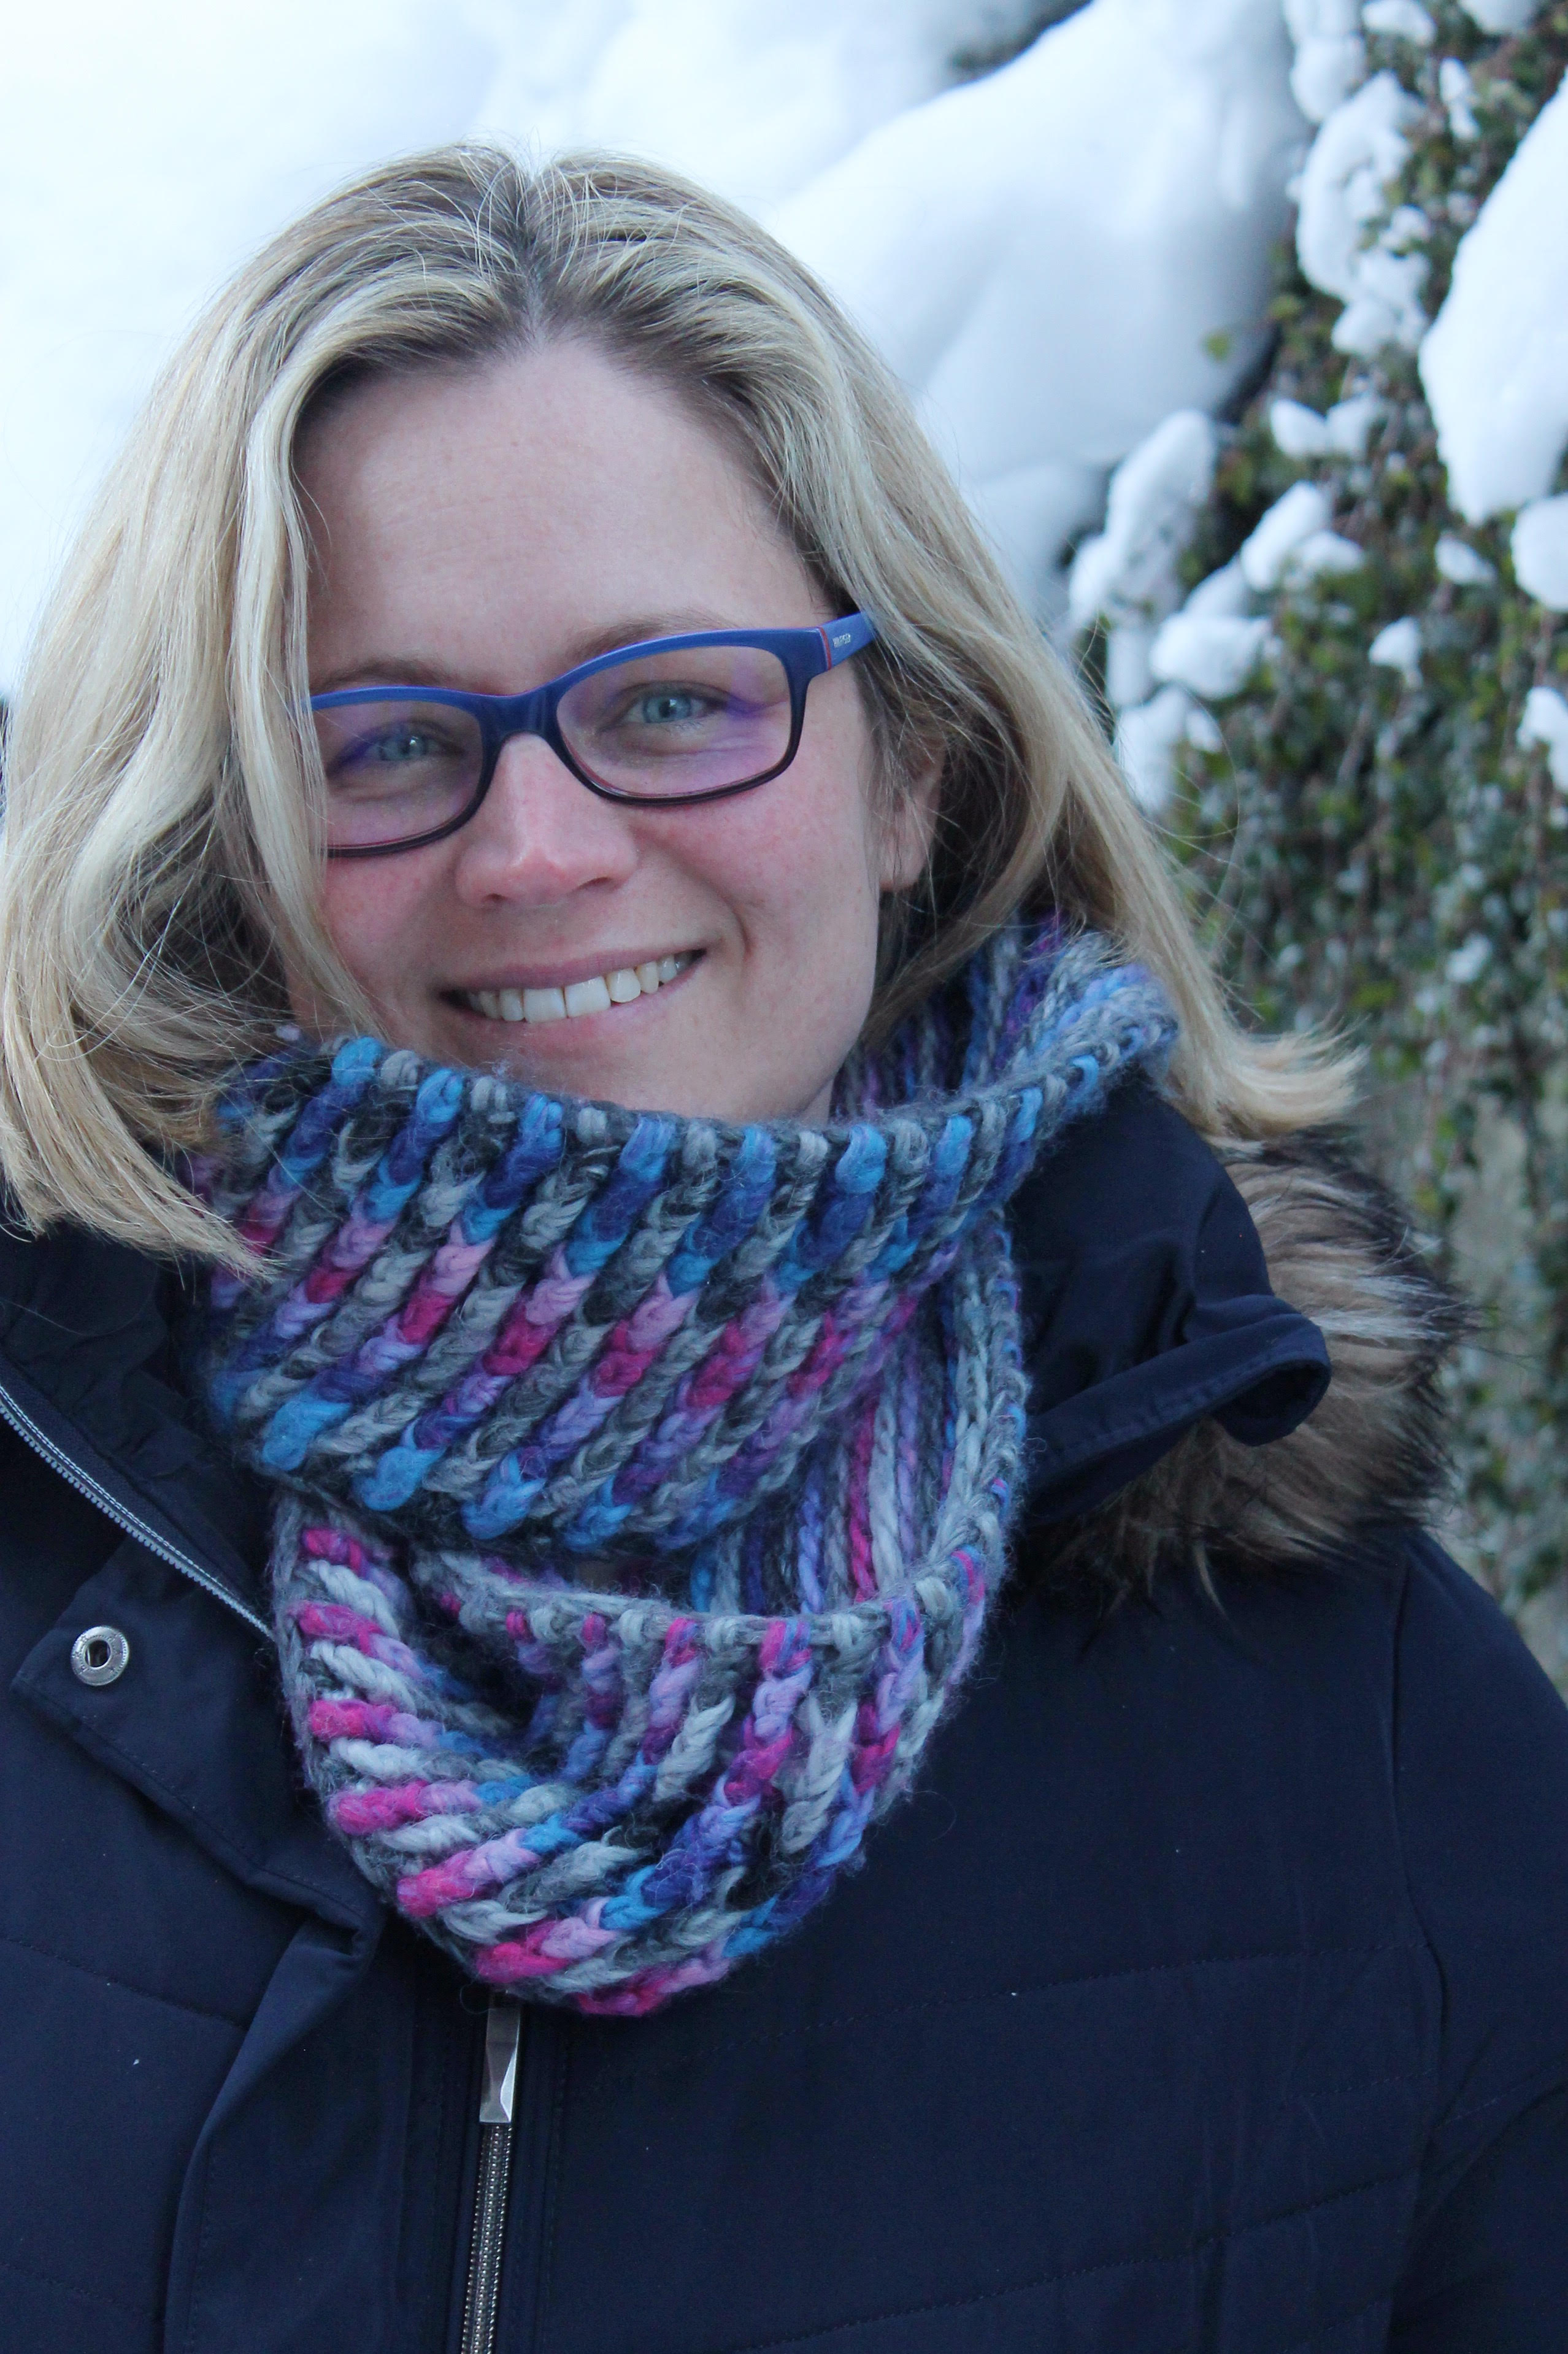
It’s here! Last week I was showing you the gorgeous Scheepjes Vinci yarn that I was working with, and this week here’s the result! A beautiful crochet brioche cowl that has barely left my neck since it was completed.
I even had to take a selfie or two at the top of a mountain!
It was so cold up there, I needed that cowl let me tell you!
One of the cool things about this cowl, and what the photos don’t really show you (except that top one up there) is that the cowl is reversible! So, if you prefer vertical colour stripes like I do, you wear it that way, but if you’re more into horizontal, just flip it over and you have a totally different accessory.
So, let’s get down to business. I’ve created a pdf of the pattern for you. The pattern also has a photo tutorial on how to do the crochet brioche stitch. What would you think about possibly seeing a video tutorial? Should I finally dip my toes in and make one? Let me know in the comments.
As always, please do share your projects with me on social media. You know I’m all over Instagram like a bad smell, so tag me @miss__neriss (that’s with two “_”) and also use the hashtag #obsessedwithcrochet. This is a little community I’m going to build, with more info coming soon…
Click the heading below to be taken to the pattern, and I hope you enjoy!!
I’ve made this for you in four different sizes, from Small through to XL.
Here you can find a written pattern for size Medium, and below you can find a chart which will give you the measurements and stitch counts for sizes Small, Large and XL.
For the Dutch speakers among us, I’ve also had the design translated. You can find it here. Veel plezier!
Scheepjes Stone Washed XL in 850 (Garnet) – 12 balls for size M (I used 11, but get an extra to be safe)
S = 10 balls (each ball of Stone Washed XL has 75 metres)
M = 12 balls
L = 15 balls
XL = 17 balls
7cm bamboo button – you can pick these up at any good craft store, or online
Size 5mm hook (or hook to obtain gauge)
Measuring Tape
Scissors
Tapestry Needle
Eucalan wool wash
Gauge
8 stitches x 5 rows = 5cm x 5cm
Stitches
Note: All stitches are in US terms
Chain (CH)
Half Double Crochet (HDC)
Half Double Crochet Back Loop Only (HDCBLO)
Half Double Crochet Front Loop Only (HDCFLO)
Size Medium
Chain loosely 119 stitches. If you’re a tight crocheter, consider going up a hook size to make sure that the chain isn’t too tight.
HDC into the third chain from the hook, and all the way across (a total of 117 stitches across). CH2, turn.
HDCBLO in the first stitch, HDCFLO in the next. Repeat this front and back (HDCBLO/FLO) format all the way across, CH2, turn. Note: It’s important to ensure that you have an odd number of stitches to make it easier to achieve the texture of the stitches. If you finish the row in the back loop, when you start the next row, start in the front loop and vice versa. You’ll find very quickly as you go that the look of the wrap will be different if you don’t maintain the BLO then FLO stitch pattern in alternating stitches.
Repeat this pattern building rows for 25cm.
Now we are going to make the first sleeve. Follow the HDCBLO/FLO pattern for 20 stitches, then CH 35, skip 35, then continue the HDCBLO/FLO pattern all the way to the end. Make sure you double check that you stitch into the BLO or FLO correctly (if the stitch in the row below was FLO, you need to stitch into the BLO).
HDCBLO/FLO to the chain from the previous row, then HDC 35 into the chain, then continue the HDCBLO/FLO to the end. the short end becomes the collar of the wrap.
Repeat step 3 for a further 37cm and then we will make the next sleeve. Making sure you start from the top of the collar and work down (add a row if you need to), repeat steps 5 and 6.
Continue building the final front panel, for 25cm, then we will make the button hole.
Starting from the top of the collar, repeat the HDCBLO/FLO pattern for 37 stitches. Chain 7, skip 7 stitches, then repeat the HDCBLO/FLO pattern all the way to the end.
HDCBLO/FLO to the chain from the previous row, then HDC 7 into the chain, then continue the HDCBLO/FLO to the end.
Build a further 7 rows, or complete your ball of yarn. Tie off, weave in ends.
Sew button on the opposite end of the garment to the button hole 9cm from the end, 25cm from the top.
Block, stretching a little (especially the length) and you’re done!
Size Chart
You can switch out the stitch counts and centimetres in the written pattern above for the numbers in the chart below, depending on your required size.
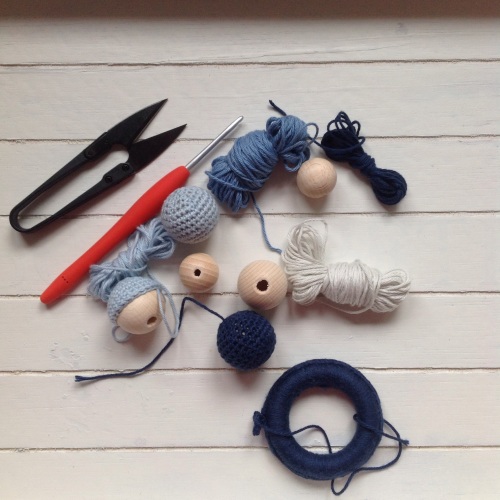
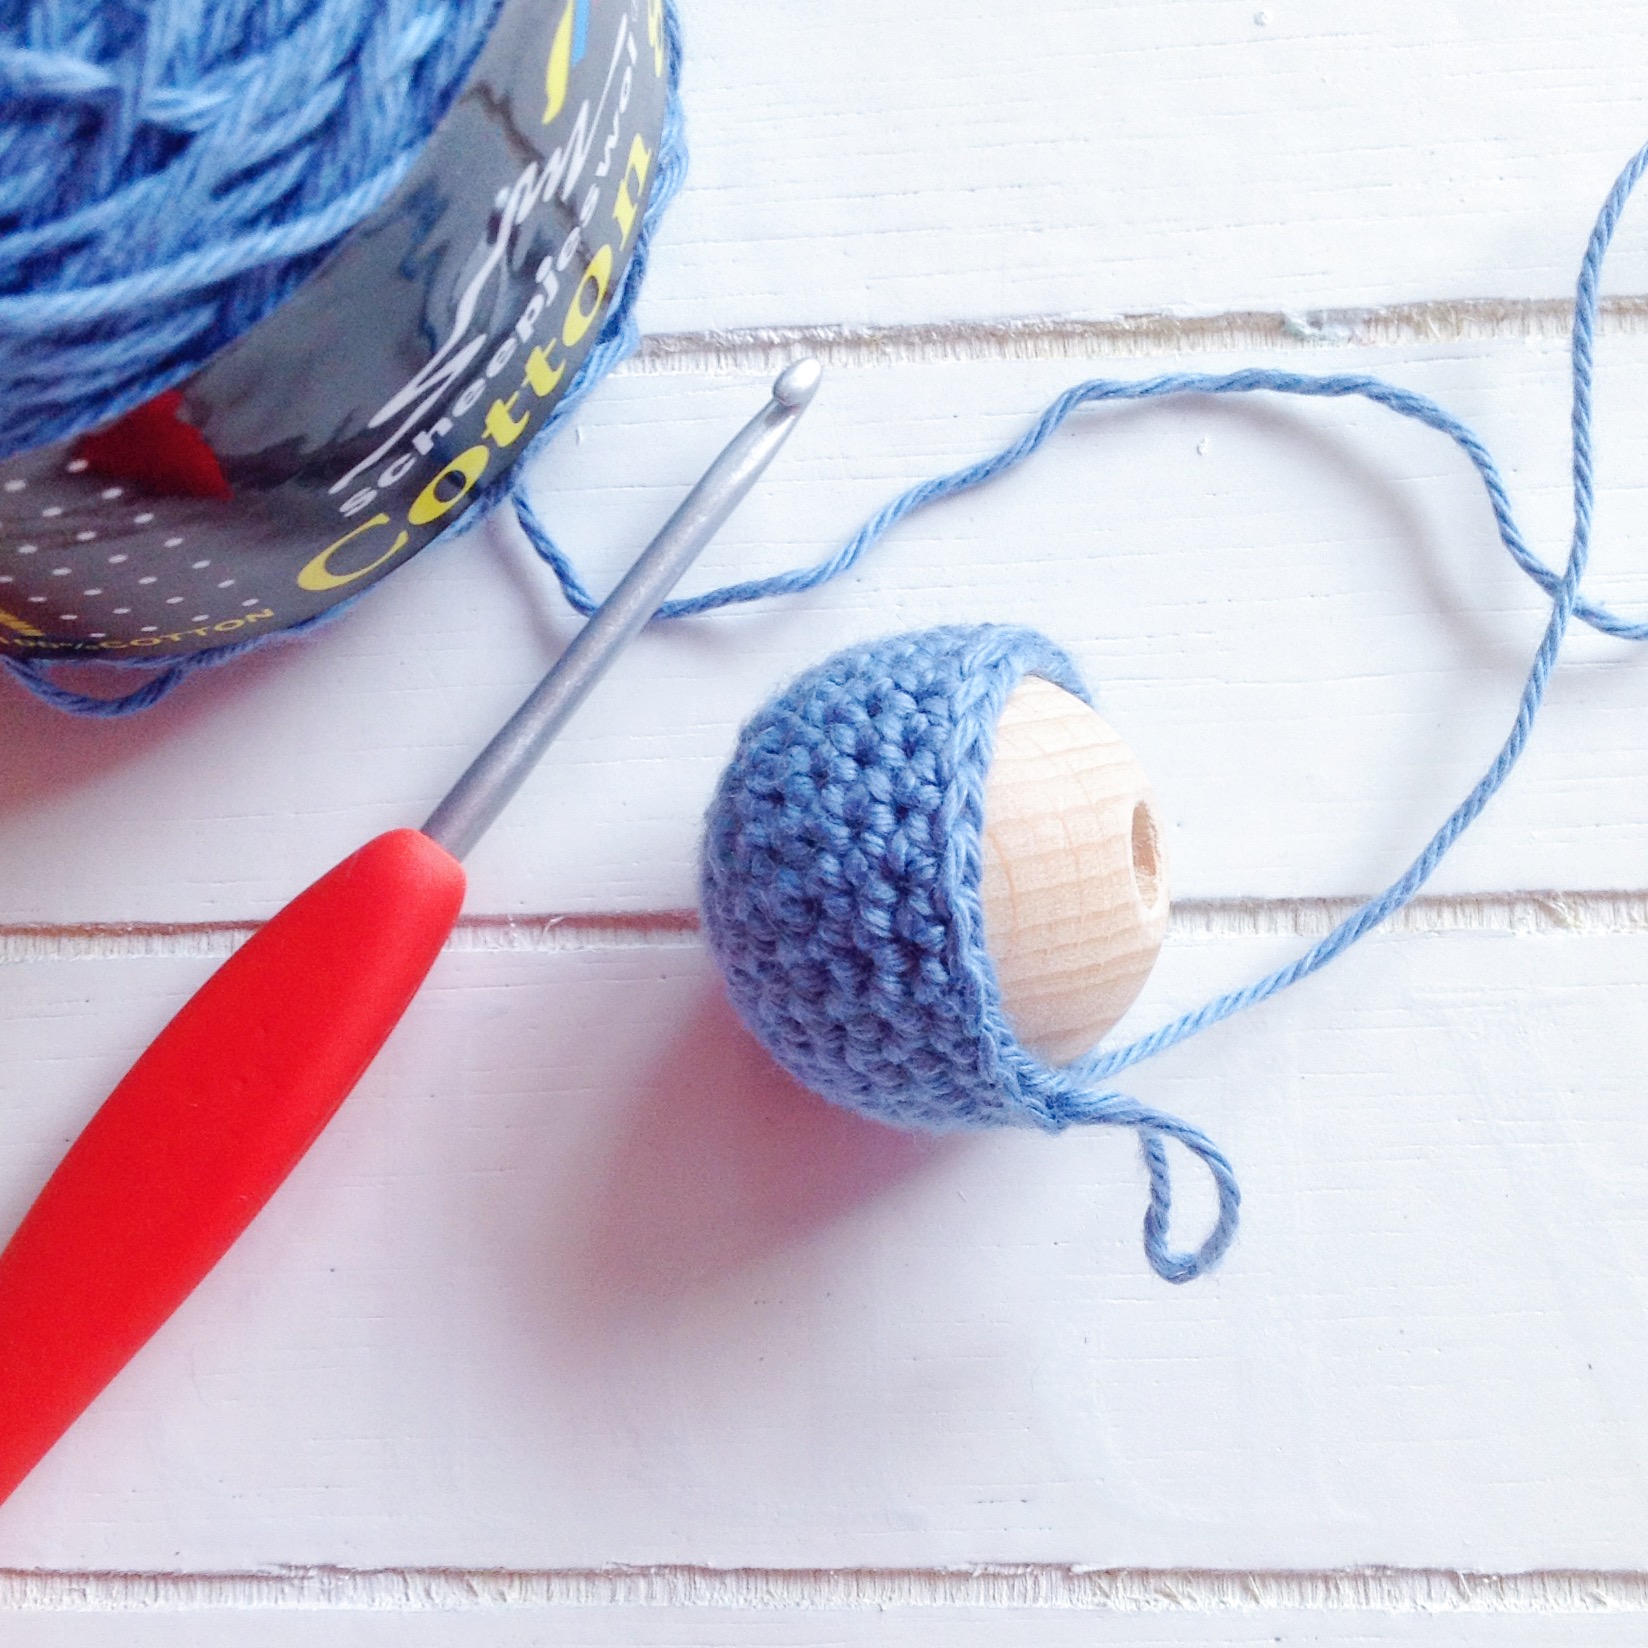
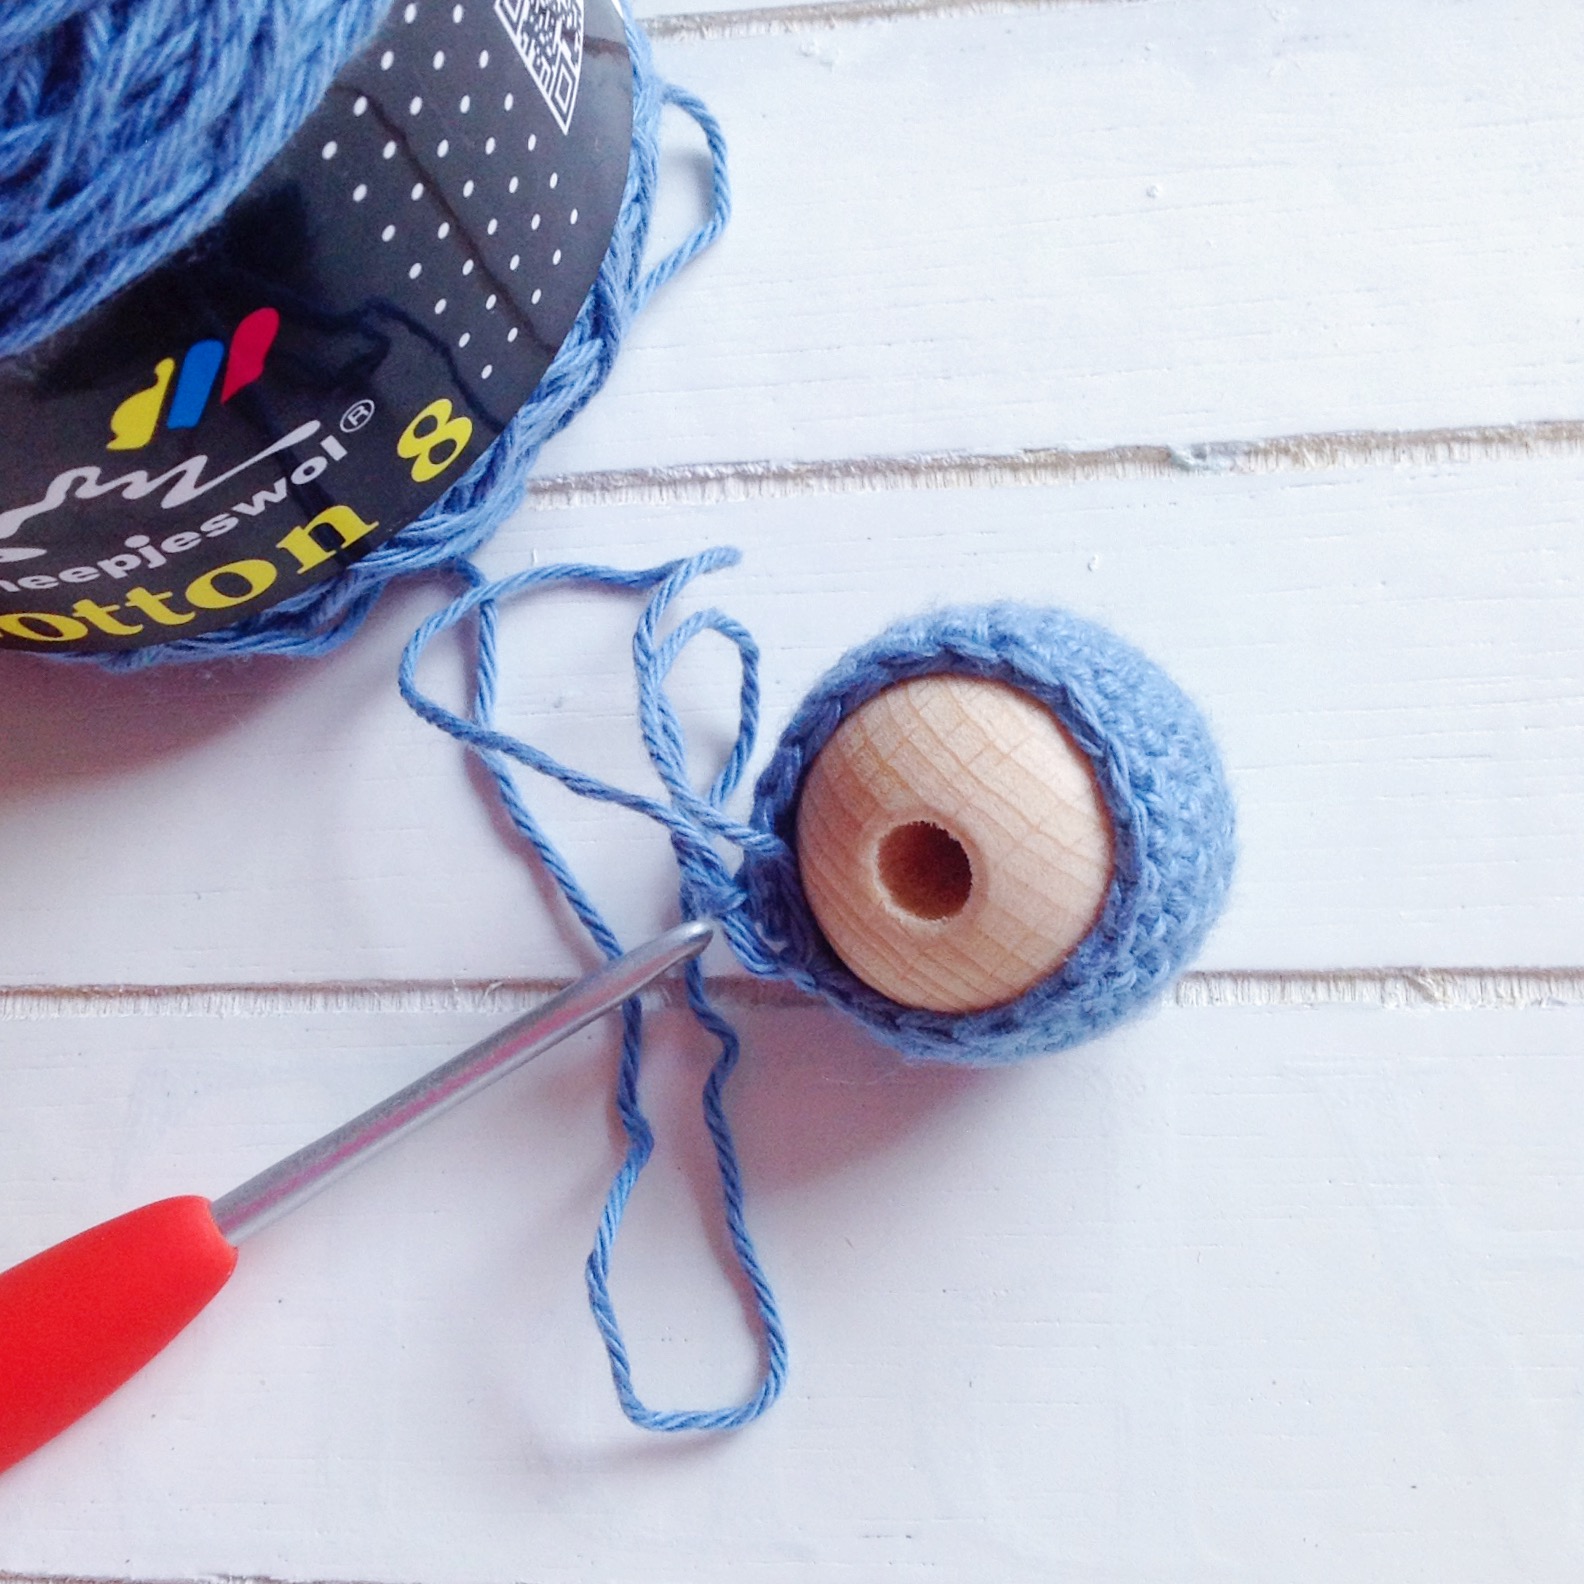
As promised, I’ve put together a tutorial on how to make your very own nursing necklace, which is designed to keep small ones occupied while nursing, saving mama’s sensitive skin from sharp fingernails, hair from being yanked, and general mischief making while baby is nursing. Of course this is not only for nursing mamas; it’s such a lovely necklace that it looks stylish on everybody!
What you’ll need
Scheepjeswol Cotton 8* in four shades. I used 527, 711, 652 and 700. In the Netherlands you can pick Cotton 8 up at just about any great yarn seller, and internationally you can buy via deramores.com*.
A 3mm crochet hook, scissors, and you’ll also need wooden beads in varying sizes. I used five 35mm balls and two 25mm balls. For added interest, you can also add a wooden ring or two – babies love the different elements and textures.
Abbreviations
(American terms)
CH – chain stitch
SC – single crochet (UK double crochet)
INC – increase; two single crochet stitches into the same stitch
DEC – decrease; two single crochet stitches together
STS – stitch count
Notes
This project is worked in the round. You will also need to crochet your stitches very tightly to ensure that they keep the form of the beads. If you crochet loosely, use a smaller hook.
Don’t forget, I’m a leftie so you might have to flip the images in your mind. I like to keep the images for us lefties because there just aren’t that many left handed tutorials out there. If you need help, ping me using the contact page or on Facebook.
Make one ball in the darkest colour, two in the second darkest, two in the third darkest, and two in the lightest (the 25mm balls).
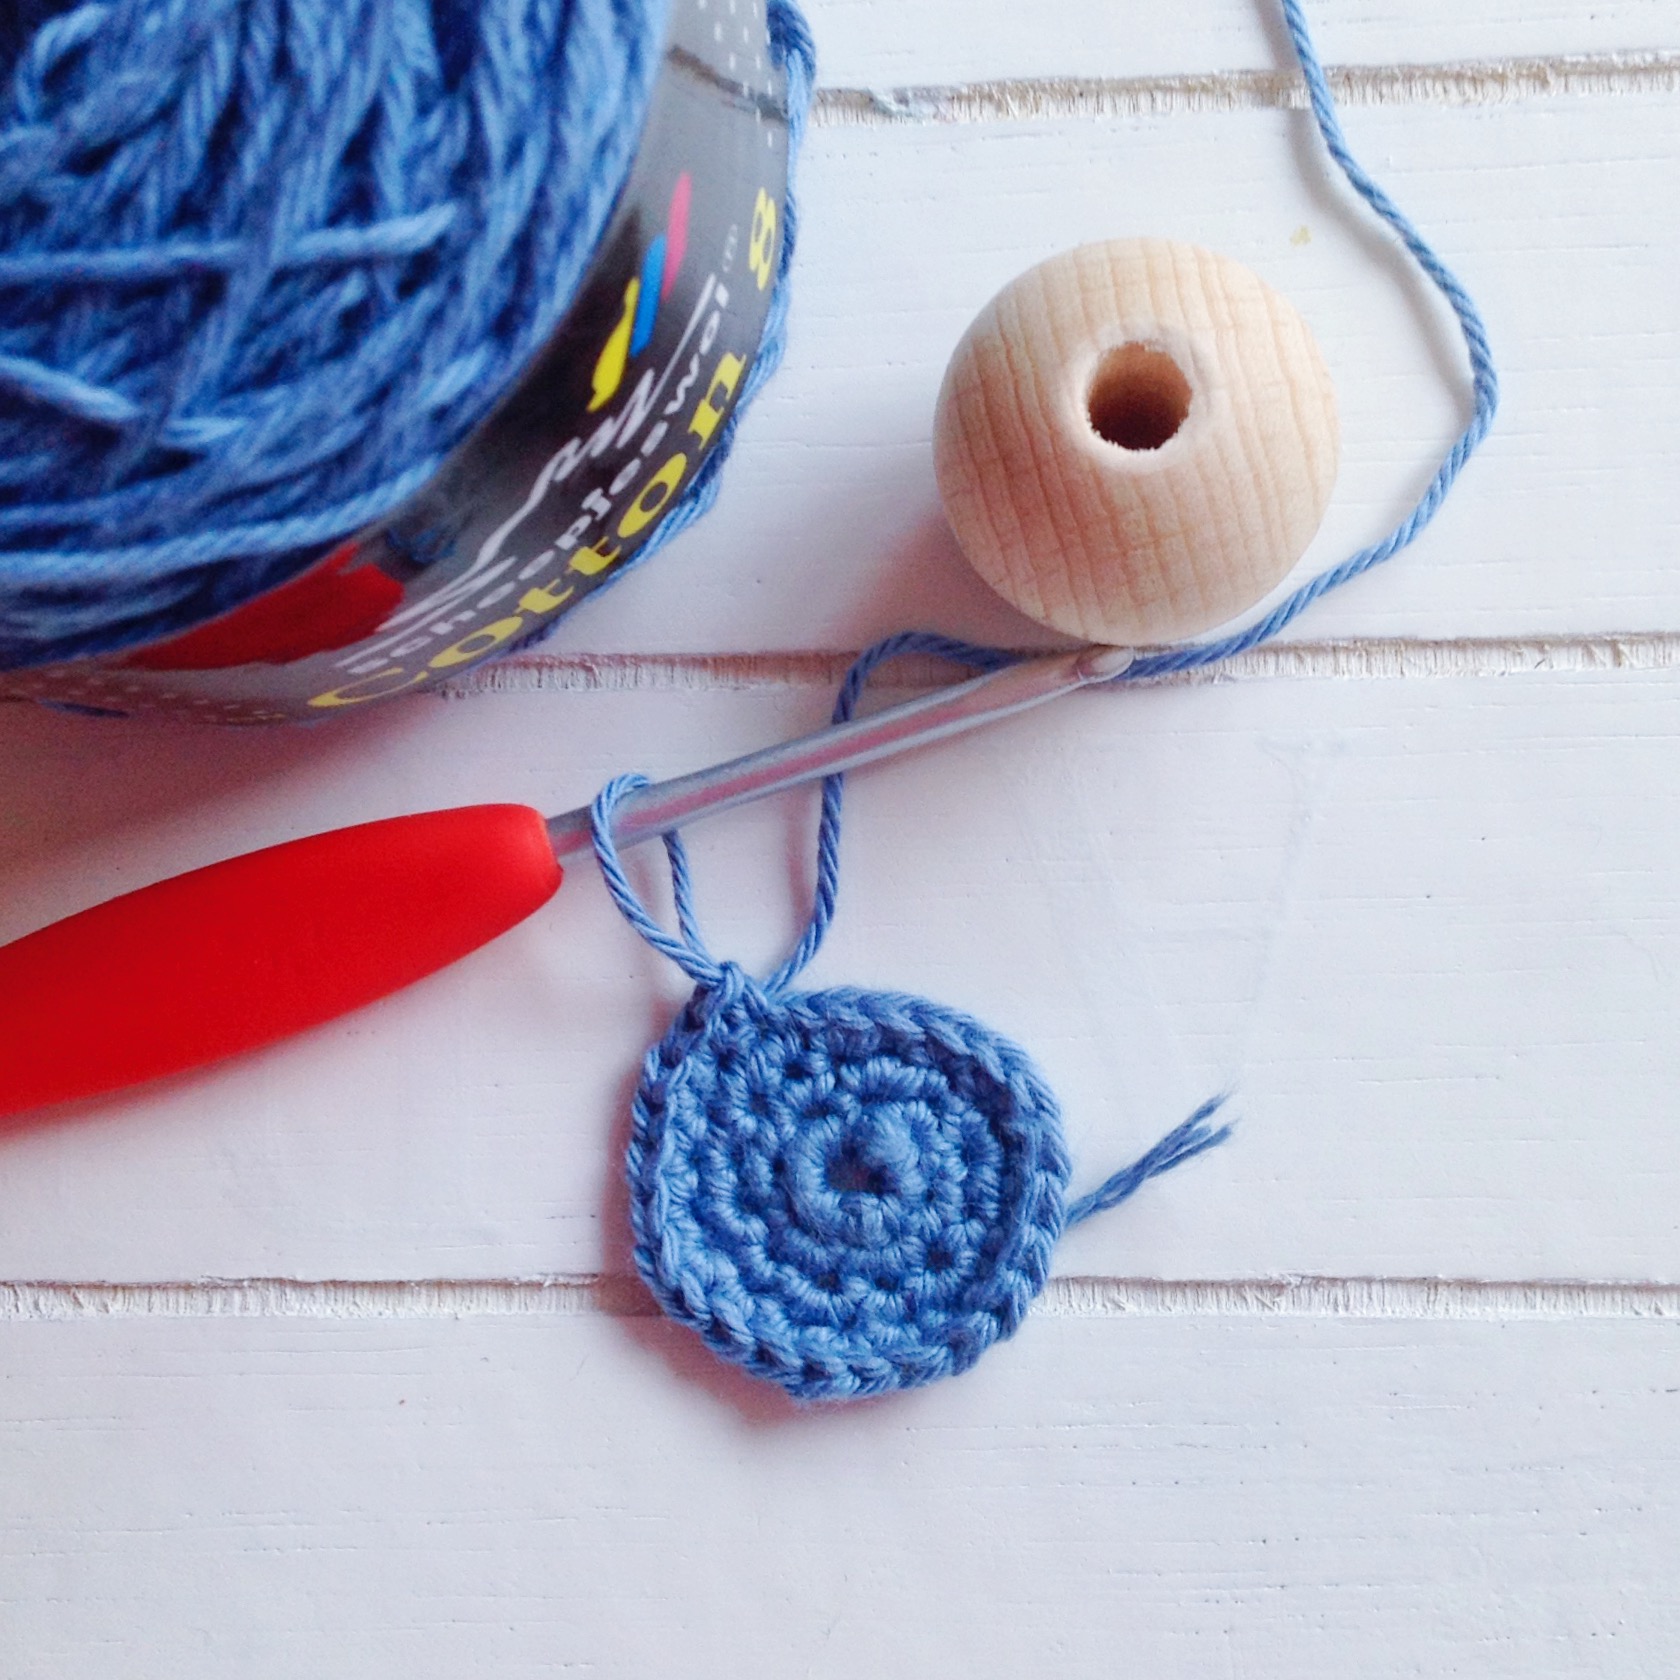
35mm Bead
Round 1
CH 5, close with a slip stitch, CH 1.
Round 2
SC x 6 into the ring (6 STS)
Round 3
INC in each stitch around (12 STS)
Round 4
(INC, 1 SC) x 6 (18 STS)
Round 5
(INC, 2 SC) x 6 (24 STS)
Round 6-10
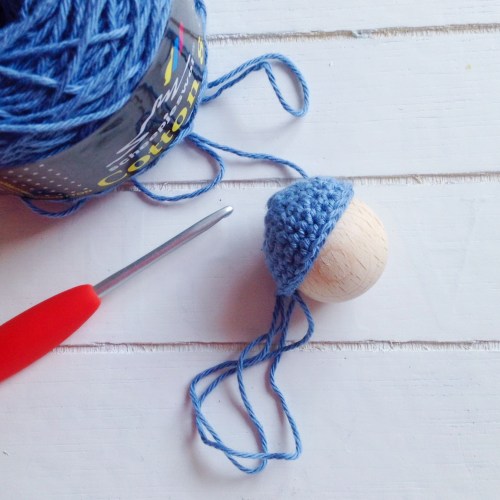
SC x 24 (24 STS). Insert the bead to measure how progress is going at each round.
Round 11
(DEC, 2 SC) x 6 (18 STS). Make sure the bead is inserted here and continue working around it.
Round 12
(DEC, 1 SC) x 6 (12 STS).
Round 13
DEC in each stitch around (6 STS)
Finish off and hide the tail.
For the 25mm bead, follow the same instructions, skipping round 5 (and round 11 as a consequence).
Once you’ve finished all five balls in the colour combination of your choice, it’s time to thread them onto a chain. First you need to make yourself one. I used the lightest shade and chained stitched until I had about 90 cm. This way the necklace would have plenty of room to become longer or shorter as necessary.
Thread the beads and tie the ends into a little knot and then together using a slip stitch so that one end can slip easily (but not too easily) to adjust the length of the necklace.
And you’re all done! Looks beautiful, doesn’t it? I love seeing projects by others, so don’t forget to brag about what you’ve made on my Facebook page or upload to Pinterest, tagging me @missneriss. Don’t forget to follow me on Instagram while you’re at it!


