Tag Archives: crochet tutorial

Chunky Crochet Brioche Cowl Reveal and How To

Chunky Crochet Brioche Cowl - free pattern available from missneriss.com.

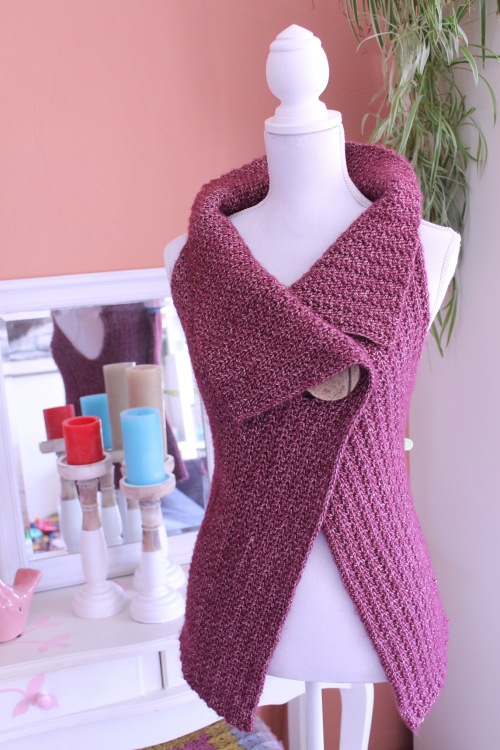
It’s here!  Last week I was showing you the gorgeous Scheepjes Vinci yarn that I was working with, and this week here’s the result!  A beautiful crochet brioche cowl that has barely left my neck since it was completed.

Chunky Crochet Brioche Cowl - free pattern available from missneriss.com.

I even had to take a selfie or two at the top of a mountain!

Chunky Crochet Brioche Cowl - free pattern available from missneriss.com.

It was so cold up there, I needed that cowl let me tell you!

One of the cool things about this cowl, and what the photos don’t really show you (except that top one up there) is that the cowl is reversible!  So, if you prefer vertical colour stripes like I do, you wear it that way, but if you’re more into horizontal, just flip it over and you have a totally different accessory.

So, let’s get down to business.  I’ve created a pdf of the pattern for you.  The pattern also has a photo tutorial on how to do the crochet brioche stitch.  What would you think about possibly seeing a video tutorial?  Should I finally dip my toes in and make one?  Let me know in the comments.

As always, please do share your projects with me on social media.  You know I’m all over Instagram like a bad smell, so tag me @miss__neriss (that’s with two “_”) and also use the hashtag #obsessedwithcrochet.  This is a little community I’m going to build, with more info coming soon…

Click the heading below to be taken to the pattern, and I hope you enjoy!!

Chunky Crochet Brioche Cowl Pattern Free Download

Chunky Crochet Brioche Cowl - free pattern available from missneriss.com.

Don’t forget: you can pick up the yarn at Scheepjes retailers all over the Benelux, or internationally from Deramores, Wool Warehouse, and at Paradise Fibers in North America!

Advertisement

Peek-a-Boo Button Wrap Pattern Size S-XL

Here it is, what you’ve been waiting for – the pattern for the Peek-a-Boo Wrap!

Peek-a-Boo Wrap free crochet pattern size S-XL on missneriss.com #haken

I’ve made this for you in four different sizes, from Small through to XL.

Here you can find a written pattern for size Medium, and below you can find a chart which will give you the measurements and stitch counts for sizes Small, Large and XL.

For the Dutch speakers among us, I’ve also had the design translated.  You can find it here. Veel plezier!

You can pick up the yarn at Scheepjes retailers all over the Benelux including Caro’s Atelier*, or internationally from Wool Warehouse* and Deramores*.

And even better, Esther from It’s all in a Nutshell has created a video tutorial, which is enormously helpful!

Are you ready?

What You Need

Scheepjes Stone Washed XL in 850 (Garnet) – 12 balls for size M (I used 11, but get an extra to be safe)
S = 10 balls (each ball of Stone Washed XL has 75 metres)
M = 12 balls
L = 15 balls
XL = 17 balls
7cm bamboo button – you can pick these up at any good craft store, or online
Size 5mm hook (or hook to obtain gauge)
Measuring Tape
Scissors
Tapestry Needle
Eucalan wool wash

Gauge

8 stitches x 5 rows = 5cm x 5cm
gauge across gauge up

Stitches

Note: All stitches are in US terms
Chain (CH)
Half Double Crochet (HDC)
Half Double Crochet Back Loop Only (HDCBLO)
Half Double Crochet Front Loop Only (HDCFLO)

Size Medium

  1. Chain loosely 119 stitches.  If you’re a tight crocheter, consider going up a hook size to make sure that the chain isn’t too tight.
  2. HDC into the third chain from the hook, and all the way across (a total of 117 stitches across).  CH2, turn.
  3. HDCBLO in the first stitch, HDCFLO in the next.  Repeat this front and back (HDCBLO/FLO) format all the way across, CH2, turn.  Note:  It’s important to ensure that you have an odd number of stitches to make it easier to achieve the texture of the stitches.  If you finish the row in the back loop, when you start the next row, start in the front loop and vice versa.  You’ll find very quickly as you go that the look of the wrap will be different if you don’t maintain the BLO then FLO stitch pattern in alternating stitches.Stitch view vest
  4. Repeat this pattern building rows for 25cm.
  5. Now we are going to make the first sleeve.  Follow the HDCBLO/FLO pattern for 20 stitches, then CH 35, skip 35, then continue the HDCBLO/FLO pattern all the way to the end.  Make sure you double check that you stitch into the BLO or FLO correctly (if the stitch in the row below was FLO, you need to stitch into the BLO).
  6. HDCBLO/FLO to the chain from the previous row, then HDC 35 into the chain, then continue the HDCBLO/FLO to the end.  the short end becomes the collar of the wrap.
  7. Repeat step 3 for a further 37cm and then we will make the next sleeve.  Making sure you start from the top of the collar and work down (add a row if you need to), repeat steps 5 and 6.
  8. Continue building the final front panel, for 25cm, then we will make the button hole.button large
  9. Starting from the top of the collar, repeat the HDCBLO/FLO pattern for 37 stitches.  Chain 7, skip 7 stitches, then repeat the HDCBLO/FLO pattern all the way to the end.
  10. HDCBLO/FLO to the chain from the previous row, then HDC 7 into the chain, then continue the HDCBLO/FLO to the end.
  11. Build a further 7 rows, or complete your ball of yarn.  Tie off, weave in ends.
  12. Sew button on the opposite end of the garment to the button hole 9cm from the end, 25cm from the top.Peek-a-Boo Wrap free crochet pattern size S-XL on missneriss.com #haken
  13. Block, stretching a little (especially the length) and you’re done!

Peek-a-Boo Wrap free crochet pattern size S-XL on missneriss.com #hakenThe back of the body warmer

Size Chart

You can switch out the stitch counts and centimetres in the written pattern above for the numbers in the chart below, depending on your required size.

SMALL MEDIUM
CM Rows CM Rows
Length 70 Chain 117 + 2 70cm Chain 117 + 2
Back 32 32 37 37
Front (button) 20 20 25 25
Front (button hole) 27 27 32 32
CM Stitch Count CM Stitch Count
Start Sleeve 12.5 20 12.5 20
End Sleeve 20 32 22.5 35
Start Button Hole 23 37 23 37
Button Hole Size 7 7
LARGE X-LARGE
CM Rows CM Rows
Length 75cm Chain 123 + 2 75cm Chain 123 + 2
Back 42 42 47 47
Front (button) 30 30 35 35
Front (button hole) 37 37 42 42
CM Stitch Count CM Stitch Count
Start Sleeve 15 24 17.5 28
End Sleeve 25 39 27.5 43
Start Button Hole 25 40 25 40
Button Hole Size 7 7

*Affiliate Link

My Week, and Paris!

It has been a quiet week for me on the crochet front.  I finished a major secret project last week after weeks of work, so this week I’ve been taking it easy.  I am working on a very cool project – a faux taxidermy rhino head for a custom order and I do love the way it’s all coming together.  Hopefully I’ll finish that over the weekend and be able to show you the result next week!

Otherwise, my family and I spent the weekend in Paris!  I’ve been to Paris a few times now, and it really is one of the more beautiful cities in the world.  Not the most beautiful; it’s tough to beat Edinburgh or Rome in my opinion, but it is spectacular, there’s no denying it.

We visited the Eiffel Tower (of course) and did a bit of crowd watching.  Those queues are incredible.  There’s no attraction on earth that you need to book in advance for more than The Eiffel Tower.  At just after 10am the queues were already hours long, so we decided not to climb.  Well, there was no decision really.  If we wanted to see anything else aside from the person in the queue in front’s backpack for the day, then waiting and waiting to climb wasn’t an option!

View this post on Instagram

Paris baby!!!

A post shared by Maarten (@supermuys) on

We also visited Versaille.  And man.  Every tourist on earth was there at the same time.  The interior of the palace was probably the most stressful and unpleasant tourist experiences of my entire life.  Now, I’ve been to quite a few of the big touristy places on this planet, and this was just g0d-awful.  Apparently there was a bedroom or two, and somehow I managed to miss the room where they signed the Treaty of Versaille.  The gardens were an entirely different matter altogether.   Massive, sprawling and not crowded at all.  There were obviously thousands upon thousands of people there, but it was easy to find a quiet nook and pretend you were alone on earth.  And the tourist/audioguide/tourgroup bubble.  Seriously people!  You can visit places without being an arsehole while you’re there.

So that evening we had well and truly earned our fabulous cheese and wine.  I couldn’t tell you what they were any more, but there was a cheddar that I could have sworn was an aged gouda from North Holland!  My friend Emma is the expert, so I left the choosing to her and I just gobbled it all up as quick as I could!

View this post on Instagram

Picnic in Paris.

A post shared by Nerissa | Crochet | Haken 🇦🇺🇳🇱 (@miss__neriss) on

Then further on the food front, I put in an order with my friend Lori from Southern Charm Cupcakes for some of her amazing caramels and chocolates.

Lori’s specialty has fast become Fleur de Sel caramels and she makes the best fleur de sel caramel chocolate you have ever seen in your entire life.  If you put a block of Godiva and a block of Lori’s chocolate in front of me, I’d go for Lori’s every.single.time.  So if you live in the Netherlands, Lori ships!!!!!  I’ve had to freeze the caramels to make sure I don’t gobble them all up at once.

And then there’s crochet.  I posted a tutorial for the granny square I designed on holidays, which is really simple and works up within ten minutes.

This weekend I’m hoping to finish a pattern I’ve been working on, and also the rhino.  Other than that, I’m going to take time for myself to work on strategies I’m going to implement for the Unstoppable program that kicked off this week!

How’s your week?

How to: Crochet a Perfect Circle

Today I want to introduce you to one of the very best hacks I’ve found and show you how you can do it. This is something I’ve learned making amigurumis, and is especially useful when making really big stuffed animals. And not only for amigurumis, but for making mandalas or anything that needs to become a circle in a solid colour; like coasters, cushions, or floor rugs. Trust me, you’ll be thankful for this one.

You know how you increase and increase and your circle really becomes more of a hexagon (or pentagon, octagon or whatever)? Well, it’s is thanks to the placement of the increase stitches. If you follow the Inc, SC method (or SC, Inc), as the piece grows, the increases become corners when what you really want is a circle. This is what I mean:

20140627-143931-52771436.jpg

You don’t really want this, right? I’m not a fan of the spoke look myself, and I found that when making amigurumis I had to really stuff the critter tight to work the corners out. This makes the poor little amigurumi really hard and not so cuddly, and my daughter wants cuddly! So, the method I have for you will make your circle come out just like this:

20140627-144235-52955794.jpg

I think we can agree this looks much better, can’t we? Ready to learn how to do it? Basically, all you have to do is offset your increases. Really, it’s that simple. I’ll show you an example pattern that you can apply next time you’re crocheting a circle, or increasing in the round.

(US terms)

R1: 6SC stitches into a Magic Ring

R2: SC Increase around =12 stitches

R3: (Increase, 1SC) x 6 = 18 stitches

R4: 1SC, (increase, 2SC) x 5, Increase, SC = 24 stitches

R5: (Increase, 3SC) x 6 = 30 stitches

R6: 3SC, (increase, 4SC) x 5, increase, 1SC = 36 stitches

R7: (Increase, 5SC) x 6 = 42 stitches

R8: 4SC, (increase, 6SC) x 5, increase, 2SC = 48 stitches

R9: (Increase, 7SC) x 6 = 54 stitches

R10: 5SC, (increase, 8SC) x 5, increase, 3SC = 60 stitches

As the circle grows in this way, corners may begin to appear again, so you should add an extra offset to the rounds.

R11: (increase, 9SC) x 6 = 66 stitches

R12: 3SC, (increase, 10SC) x 5, increase, 7SC = 72 stitches

R13: (increase, 11SC) x 6, = 78 stitches

R14: 6SC, (increase, 12SC) x 5, increase, 6SC = 84 stitches

R15: (increase, 13SC) x 6 = 90 stitches

R16: 4SC, (increase, 14SC) x 5, increase, 10SC = 96 stitches

R17: (increase, 15SC) x 6 = 102 stitches.

Continue in this way until the circle is as large as you need it to be.

When it comes to decrease rows, do the same thing, but in reverse. Look at the difference: 20140627-145541-53741247.jpg What do you think? Going to give it a try on your next project?

For this tutorial I used Scheepjes Catona.  It’s one of my favourite amigurumi yarns, I’ve used it in a couple of designs, like my free flopsy bunny pattern.

Shop it here: Wool Warehouse* or Caro’s Atelier*

Enjoy!

*affiliate link