
Today I want to introduce you to one of the very best hacks I’ve found and show you how you can do it. This is something I’ve learned making amigurumis, and is especially useful when making really big stuffed animals. And not only for amigurumis, but for making mandalas or anything that needs to become a circle in a solid colour; like coasters, cushions, or floor rugs. Trust me, you’ll be thankful for this one.
You know how you increase and increase and your circle really becomes more of a hexagon (or pentagon, octagon or whatever)? Well, it’s is thanks to the placement of the increase stitches. If you follow the Inc, SC method (or SC, Inc), as the piece grows, the increases become corners when what you really want is a circle. This is what I mean:
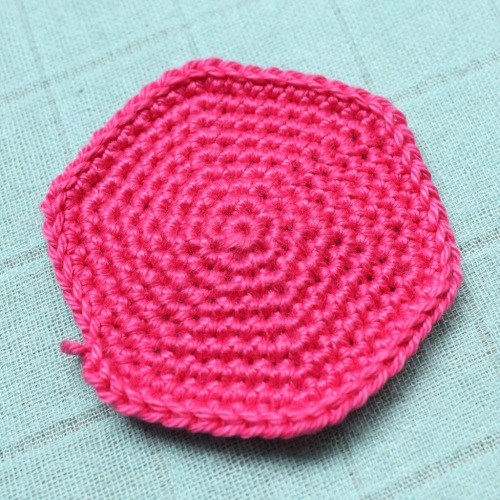
You don’t really want this, right? I’m not a fan of the spoke look myself, and I found that when making amigurumis I had to really stuff the critter tight to work the corners out. This makes the poor little amigurumi really hard and not so cuddly, and my daughter wants cuddly! So, the method I have for you will make your circle come out just like this:
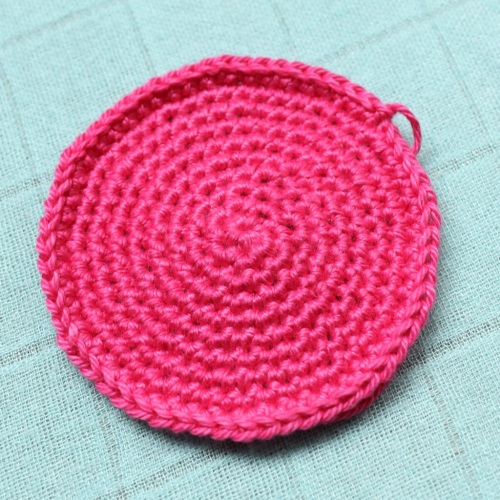
I think we can agree this looks much better, can’t we? Ready to learn how to do it? Basically, all you have to do is offset your increases. Really, it’s that simple. I’ll show you an example pattern that you can apply next time you’re crocheting a circle, or increasing in the round.
(US terms)
R1: 6SC stitches into a Magic Ring
R2: SC Increase around =12 stitches
R3: (Increase, 1SC) x 6 = 18 stitches
R4: 1SC, (increase, 2SC) x 5, Increase, SC = 24 stitches
R5: (Increase, 3SC) x 6 = 30 stitches
R6: 3SC, (increase, 4SC) x 5, increase, 1SC = 36 stitches
R7: (Increase, 5SC) x 6 = 42 stitches
R8: 4SC, (increase, 6SC) x 5, increase, 2SC = 48 stitches
R9: (Increase, 7SC) x 6 = 54 stitches
R10: 5SC, (increase, 8SC) x 5, increase, 3SC = 60 stitches
As the circle grows in this way, corners may begin to appear again, so you should add an extra offset to the rounds.
R11: (increase, 9SC) x 6 = 66 stitches
R12: 3SC, (increase, 10SC) x 5, increase, 7SC = 72 stitches
R13: (increase, 11SC) x 6, = 78 stitches
R14: 6SC, (increase, 12SC) x 5, increase, 6SC = 84 stitches
R15: (increase, 13SC) x 6 = 90 stitches
R16: 4SC, (increase, 14SC) x 5, increase, 10SC = 96 stitches
R17: (increase, 15SC) x 6 = 102 stitches.
Continue in this way until the circle is as large as you need it to be.
When it comes to decrease rows, do the same thing, but in reverse. Look at the difference:  What do you think? Going to give it a try on your next project?
For this tutorial I used Scheepjes Catona. It’s one of my favourite amigurumi yarns, I’ve used it in a couple of designs, like my free flopsy bunny pattern.
Shop it here: Wool Warehouse* or Caro’s Atelier*
Enjoy!
*affiliate link


