
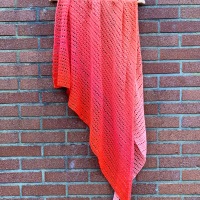
The Jasper V! I loved all the ideas so much that everyone came up with, but one that stuck with me was the use of Jasper and V-Neck. In the end it was simple and the Jasper V has been born!
Today I’m sharing the pattern for the XL size with you. This is the first garment pattern I’ve written and stay tuned for more sizes. I just wanted to get this out to you as soon as I possibly could!
So without further ado, let’s get to it! For any questions, please send me an email using the contact form and I’ll get back to you to assist, OK? If you find mistakes, please do the same. Because it’s a free pattern, I’m the only tester so I’m relying on your help – thanks in advance!!
You can also find a printer version right here:
Printer Friendly Version of the Jasper V
This pattern assumes that you know crochet basics, like Chain, Single Crochet, Half Double Crochet and Double Crochet stitches. You will also need to know how to do the Foundation Single Crochet stitch (FSC). If you’ve never seen an FSC, you can find a great tutorial video here. Alongside the FSC, you will also need to know how to do the Mesh Stitch, which is essentially Double Crochet, chain 1, skip 1, Double Crochet into the next stitch.
To keep a beautiful clean straight edge going up the sides, I use this brilliant technique that I found; I recommend you use it too.
All measurements are in centimetres and crochet terms are US based.
This is an original design by Nerissa Muijs. Please do not reproduce this pattern or sell this pattern as your own work. Please share it on your social networks, linking it back to the original source. Please also feel free to sell items made from this pattern and please credit me by linking my website: missneriss.com. All images are the property of Nerissa Muijs, and if you would like to repost the originals, please send me a message to ask my permission before the fact.

Written Instructions
Abbreviations
FSC: Foundation Single Crochet
SC: Single Crochet
HDC: Half Double Crochet
DC: Double Crochet
CH: Chain
SK: Skip 1 stitch
MS: Mesh Stitch
Gauge
21 stitches across x 9 rows high = 10cm2
Materials
- Scheepjeswol Stone Washed (or similar 4 ply/sock) yarn – 1080 metres
- 5mm hook; or hook to obtain gauge. I crochet tightly, so consider this when making your gauge swatch, which you will need.
- Tapestry needle to sew in ends and seams.
- Stitch markers.
- Measuring tape to ensure that the sizing is correct for your body.
- Pins (either ordinary pins, or even stitch markers will do).
Size
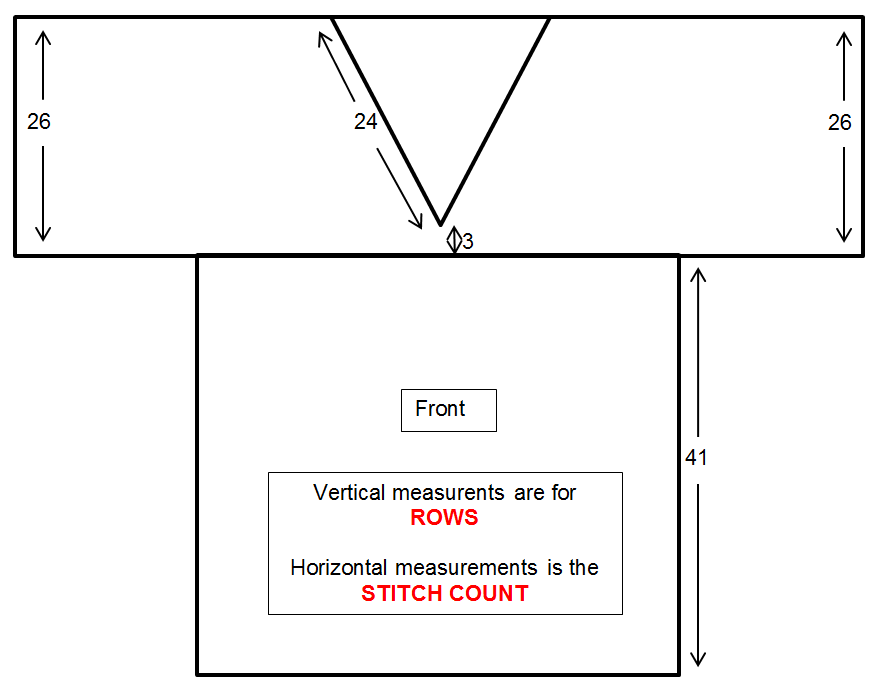
This pattern is for a size XL garment. The finished circumference (bust/hip measurement) is 110cm (43 inches) around and the length from top to bottom is 68cm (27inches).
Instructions
Row 1: FSC x 105 (55cm)
Row 2: CH 3 (counts as first DC and chain), skip 1 stitch, (DC, CH1, SK1) x 50, DC in the last. Turn.
Row 3: CH3, SK1, (DC, CH1, SK1) x 50
Repeat row 3 until your work is 43 cm long (41 rows).
Begin the sleeves:
Chain 35 (18cm), tie off and cut the yarn.
Re-attach at the other side, chain 37. DC into the 3rd CH, CH1, SK1, DC into the next. Repeat across to the last stitch of the other sleeve (179 stitches, or about 90cm end to end). Repeat this row for a total of 3 rows and then start the V-neck.
Mark the middle stitch and crochet to the 2nd DC before the marker. This becomes the decrease. CH3 and turn (this counts as DC and SK1). DC into the next DC stitch. Crochet across to the edge of the sleeve. CH3, turn. Repeat that row, always stopping at the top of the CH 3 from the previous row, for 24 rows (23cm). Tie off and attach yarn to the other sleeve, repeating the action again.
Once the V is complete, do not tie off. Instead, MS across to the centre edge of the V. Chain 48, attach at the first stitch on the other sided of the V and MS to the far edge of the sleeve. This is now the beginning of the back of the top.
Repeat the MS rows for 26 rows in total; essentially the reverse of the front without the V. After 26 rows, tie off and re-attach the yarn 37 stitches in. CH3, SK1, (DC, CH1, SK1) x 50 for 105 stitches, turn and repeat for 41 rows (or 43cm).
Now the body of the top is complete and it is time to create the edging and sew it all together. Lie the top flat, so that the front and back edges all line up, pin the top together and whip stitch it up both sides and under the sleeves. Try it on and admire your reflection. You look awesome.
For the edging, Attach the yarn at the join on one side of the bottom of the top and HDC all the way round (210 in total). Join, CH2 and repeat. The final row will be a SC row, just to firm it up and prevent excessive stretch.
The sleeves follow much the same rule. Join at the seam and HDC around. HDC in the side of each stitch, and also in each space between rows. Repeat the HDC row, then complete a SC row to finish it off. Do the same for the other sleeve.
With the edging, be sure that you keep your tension to be consistent with the shape of the top. If the edging is too loose, crochet a little tighter or considering going down a hook size. Same for if it is too tight. Blocking will help, but can only do so much if the edging is too tight.
The final piece is the V. there should be 2 DC posts each side of your centre stitch marker. Attach your yarn to the top of the DC furthest from the centre (this will replicate a CH1 and bring the two edges together) and SC into the first stitch of the V. SC all the way up the side, crocheting into each stitch and into each gap, ensuring you stitch into the stitches, not around them. The final stitch should be a Slip Stitch into the top of the DC stitch on the body of the top. Turn, SC into each stitch around, with the final stitch being a Slip Stitch into the next DC space on the body of the top. Turn and repeat for a total of 5 rows. Tie off and whip stitch the V together for two or three stitches, to keep the rows at the bottom of the V straight while wearing the top.

Tie off, sew in all the ends as securely as possible, soak in Eucalan for a couple of hours then block until dry. Because it is two layers, allow for a long drying time.


Don’t forget to parade around in front of your friends in your new top, you look amazing!


Pingback: Jasper V Pattern – All the Sizes!! (S, M, L, XL) | MissNeriss