I’m giving away 20 copies of my Merry Mini Christmas hat for free on Ravelry to help everyone get into the Christmas spirit! Just enter MERRYMINIXMAS when checking out!
 http://www.ravelry.com/patterns/library/mini-santa-christmas-hat

I’m giving away 20 copies of my Merry Mini Christmas hat for free on Ravelry to help everyone get into the Christmas spirit! Just enter MERRYMINIXMAS when checking out!
http://www.ravelry.com/patterns/library/mini-santa-christmas-hat
There are two types of people in this world, those who love Angry Birds and those who have never played Angry Birds.
My husband is still obsessed, even after playing the game for a couple of years on his phone. Has to get three stars on all levels. Thinks nothing of working on one level for days (weeks?). I on the other hand just want to get through all the levels as fast as possible and don’t care about my rank.
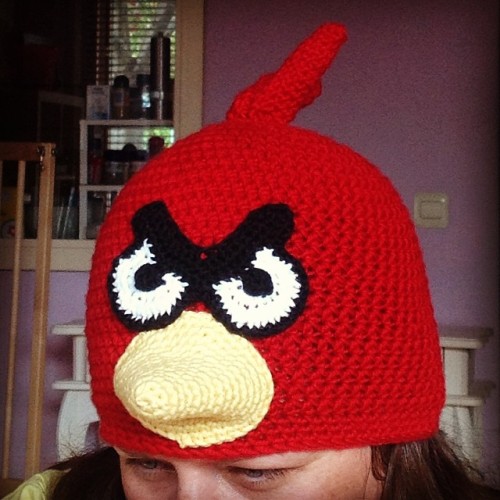
When a request came in to make this Angry Birds hat for a little boy, I have to be honest and say that I had reservations. I was sure that the end result would be nothing like the actual Angry Birds themselves.
How wrong could I have been?! Even when I was putting the eyes together, you could see that they could only belong to the red Angry Bird and then when it was all finished I couldn’t stop smiling because it looks so fantastic!
I pulled the pattern from Crochet Geek, who is one of the single best crochet resources on the Internet. Clear tutorials, plus videos for both right and left handers; just fantastic.
I used Drops Big Merino for the hat, which is lovely and soft and super stretchy, so will last for ages even on the fastest growing kids. For the face I used Drops Cotton Light.
What do you think? Cool, right?
Click the photo to be redirected to the tutorial.
October 8, 2013 in Drops, Pattern, Projects, Tutorials, Uncategorized
Tagged angry birds, crochet, crochet geek, drops, free tutorial, haken, handmade, hat, merino, pattern, yarn
Do, or do not. There is no Try.
Yoda inspired hat for babies.
Beginner
For this pattern I use American terms. If you decide to use a different weigh yarn, no problem. You’ll just have to add or remove one or two increase rows and perhaps some length.
This pattern is written in the round. I’m not a fan of joining and chaining and a visible seam, but you can work that way if you prefer.
I’ve made three sizes; newborn, 6-12 months, and 12 months – 2 years. I do have an adult version too, but will add that separately, later.
By all means, please feel free to sell items that you make from this pattern, but please do not sell this pattern or make changes and redistribute it claiming it as your own. I would be forever grateful if you credit Miss Neriss when using this pattern – it’s important to all support one another.
May the force be with you, and if you spot any mistakes, please let me know!
R1: 7 HDC into a magic ring, pull tight to close the hole.
R2: INC into each stitch around (14)
R3: INC, 1HDC x 7 (21)
R4: INC, 2HDC x 7 (28)
R5: INC, 3HDC x 7 (35)
R6: It gets a bit weird here. A normal increase round makes the hat too big, yet leaving it at R5 makes it just too small (for a premie you could skip R6 and go straight to R7). Instead we have a reduced increase row: INC, 6HDC x 5 (40).
R7-13: HDC around (40)
R14: SC around (40)
R15: SC around (40), tie off and weave in ends.

Make 2.
R1: MR4
R2: HDC x 4 (4)
R3: INC, HDC x 2 (6)
R4: HDC x 6 (6)
R5: INC, 2HDC x 2 (8)
R6: HDC x 8 (8)
R7: INC, 3HDC x 2 (10)
R8: HDC x 10 (10)
R9: INC, 4HDC x 2 (12)
R10: HDC x12 (12)
R11: DEC, 4HDC x 2 (10)
Sew open end shut then attach to the side of the hat.
R1: 7 HDC into a magic ring, pull tight to close the hole.
R2: INC into each stitch around (14)
R3: INC, 1HDC x 7 (21)
R4: INC, 2HDC x 7 (28)
R5: INC, 3HDC x 7 (35)
R6: INC, 4HDC x7 (42)
R7-16: HDC around (42)
R17: SC around (42)
R18: SC around (42), tie off and weave in ends.
Make 2.
R1: MR4
R2: HDC x 4 (4)
R3: INC, HDC x 2 (6)
R4: HDC x 6 (6)
R5: INC, 2HDC x 2 (8)
R6: HDC x 8 (8)
R7: INC, 3HDC x 2 (10)
R8: HDC x 10 (10)
R9: INC, 4HDC x 2 (12)
R10: HDC x 12 (12)
R11: INC, 5HDC x2 (14)
R12: HDC X 14 (14)
R13: INC, 6HDC x2 (16)
R14: HDC x 6 (16)
R15: DEC, 6HDC x 2 (14)
R16: DEC, 5HDC x 2 (12)
Sew open end shut then attach to the side of the hat.
R1: 7 HDC into a magic ring, pull tight to close the hole.
R2: INC into each stitch around (14)
R3: INC, 1HDC x 7 (21)
R4: INC, 2HDC x 7 (28)
R5: INC, 3HDC x 7 (35)
R6: INC, 4HDC x7 (42)
R7: INC, 5HDC x7 (49)
R8-17: HDC around (49)
R18: SC around (49)
R19: SC around (49)
R20: SC around (49)
Make 2.
R1: MR4
R2: HDC x 4 (4)
R3: INC, HDC x 2 (6)
R4: HDC x 6 (6)
R5: INC, 2HDC x 2 (8)
R6: HDC x 8 (8)
R7: INC, 3HDC x 2 (10)
R8: HDC x 10 (10)
R9: INC, 4HDC x 2 (12)
Sew open end shut then attach to the side of the hat.


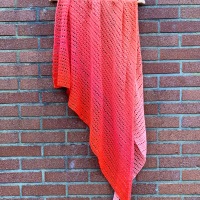
Here’s something I whipped up the other evening on the couch. I’ve been so in love with this rainbow yarn from Hjertegarn since I stumbled across it in my local yarn store last year. But it was one of those yarns that looked beautiful as a ball, but terrible when made into anything. In the end I managed to make a woolly hat for myself, and some gorgeous ombre owls, and finally the yarn has found it’s place in my heart as this beautiful mug cozy.

The colours work wonderfully together, and it was just the right length that I could miss out the mustard section of the yarn.
If you’d like to make this one for yourself, you can find all the instructions (for free!) here.
Increasingly, amigurumi is the crochet genre that I’m finding the most joy in.
Here are a couple of mini-projects I’ve undertaken of late:

I came across these awesome whales on Pinterest and when I clicked through to the original post, I was ecstatic to discover a free pattern!
I did make a couple of changes to the pattern, however. As I prefer to use as few joins as possible, instead of creating and attaching the fins and tail, I integrated them into the body of the whale.
Fins: Ch4 and join into the same stitch before continuing around.
Tail: Ch5, HDCin 2nd stitch from the hook, HDC, SC, slip stitch into the next stitch. Repeat, but SC into the same stitch, then fasten off and change colour.
 This baby penguin was found on Craftsy, and is of course by A Morning Jup of Jo Creations . I keep meaning to make the larger penguins too, but as I say almost every day, time is not my friend!
Have you made mini amigurumis? Do you have any patterns you’d like to share?
Ive been dreaming about this really cool project for a few weeks. As you already know, I’m a huge fan of A Morning Cup of Jo Creations and I’ve been making dozens of her mini owls (want one? Leave a comment or message me via my Facebook and I’ll be in touch ASAP). But aside from looking cute, what can these owls be used for?
A bouncy cat toy, of course!

Let me explain how I made it. That’s right, it’s my first ever how-to!
First things first. Go to Craftsy and download Josephine’s Baby Owl Ornaments pattern. It’s free!
You can see from her pattern that the owls are indeed very mini, but it’s very easy to upsize the owls by using a heavier yarn. For my toy I used Katia Nevada #27 (purple) and a 6mm hook (US 9-10).
Once you’ve finished your owl, added eyes (I used 8mm safety eyes) stuffed him and sewn him up, don’t tie off. Instead, chain 8, single crochet into the other end of the top seam. Then slip stitch through 4 stitches of the chain that you just made so that you are now in the middle of the chain.

Now chain 35, or as long as you’d like to make your bouncy chord.
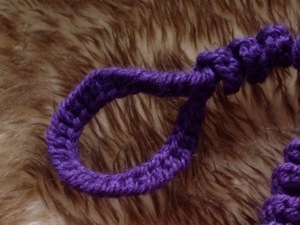
To make the handle you will need to use a foundation single crochet. If you don’t know how to do this stitch, Tamara from Moogly Blog has a great simple video tutorial to show you how. FSC the right length to be able to wrap around your handle. I created 35 stitches, then joined with a slip stitch at the top of my chain.

Continue back down your chain, with 4 single crochet per chain, creating a bouncy spiral. Once you reach the beginning of the chain, slip stitch down the last 4 stitches to the body of the owl. Finish off and hide the loose ends in the body of the owl.
To make the Owly Bouncy Cat Toy extra irresistible, add a bag if catnip and a small bell and you’re ready to play!

If you have any questions, please don’t hesitate to ask. And if you spot mistakes, please let me know!
Apologies that the photos aren’t the best. I plan to make this again very soon, so will add better photos.


