Category Archives: free pattern

Crochet Brioche Beanie Free Pattern

I know, I know.

This has taken me ages to do.  I have a load of excuses; you all know – December is crazy!

crochet brioche beanie in One Size Fits All, free tutorial on missneriss.com

But here it is!  The pattern for the Brioche Beanie!

I’m sorry Dutch ladies, this pattern is only in English right now.  I’d love to translate it for you, but well, you know, time.

I’ve created a handy pdf so you can work on the design offline, or open it in your e-reader.  It’s a bit photo heavy, so do think twice before printing.  Included are step by step photo tutorials on how to create the brioche stitch itself, and also how to decrease and shape the hat.

Click here to download the free pattern for the Brioche Beanie

crochet brioche beanie in One Size Fits All, free tutorial on missneriss.comcrochet brioche beanie in One Size Fits All, free tutorial on missneriss.com2015-11-28 13.07.50

This design is made using Scheepjes Colour Crafter. You can pick up the yarn at Scheepjes retailers all over the Benelux, or internationally from Deramores, Wool Warehouse, and at Paradise Fibers in North America!

I hope you enjoy making this hat, it’s really fun and easy to do once you get the hang of the stitch and the coolest part is that it’s totally reversible!  So if you prefer horizontal stripes, go for it!

Ps.  Coming soon is a cowl pattern too!  Stay tuned, and have a wonderful Christmas and New Year!

Crochet Christmas Gnome

Love Knitting Love Crochet Big November Sale, up to 70% off

Welcome to the pattern page for my Scandinavian Christmas gnomes!

I’ve made a few changes to this post, updating the pattern to make it more user friendly.  I’ve also updated the Ravelry listing, adding UK and US crochet terms so you can choose the version that suits you best if you prefer a printer friendly version for a small fee. Here in this post you’ll find the UK version

I hope you like it!

Get the Yarn

Scheepjes has a complete list of stockists here
Wool Warehouse* ships to the UK and globally
Caro’s Atelier* ships to the Netherlands and Europe
Knotty House* ships to USA and Canada

crochet amigurumi Scandinavian Christmas gnomes, free tutorial on missneriss.com

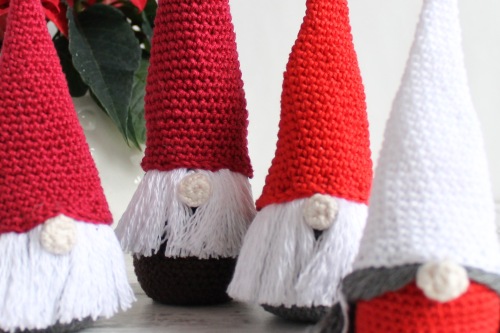
I absolutely loved making these little guys.  I made a regular gnome, a slightly taller one, and even a lady gnome!

crochet amigurumi Scandinavian Christmas gnomes, free tutorial on missneriss.comcrochet amigurumi Scandinavian Christmas gnomes, free tutorial on missneriss.com

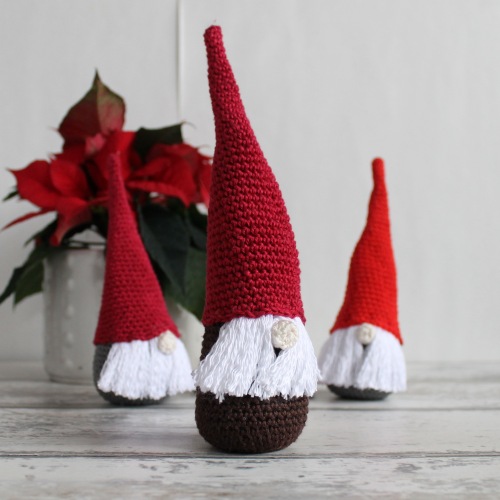
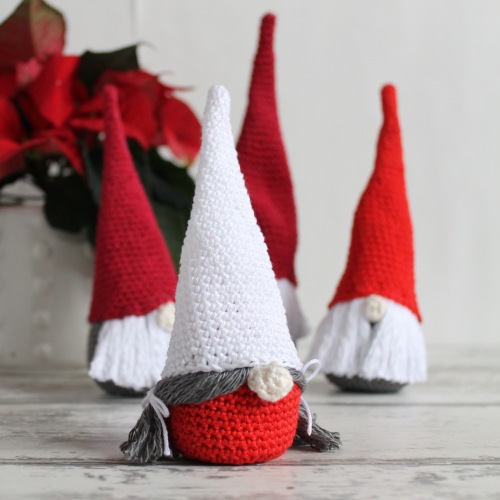
The pattern is really very simple, and it’s definitely possible to whip out one or two of these in an evening.  They make great ornaments, or you could even attach a loop to the top of the hat and hang it in your tree.

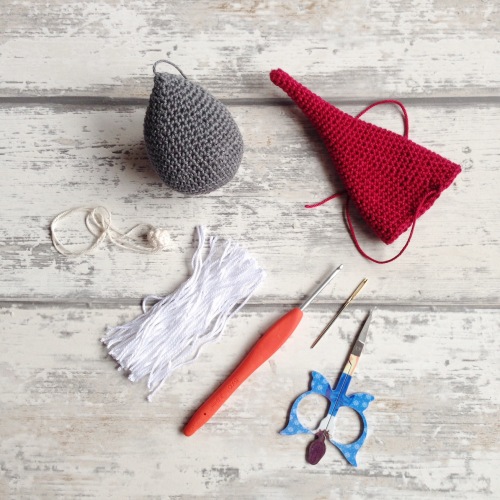
So, what will you need?  A couple of shades of red, a grey, a brown, white and off-white mini Catona skeins, and rice!  We’re going fill the bodies with rice, so a little tip: if you crochet loosely, consider using a stocking as a lining, or size your hook down.  The pattern uses a 3mm hook, but you might consider a 2.5mm.


IMG_0115

Ready to get started?

What You’ll Need

Four mini skeins of Catona
Colour 1: grey (242)
Colour 2, red (115)
Colour 3 off white (130)
Colour 4 white (106)
3mm crochet hook
Rice Scissors
Stitch marker
Tapestry needle

Abbreviations

(UK terms)
MR magic ring
Ch chain
Sts stitches
dc double crochet
inc two double crochet sts in one st increased
dc2tog 2 double crochet stitches decreasing into one stitch
Ss slip stitch
Rep repeat

Instructions

Body

Colour 1
Round 1. 6dc into a MR [6sts]
Round 2. INC in each stitch around [12 sts]
Round 3. (INC, 1dc) 6 times [18 sts]
Round4. (INC, 2dc) 6 times [24 sts]
Round 5. (INC, 3dc) 6 times [30 sts]
Round 6. (INC, 4dc) 6 times [36 sts]
Round 7. 36dc [36 sts]
Rounds 8-18. Rep round 7 11 times [36 sts]
Round 19. (dc2tog, 4dc) 6 times [30 sts]
Round 20. 30dc [30 sts]
Round 21. (dc2tog, 3dc) 6 times [24 sts]
Round 22. (dc2tog, 2dc) 6 times [18 sts]
Round 23. (dc2tog, 1dc) 6 times [12 sts]
Fill with the rice; use a funnel if you need to. I made one with paper and it worked perfectly.
Round 24. dc2tog 6 times [6 sts]
Sew close, tie off and hide the tail in the body.

Hat

Colour 2
Round 1. 6 dc into a MR [6]
Rounds 2-5. 6dc [6]
Round 6. (INC, 2dc) 2 times [8]
Round 7. 8dc [8]
Round 8. 8dc [8]
Round 9. (INC, 3dc) 2 times [10]
Round 10. 10dc [10]
Round 11. 10dc [10]
Round 12. (INC, 4dc) 2 times [12]
Round 13. 12dc [12]
Round 14. 12dc [12]
Round 15. (INC, 3dc) 3 times [15]
Round 16. 15dc [15]
Round 17. 15dc [15]
Round 18. (INC, 4dc) 3 times [18]
Round 19. 18dc [18]
Round 20. 18dc [18]
Round 21. (INC, 5dc) 3 times [21]
Round 22. 21dc [21]
Round 23. 21dc [21]
Round 24. (INC, 6dc) 3 times [24]
Round 25. 24dc [24]
Round 26. 24dc [24]
Round 27. (INC, 7dc) 3 times [27]
Round 28. 27dc [27]
Round 29. 27dc [27]
Round 30. (INC, 8dc) 3 times [30]
Round 31. 30dc [30]
Round 32. 30dc [30]
Round 33. (INC, 9dc) 3 times [33]
Round 34. 33dc [33]
Round 35. 33dc [33]
Round 36. (INC, 10dc) 3 times [36]
Round 37. 36dc [36]
Round 38. 36dc [36] Tie off; leave a long tail to sew the hat onto the body .

Nose

Colour 3
Round 1. 6 dc into a MR (6)
Round 2. INC in each stitch around [12]
Round 3. dc2tog 6 times [6] Tie off; leave a tail to attach the nose to the body.

Assembly

With colour 4, cut about 40 8cm lengths, fold in half, loop through the stitches in rows 19 and 20 of the body for 14 stitches on row 19 and 12 on row 20 (1 extra at each end on row 19). With your tapestry needle split the yarn so it looks more like a beard.

Attach the nose so that it over laps the beard on row 18/19 in the middle of the beard. Try to have some of the beard sewn underneath the nose.

Take the hat and sew it onto the body, pulling it firmly down over the knots you’ve made with the beard, and so that it moulds around the nose. Tie off and hide all tails in the body.

crochet amigurumi Scandinavian Christmas gnomes, free tutorial on missneriss.com

I hope you love making this project as much as I’ve loved designing it.  Please don’t forget to share your creations on social media, and tag me on Facebook, Instagram and Ravelry!  And use hashtag #ScheepjesChristmasBlogHop so we can all find and like your pictures.

And most importantly, don’t forget to visit Tammy at Canadutch tomorrow to find out what the next project is.  Trust me, if you knit, you’ll love it! There are also a bunch of other amazing projects coming your way in the next week, so don’t miss a thing on the Scheepjes Facebook page.

Scheepjes Blog Hop

Crochet Minecraft Beanie Hat Tutorial

I’m really in Hat Mode lately, aren’t I?

This is the latest off my hook, a Minecraft inspired beanie for the son of a friend of mine. Minecraft inspired Beanie Hat, a free tutorial on missneriss.com

So far I’m lucky, I’ve been spared the Minecraft Mania.  But that’s possibly because my daughter is not yet four, nor at school.  I give it six months before Peppa Pig has been ditched for weird pixel people.

I decided to make a little tutorial so you can create your own Minecraft hat (or anything else, for that matter).

First, take your favourite double crochet hat pattern.  We all have one, mine is by Sarah from Repeat Crafter Me. Well, I don’t really use the pattern any more because I’ve made so.many.hats.

Once you have your hat underway, you can start working the Minecraft logo into it.  I’ve made a handy chart for you here, and remember, if you’re making a hat, you need to work from the top down.

Minecraft logo crochet chart with free tutorial on missneriss.com

Minecraft inspired Beanie Hat, a free tutorial on missneriss.com

These symbols are all US double crochet stitches, so you can use this chart to count your colour changes.

You need to carry the non-working yarn along behind your work as you go. Usually I would work the stitches around the non-working yarn, but in this case the black is quite visible through the green.  So what I did was, once I had finished working with the black, I continued on with the green, leaving the non-working yarn behind.  When I came back round to start the black on the next round, I loosely brought the black back from the previous yarn, and then worked that into my black stitches so it wasn’t hanging out to be caught.

You can also cut the yarn if you like, but carrying it and then hiding it will make it much tidier and easy to manage.

Once finished with the logo, just carry on in green and you can complete your hat.  Super simple!

Enjoy!  If you have any questions, don’t hesitate to send me an email, or fire off a Facebook message.

For this project I used Scheepjes Colour Crafter in Emmen (green), and some black yarn that I found in my stash.

You can pick up the yarn at Scheepjes retailers all over the Benelux, or internationally from Deramores, Wool Warehouse, and at Paradise Fibers in North America!

Never miss a post!

Enter your email address to subscribe to this blog and receive notifications of new posts by email.

Egyptian Star Flower Stool – Free Pattern

I’ve had the patterns for this ready for a week now, but I haven’t shared it because I still couldn’t decide on a name!  I made the mistake of asking for recommendations on Facebook, and I think honestly there were around 200 different suggestions!  They were all amazing, and it was wonderful what different people could see when they look at the stool.  Some saw Aztecs, others carnival, the circus, Arabian style, Moroccan even.  I loved all the suggestions!

Tapestry crochet stool by missneriss

There were a couple that really stood out – Star Flower, Moroccan Candy, and the Circle of Life.  The Moroccan Candy was probably my favourite, but then it doesn’t really give room to use other colours.  And I had the inspiration from Lucky the Camel on Holidays in Egypt earlier this year, and I can’t decide if the top of the stool is a star or a flower, so star flower it is!  So I’m enormously excited to bring you the pattern for the Egyptian Star Flower Stool!

En dames, voor jullie heb ik het ook in het Nederlands vertaald, met dank aan mijn vriendin Kirsten van Haak Maar Raak!  Do be kind, it is the first time I’ve written a design in Dutch.

You’ll need 5 ball of Scheepjes Catona Denim, which you can pick up from Wool Warehouse* or Caro’s Atelier in the Benelux and Germany.

You can find the patterns below/beneden vindt jij het patroon.

Click here for English

Klik hier voor Nederlands

Enjoy, do let me know if you have any questions or issues, and please don’t forget to add this to your Ravelry favourites so more people can find it!

*Affiliate link

Peek-a-Boo Button Wrap Video Tutorial, by It’s All in a Nutshell

I am SO excited to be able to bring this video tutorial to you!  When I first created the Peek-a-Boo Button Wrap I thought: I should make a video for this, but well, I talk a bit fast (thanks nerves) and I don’t have a video camera, so I didn’t.

But when the opportunity arose for Esther from It’s all in a Nutshell to do this for me I grabbed it!  Of course you would know Esther if you use videos with crochet, she’s the voice behind the Sophie’s Universe videos and the recent Flight of Fancy CAL videos.  Quite a pedigree, wouldn’t you agree?

Esther published the video today, and you can view it here:

There are also some insanely good tips and tricks on Esther’s site – tips that hadn’t even occurred to me, including her “No More Mistakes” chart here:

It's all in a nutshell

In the video Esther used Scheepjes Bloom which is a comparable weight to the Stone Washed XL and a great summer alternative.

Thanks so much for doing this for me Esther, I am grateful beyond words!

Be sure to check out all of Esther’s fabulous posts and videos, she has the coolest tutorial voice ever!

You can find my original pattern here, and the Dutch version here.  Enjoy!

The Granny Smith Market Bag Free Pattern and Tutorial

Goodness, what a title to a blog post!

But it does mean that the pattern is here.  Once again I’ve created a handy PDF file that you can download from here safely.

Granny Smith Crochet Market bag by designer @missneriss with Scheepjes Catona

I’ve also created a separate file with a photo tutorial of the special stitch repeat that this design uses.  It’s a really simple increase method, but is convoluted and makes me scratch my head and I came up with it!

Red Delicious Crochet Market bag by designer @missneriss with Scheepjes Catona

Granny Smith Market Bag free pattern on MissNeriss #scheepjes #catona

What You’ll Need

4 x 25g mini skeins of Scheepjes Catona*
1 x 50g skein of Scheepjes Catona*
4mm crochet hook
A tapestry needle to sew in your ends.
Cute scissors (one can never have cute enough scissors).

You can pick up the yarn via any great Scheepjes retailer in the Netherlands, or via Wool Warehouse* and Deramores* internationally.

Click below to go straight to the pattern:

The Granny Smith Market Bag

and the The Granny Smith special stitch

Red Delicious Crochet Market bag by designer @missneriss with Scheepjes Catona

Or, clicking on any of the images in this post will take you straight to the pattern too.

Don’t forget to share your finished bags on social media, you can tag and follow me just about everywhere: on Instagram, Pinterest, Ravelry and Facebook.  I love seeing your finished results!

Never miss a post!

Enter your email address to subscribe to this blog and receive notifications of new posts by email.

Happy crocheting!

*Affliate link

Bloom Flip Flops Free Pattern

Being Australian Flip Flops are my national footwear.  Except, we don’t call them “flip flops” in Australia, but instead their real, actual scientific name – Thongs.

Back when I lived in Alice Springs I had thongs for every occasion.  I had going out thongs, nipping to the shops thongs, doing the gardening thongs, masseur thongs, beach thongs. Remember that scene from Forrest Gump where Bubba mentions all the different types of shrimp (which are actually prawns, btw)?  Well that’s me and thongs.

However, it’s taken me until now to actually make a pair for myself, and they’re crackers!Bloom Flip Flops, free pattern using Scheepjes BloomAnd not only did I make myself a pair, I created a pattern for them too!

You can check out the fast photo tutorial on Instagram here:

I created a handy PDF pattern as well, with step by step instructions and loads of photos.  Click the heading below:

Bloom Flip Flops

I used Scheepjes Bloom for the design, which is a great woven worsted weight yarn, and is slightly mercerised.  It’s just perfect for this sort of project.  It won’t discolour, and nor will it break easily.  Plus it’s available in about a million colours. (Well, almost 60.  Australians are also prone to exaggeration.)

You can pick up Scheepjes Bloom at any Scheepjes retailer, Caro’s Atelier* in NL or Wool WarehouseDeramores* internationally.

You can pick up the Scheepjes Flip Flop soles at Deramores* too.

One great retailer in NL is Pera and Pasha (and they stock the Bloom too, so two birds, one stone!).

Now, which occasion do you think I should use these for?  Picking up the kids thongs?Bloom Flip Flops, free pattern using Scheepjes BloomBloom Flip Flops, free pattern using Scheepjes Bloom

*Affiliate links.

The Flopsy Bunny Amigurumi Reveal and Free Crochet Pattern!

Well, Hello There!

Flop-Eared Bunny free pattern by @MissNeriss made with Scheepjes Catona mini-skeinsThe cutest little flop-eared bunny is ready to be shared with you, along with the instructions as to how to make him for yourself.

I’ve created the pattern as a handy pdf file which you can safely download from here and enjoy.  But before that, here are some more photos:

Flop-Eared Bunny free pattern by @MissNeriss made with Scheepjes Catona mini-skeinsFlop-Eared Bunny free pattern by @MissNeriss made with Scheepjes Catona mini-skeins Flop-Eared Bunny free pattern by @MissNeriss made with Scheepjes Catona mini-skeins Flop-Eared Bunny free pattern by @MissNeriss made with Scheepjes Catona mini-skeins

He’s right at home there amongst my daughter’s favourite stuffed animals, but sadly he can’t stay.  He’s about to be bundled up into luggage and sent of to Perth to a new home with the son of my oldest friend.  I know he’ll be well loved.

Right, so let’s get to it.  To start making your own bunny, click this PDF file:

Flopsy Bunny Pattern

Or, clicking on any of the images in this post will take you straight to the pattern too.  If you have any problems opening the pdf, shoot me a message via my Contact page.

Edited to add: I forgot to mention the size!  Flopsy bunny is about 20cm tall when finished.  A great size for toddler hands.

Don’t forget to share your finished bunnies on social media, you can tag and follow me just about everywhere: on Instagram, Pinterest, Ravelry and Facebook.  I love seeing your finished results!

Never miss a post!

Enter your email address to subscribe to this blog and receive notifications of new posts by email.

Happy crocheting!